My Quasi-Recording/Mix Room Build

Myriad_Rocker

New member
WARNING: This first post is what some might consider long winded. You have been warned.

WARNING 2: I can be sarcastic and dry. Deal with it. :D

This is an attempt to document the process of building the “Quasi Recording/Mix Room”. I hope you enjoy it, my random rants, and my infrequent victories. I’ve also started a blog (yes, I’m rather late to the game) and I’m going to use this room build to jump start it. Visit it if you like…I will probably post unrelated things there…thoughts, euphemisms, crazy ideas, whatever I think of...intertwined with this “project”.

Let me first start earlier in my recording endeavor. The previous house I lived in, I had a quasi-recording space. It was an upstairs bonus room with minimal treatment. I recorded an entire album with my band in that room. The results of that can be heard at Black Leaf Clover - Myspace Music

The wife and I decided to move into a new house…we were going to build. My initial plan was to build a building totally dedicated to recording. I had thought that I would make it a more serious hobby and parlay that into a recording career locally. I slaved over the plan for what seemed like forever. The plan I had was quite large by my standard. I “correctly” shaped control room with a good size live room. I had a full bath, lobby, and small entertainment area. There was storage off of the live room as well as a vocal booth. I went so far as to use ideal room sizes, 3 leaf wall construction, dedicated circuits, isolated grounding, one heck of an HVAC setup…etc, etc. Wood floors, proper treatment everywhere, the whole nine yards. It was epic.

Well, reality started to set in after we started churning some numbers with our builder. It wasn’t all that bad price wise, I thought, but the bank thought way differently. As far as they were concerned, it was just a garage. There was nothing in the area to compare something like this to. With that being said, it made the bank really hesitant on loaning on it. And we weren’t going to be able to come up with the cash to do it.

Long story short, we ended up firing that builder for other reasons and totally moving our lot selection. We went with another builder and went back to building the studio with the house on a larger lot...about 1.2 acres. We bought the lot and started running some numbers more in depth. Everything was coming out pretty well. Because I knew this particular builder, I was able to swing some deals and the house pre-appraisal was coming out well. However, we were really concerned that the equity coming from the house in addition to our down payment was not going to cover the cost of the studio. Again, the bank didn’t know how to value it. So they just called it a detached garage.

Well, the numbers didn’t work out…again. I wasn’t comfortable putting my family in that kind of situation even though I could have done it. So I moved to attach the studio to the actual house and scaled down the size. That way, the bank would have to consider it living space since it was attached to the house. I don’t recall the exact series of events after that but my plans just kept getting chopped and chopped. I made compromise after compromise until, finally, I basically got myself into a bedroom. Not even as large as the bonus room I had before. But at least I wasn’t upstairs anymore.

So, here I am…now in our new house that we moved into in August. It’s great and I love it. But I did have to make a lot of compromises on my “dream” of having a legit studio space. So, at this point, I’m just trying to make the best with the cards I’ve been dealt. And that’s what has lead me here.

As boring and brutal as this may be, I’m going to attempt to document this process as best I can. It may not be consistent as far as timeline but I’m going to attempt to continually give updates as much as I can, even if it is just thoughts about what I’m going to be doing next.

So, without further delay, here is the room I am starting with. There’s lots of junk in it right now. Most of it is recording and/or music related. Some of the gear in the room was gear I purchased when I thought I was going to have a larger studio and go full time. So, I probably have too many SM57’s and such like that than I need. And as soon as I wade through the mass amount of stuff, I’ll probably end up selling some of it; which could turn out to be a good thing because I can use that money to buy other shiny things that have lights on them!

Excuse my lack of picture taking skills.
 

Attachments

  • DSCN0440_edited.jpg
    DSCN0440_edited.jpg
    33.6 KB · Views: 1,131
  • DSCN0443_edited.jpg
    DSCN0443_edited.jpg
    42.8 KB · Views: 1,109
  • DSCN0442_edited.jpg
    DSCN0442_edited.jpg
    32.6 KB · Views: 1,105
Last edited:
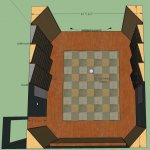
Here was my initial plan:

Mix Room.jpg

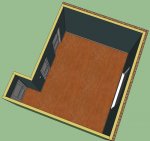
I have since started working on a more detailed drawing of the room. I'm not quite sure why. I thought it would be a good idea at first but then I started wondering why I was doing it at all.

Mix-Room---More-Detailed.jpg
 
I should also mention that I've started to design a desk. It's in this thread. But, I think I'm going to scrap that idea and do something a bit more refined.

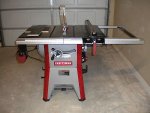
To help me accomplish my woodworking goals (desk, racks, treatment), I made my first large tool purchase a while ago. Got a killer deal on this saw. I know Craftsman isn't what it used to be but this particular saw has gotten pretty good reviews and I got it on sale + a percentage off (don't remember exactly what percent), putting it in the low 400's total. I slapped a Freud blade on it after it got assembled and it cuts like a hot knife through butter!!

DSCN0446_edit.jpg


I have also acquired, and continue to acquire, other tools that will help me out in this journey. As an aside, I plan on building out a shop while also doing the studio. I'd like to get somewhat respectable with woodworking and my list of tools to buy will help me get to that goal as well. Winner take all, but winner be broke. :D :(
 
So, at this point, I’m just trying to make the best with the cards I’ve been dealt.
Well it's about time.:p Howdy Myraid and welcome to the "make do" club.:D Hey, in the end, it's all about having fun, and making music, no? Who needs a Manifold Studio to have fun. At least you HAVE a room dedicated to your interest, vs some people who have to make do with a living room or even an apartment.


To help me accomplish my woodworking goals (desk, racks, treatment), I made my first large tool purchase a while ago. Got a killer deal on this saw. I know Craftsman isn't what it used to be but this particular saw has gotten pretty good reviews and I got it on sale + a percentage off
Oh baloney. IF it has a good solid fence, a sharp blade and a fairly large motor...what the hell, almost all modern table saws will do what a Powermatic will do. The difference is in 24/7 production vs home use. I'll give you a clue. I used older AND newer Craftsman saws in a cabinet production environment. I've machined hundreds of cabinets/casegoods on an old 8" Craftsman and lots on a newer one. The real key to accurate cutting of sheetgoods is building an off feed table level with the saw, and making sure your fence is parallel to the blade. And btw, I've used all kinds of blades over the years, and Freud's cheap $39 10" is THE defacto blade in the last cabinet shop I worked in. :D In fact, I just found a Freud 6" for my PorterCable "Boss" skill saw. Works fantastic. Heres another clue.

The real problem with cutting up sheetgoods is crosscutting large panels(at least for home craftsman) Ripping panels is no problem for most people as their fence is at least 24" to the right of the blade. However, cross cutting a panel larger than 36" can be a pain in the butt. This is where this tool comes in, and it works "mahvalous dahling":p Its called a "Clamp and Guide" tool. But it works at its best for crosscutting panels if you have a PorterCable "Boss" skill saw and one of those triangle shaped carpenters square with a lip on one edge. Once you try this you will see why. Another "gotta have" tool are QUICK GRIP clamps. And lots of them. Lots more to offer in the woodworking arena but just give me a holla if you need any info.

is.php

fitZ:)

ps. Works great with a router too for dado work or even cutting panels. Just remember to offset the Clamp&Guide what ever distance from the saw guide edge to the blade. Usually about 1 1/8". Just measure it. Same with a router.

Oh, and another thing. The reason for a Boss saw is the blade is on the LEFT side of the saw, which most skill type saws are on theright. Makes for easier cutting and setups. Besides..its real light too.;) Also..there are TONS of tricks to learn. Just ask. After 40 years of woodworking I've learned a few.:D And finally, remember, woodworking is another hobby, and collecting tools just to have them cuts into the studio tool budget. My suggestion is to only purchase those tools that are "indespensible", as many tools work for other applications besides the one they are meant for. Like routers. OMG...if I only had one tool...a router would be it. Especially with one of these bits....
http://www.amazon.com/06-127B-Bearing-Pattern-Downshear-Cutting/dp/B000W3O31W
 
Last edited:
Well it's about time.:p Howdy Myraid and welcome to the "make do" club.:D Hey, in the end, it's all about having fun, and making music, no? Who needs a Manifold Studio to have fun. At least you HAVE a room dedicated to your interest, vs some people who have to make do with a living room or even an apartment.
Hey fitZ! Yeah, I've toiled and toiled over this. It is what it is now, though, right? I'm just happy to have something.

The real key to accurate cutting of sheetgoods is building an off feed table level with the saw, and making sure your fence is parallel to the blade. And btw, I've used all kinds of blades over the years, and Freud's cheap $39 10" is THE defacto blade in the last cabinet shop I worked in.
That makes me feel pretty good because I'm building an off feed table here pretty soon. Also, it makes me feel good that you mention the $39 Freud 10" because that's the one I bought! :D

Lots more to offer in the woodworking arena but just give me a holla if you need any info.
Oh, you'll regret that little bit of volunteering! :D

And finally, remember, woodworking is another hobby, and collecting tools just to have them cuts into the studio tool budget. My suggestion is to only purchase those tools that are "indespensible", as many tools work for other applications besides the one they are meant for. Like routers. OMG...if I only had one tool...a router would be it. Especially with one of these bits....
Amazon.com: 06-127B, 1/4" Shank Double Bearing Pattern Router Bit, 1/2" Cutter Diam., 1" Cutter Height With Downshear Cutting Action: Home Improvement
I'm wanting to get into woodworking, actually. I have a list of tools that I'm looking to start off with and I'm about halfway through the list. Just some quality power tools and a few hand tools that I've researched on. Luckily, my budgets are covered so I'm not too worried about that. All I really have to do right now is watch my excess spending...the overruns. I'm actually buying my first router here pretty soon. A really nice Bosch that gets great reviews. I don't know what that bit is that you linked to but if it's good for you, I'm gonna snag it!
 
I'm actually buying my first router here pretty soon. A really nice Bosch that gets great reviews.

Hey Myraid, it just so happens that the owner of the cabinet shop I last worked at, also had a retail Woodworkers supply business in the front. He had Freud as one of his suppliers, and had every router bit and router, and all the blades that Freud manufactures. This is the router we used all the time.
Freud Tools - FT3000VCE 3-1/4 HP Variable Speed Plunge Router

Damn good router. HOWEVER this is the DEFAULT router used by most cabinet shops and architectural mills. Comes with a PLUNGE base as well as the fixed base. Great router. I have 3:D and my boss had 6. GREAT routers.

Porter-Cable 693LRPK 1-3/4 HP Fixed Router and Plunge Base Kit

Check out all the router bits on the Freud site. They're not the best bits, but for the money they're pretty good. Although Amana makes absolutely the best.
Amana Tool Router Bits

Oh, and about that router bit. Actually, its a Freud bit. Looks like this one, only it has a 1/2" shank and 3/4" diam cutting path. I don't see it on this site, but I have one so I know they make it. Real HEAVY DUTY.

Freud Tools - Top & Bottom Bearing Flush Trim Bit


Hey, don't worry about asking questions. I'm all ears:D
 
Last edited:
I've been so focused over the last few years about OC703 being the defacto treatment that I never really even considered Roxul. It would save me some money on a per box basis where building the bass traps is concerned. I think I would still do the panels themselves out of the 703, though, since I hear it is more rigid.

But my curiousity has been peaked by nothing more than my desire to save money. I read in another thread that Roxul Safe is what you should go after. Specifically, the 3" variety. That particular product is a commercial item. I've found it rather difficult to get that stuff in my area. I won't go into the details surrounding that. Roxul also makes something called Safe n Sound. The acoustic co-effecients are roughly the same with the exception of the 125Hz rating.

Here are the two:
Roxul Safe
Roxul Safe n Sound

So...my question is: Is Safe n Sound a comparable and good substitute for Safe and/or OC703? OC703 is known to be 3pcf. Safe N Sound is obviously 2.5pcf. But it's quite cheaper. I just read on another forum that "Safe n Sound is the acoustic bargain in our part of the world. It requires more physical support than the 703 type materials, but is a fraction of the cost!" This is coming from Andre at the John Sayers forum. He knows his stuff. But, I have access to both materials.

EDIT: These might help...

Roxul Safe
RoxulSafe.jpg

Roxul Safe N Sound
RoxulSafeNSound.jpg

OC 703
OC703..jpg
 
Last edited:
Hi Myraid. Warning..non expert "opinion":D Ok, the most important thing in SMALL ROOMS is LOW FREQUENCY absorption. And since LF's terminate in the corners, filling them with ANY product with similar absorption coefficients should have "similar" results. Using 3" DIAGONALLY across the corners may have widely different results based on the Lab test coefficients though.

So, check this stuff out. You'll see the results of a lab test conducted by Eric Desart at Studiotits, in regards to different devices/products used as they are manufactured, and 703 panels used DIAGONALLY and cut/stacked as "superchunks". Here's the gist of the post.

is.php


is.php


However, read the DISCLAIMER at the beginning of the post, in regards to testing "standards" of corner absorbers. But it should give you an idea of the performance of similar devices depending on material

My guess is, by the test coefficients of the SAFE vs SAFE and SOUND vs 703 in the 125hz range... there may be a difference of a few SABINS of
absorption per linear foot. Although, this COULD be significant, as ONE SABIN equals 1 square foot of open window, and the chart shows there is about 1 1/2 Sabins difference PER LINEAR FOOT between diagonal panels and Superchunks. And NOTE this difference is at frequencies BELOW 125hz. However, there is no way to absolutely know how the the Roxul stuff performs in the real world in this application/location.

As far as using them as broadband absorption panels on the walls ceiling, I think the coefficients at 125 hz says it all. Of course, as wall panels...they ALL perform at 1+ in the mid/highs. Sooooooo....overall...your guess is as good as mine.:D Personally, I think if you simply used Roxul panels like this at your wall/wall and wall/ceiling corners...everything would be dandy:p It's a compromise between diagonal panels and superchunks. And I bet no one could tell the difference.:D
Plus, it's a cutting strategy for saving money as well.:)

is.php


is.php


is.php


If you really want to make comparisons of the absorption coefficients...check Bob Golds absorption coefficients page here

Anyway, hope that helps you make a decision. I think, for all practical purposes..the Safe stuff is fine. At least used as I showed. HOWEVER, my disclaimer says it all.:D

PS...if you're wondering how an absorber can absorb more than 1 Sabin(equal to 1 square foot of open window) at a given frequency band, I was told this is due to DIFFRACTION EFFECTS, at the edges, even when the absorption is flush with the adjacent surface. And this is why PATCHWORK absorption panels perform better than the same square footage of material in one piece.
 
Last edited:
Thanks for the huge amount of info, fitZ. I've been poking around about the Safe N Sound stuff myself and I was actually just about to do some calculations to see if the money saved would benefit me. Because it is less rigid than 703, I was thinking I'd only use it for superchunk bass trapping and leave the panels for the 703. I think the Safe N Sound might sag over time and I don't want to deal with that mess.

For those that view this thread, here's a bunch of links that talk about the Safe N Sound stuff. Mostly by one guy but he's very knowledgeable and known on the forum.

John Sayers' Recording Studio Design Forum View topic - Safe n sound
John Sayers' Recording Studio Design Forum View topic - What is 703 and Why Don
John Sayers' Recording Studio Design Forum View topic - Absorbtion differences. Am I missing something???
John Sayers' Recording Studio Design Forum View topic - RC-2 and 703 in Ontario?
John Sayers' Recording Studio Design Forum View topic - Advice on Sound Conditioning for Basement Studio
John Sayers' Recording Studio Design Forum View topic - Comprible to 703?
John Sayers' Recording Studio Design Forum View topic - Absorber Panels
John Sayers' Recording Studio Design Forum View topic - 703 new price variance!
 
So...it's been a little while since I posted. I've been busy. If I'm not working, I'm trying to learn about woodworking and that kind of thing. Yet another hobby.

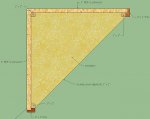
Anyway, I wanted to post my design idea for a free standing superchunk. The thought is that this baby will sit in the corner and can be moved later on if need be. I'll put some small rubber feet or a sliding pad on the very bottom. It has a 1 by strip in the back of the cabinet for extra support and durability. I'll also be sealing it off airtight. Rabbet joints complete the design for some added support instead of sloppy butt joints. I'm kind of wondering how heavy this thing is going to be at 9' tall!

This is the 2D version of it but I think it's pretty self explanatory. I'll model it in 3D as I continue to hone my Sketchup Skills. I'm learning quite a bit by following some stuff I found from Popular Woodworking on SketchUp for woodworkers.

Bass-Trap-Design-Smaller.jpg
 
One inch plywood it's going to be very heavy and the length will make it a bitch to move. How about two or three stackables instead?


lou
 
One inch plywood it's going to be very heavy and the length will make it a bitch to move. How about two or three stackables instead?
I thought about the stackables thing but I'd like to avoid it if I can. The true reason for my design is so I can avoid attaching it to the walls permanently. If they ever get moved, they're getting dismantled and burned. So once they're in place, they aren't going anywhere. But I don't want to attach them to the walls or damage my trim in the event that I need to take them down.

I may build a prototype and see what kind of weight I'm dealing with and how easy (or not) it will be to work with.

The 3D model of it is done. I'm pretty happy with how it turned out and it really helped me work some of the kinks out of the design and think things through better. Hopefully I get faster at designing in SketchUP because this was a bit of a bitch.

Bass Trap Design 3D.jpg
 
Thanks, as usual, fitZ. I don't want to attach things to the walls, though. I could probably just make a frame, though....kind of like you have except with pieces that go from back to front. Something to give it some stability, but should substantially reduce the weight. I like the idea of the velcro, but I don't think it's for me. I have a small child and I don't want him pulling the faces off. Besides, brads and air is cheaper than velcro! :D I'll think it over. It may work or it may not. Sounds like it's back to SketchUp to do some more bass trap drawing to see compare and contrast the two designs.
 
I don't want to attach things to the walls,


The frame is simply sitting on the base. Mostly though, I was trying to illustrate a way to install these. Remember, if you make these full height, you can't tip them up in the room. Thats the whole point of a LOOSE BASE. This allows room to stand up your frame, and lift it up on the base. Insert the 703, and then attatch trim. Whether or not you use velcro is of no concern. Three small pieces vertically and 2 at top and bottom would do it though. I doubt a child could pull them off as there is no where to get your fingers behind them. Plus, it saves trying to staple fabric in place and then having to cover the staples with trim. Thats the whole point. Simple construction, simple installation. and most of all...cheap. Oh...did I mention I like contemporary looking things too? Hence the design.:) Anyway, good luck.

ummm, btw, whats the big deal about fastening things to walls?:confused: By the time you sell it, your gonna have to do a ton of spackling and painting anyway.:rolleyes::D Sure makes things easier.
 
ummm, btw, whats the big deal about fastening things to walls?:confused: By the time you sell it, your gonna have to do a ton of spackling and painting anyway.:rolleyes::D Sure makes things easier.
This bit right here. (The rest is good too, of course. ;) )

My corner traps are laid up loose and the felt was stapled to the wallboard - boom, bang, done. I did fasten nailers to the floor and ceiling to have a horizontal surface to staple fabric to. No biggie. Cheapest, quickest and unless it's a rental - they's always gonna be painting and such to do come selling time. Or not.


lou
 
I'm basically OCD about having holes in my wall. There, I said it.

Also, I don't know if this is of any consequence but I found this on the John Sayer's page about the wall units. "The box created must be completely sealed to be airtight. The only access to the outer air is via the gaps between the slats." Now, I'm not doing slats on my bass traps, so I don't know if it matters at all that they're airtight. I suppose the entire purpose is that sound only goes into the slats and is absorbed. What sound goes into then bounces off the airtight cabinet to be absorbed again.
 
I think you're talking about the difference between a true "trap" where all the energy and resonance is captured and bounced around until dead and a trap/absorber where most of the energy is converted to heat without being concerned about some escaping. That's getting into some of the black voodoo shit that I just can't be bothered with.

You're a good man to be honest about yer anal retentive aversion to fucking up yer walls. :D

;)
lou
 
"The box created must be completely sealed to be airtight. The only access to the outer air is via the gaps between the slats." Now, I'm not doing slats on my bass traps, so I don't know if it matters at all that they're airtight.

A slat/slot absorber is an entirely different animal. It's based on a Hemholtz absorber, and as such does require an airtight chamber. On the other hand, plain ole resistance absorbers require no such "airtightness". The only principle at play here is 1/4 Wavelength depth and a boundary where the velocity of the wave is zero. That boundary can be anywhere in reason behind the material. In the case of my design, there is a 3/4" airgap, yet the edges are somewhat sealed depending on how tight you put it against the wall. Hell, freestanding resistance absorbers will STILL work to some degree, even if there is no boundary. Many people use them as gobos, although they won't attenuate sound like a boundary will, they do keep reflections from happening around a mic. The fiberglass STILL absorbs some of the sound by virtue of friction in the fiber interstices, which is transduced into heat. Hemholtz absorbers work via resonance absorption. Hence a narrow band of absorption at the throat of the slot, which is governed by width/depth of the slot and the box. Soooo, don't worry about sealing these.
 
Back
Top