Midimonkey Producer Desk/Racks

  • Thread starter Thread starter frederic
  • Start date Start date
frederic

frederic

New member
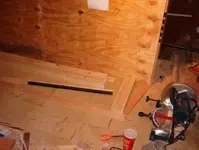
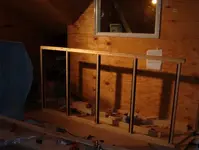
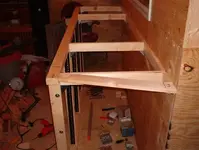
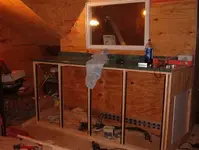
Since the room is small (13ish x 20ish) minus the 6x8' vocal booth, I decided early on to slap the producer's desk against the vocal booth.

Essentially, its a slew of racks with a counter top, that I'm "calling" a producer's desk just to be like the cool guys here :)

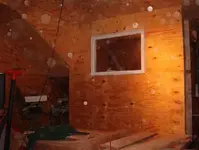
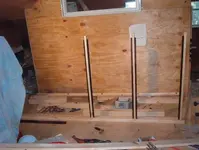
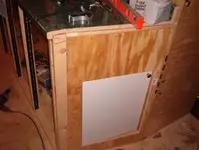
So the first picture is the front of the vocal booth. Looks like I have camera witches too.
 

Attachments

  • im000394.webp
    im000394.webp
    17.6 KB · Views: 250
here is the framing of the footer, and my cutting of all the frame pieces. I used top quality 1x3" pine, partly because they are thin yet strong, thus not eating up too much width like a 2x4, and I really like the smell of pine. I could cut pine all day just to enjoy the smell. new drug trend - pine sniffing.
 

Attachments

  • im000396.webp
    im000396.webp
    21.4 KB · Views: 236
Here is the footer, already screwed to the floor with spacers providing a rough 19.125" opening for the verticals, and I have the header laid immediately in front with short pieces of 1x3 wedged between the header and footer, to be assured the spacing is identical top to bottom.
 

Attachments

  • im000397.webp
    im000397.webp
    26.7 KB · Views: 232
And the withdrawal period would be called - "Pining for Pine"??!?
 
Here is a closeup as to how I wedged the short pieces to line it up. I figured this was easily visualized, but a picture sometimes helps.
 

Attachments

  • im000398.webp
    im000398.webp
    18.5 KB · Views: 231
Some of the verticals going up. There will be four racks across the vocal booth, then a 45 degree angle rack I haven't made yet that will meet the side wall. Its all cut and ready to go, I just haven't assembled yet because I have a lot of junk in the cove that has to come out, and I wanted easy access to sheet rock that area as well. So the rack goes in last. I'm also going to hinge it to the four racks against the vocal booth, so i can swing it forward and get back there if I need to. It will be tight, but as long as I don't pack in the donuts over the next 10 years I'm good to go.
 

Attachments

  • im000400.webp
    im000400.webp
    20.5 KB · Views: 220
Footer and header installed, though not screwed down yet. This was a friction fit to make sure the verticals were in fact true vertical. You can't see from the picture, but the 1x3's are on true vertical, and the rack rails were mounted on a 5 degree incline, front forward, top back, so the rack is slightly angled. This worked out well because even with the longest piece of gear in the bottoms of the rack (logical, since its the heaviest), it will be 1/8" off the floor. This is one advantage of having a footer, one can get away with stuff like this :) Also, the hardwood floor will fit flush to the footer as well.
 

Attachments

  • im000401.webp
    im000401.webp
    15.2 KB · Views: 222
Top framing... this was tough because the vocal booth wall facing forward is at a 3 degree slant top to bottom, as well as a 3 degree slant left to right. So, the top horizontal's had to be compound mitered to fit flush with the booth wall. At the correct height behind the vocal booth wall is a set of 2x4's so I had something to drive the deck screws into, and not worry about any weight adding to the compliance of the facing plywood.

One thing I did do was make an angled, mitered edge so the racks were slightly to the left of the booth, so people walking around the booth could bump on a slightly angled side, rather than a straight edge, making it a little more ergonomic. Something that will make humping huge bass amps up the stairs through the flip-floor vocal booth, past the sofa that will be in the cove, into the room. The additional swing room is only 6.5" at this point, but thats huge when a marshall cabinet is coming up the stairs.
 

Attachments

  • im000402.webp
    im000402.webp
    21 KB · Views: 217
Here is a picture of the racks, partially framed, but what is framed has been glued with elmers wood glue, and screwed down. Countersinking screw heads on a 45 degree angle is tough, I debated buying a jig at home depot, but opted to spend the $40 on materials, so I had to "wing" it. Worked out just fine. The advantage of really sharp drill bits is they don't walk at all.

At the base you can see two of the five outlet strips I will have mounted on the face of the vocal booth. Magically, they screws holding in the brackets go through the facing plywood into the vertical studs of the vocal booth. I'm amazed I got that right. Only one missed, easily fixed.
 

Attachments

  • im000405.webp
    im000405.webp
    29.2 KB · Views: 221
Here is a picture of the near completed rack/producers desk. The on-sale counter top has been angled and is resting level without any shims. I thought I'd have to shim it, but apparently not. Also, the angled side is on, and the home depot $8 cabinet door installed, without a stop on the inside so it flops in too far. I fixed this a little later. The plan is to purchase veneer as Fitz suggested and cut it to fit the side, then glue it on. I already purchased the veneer from home depot, and since its essentially an almost-square side, I think I can actually do this. I like the rounded front overhang of the counter top, though the backsplash isn't to my liking, but can't win everything. The price was right!
 

Attachments

  • im000407.webp
    im000407.webp
    21.1 KB · Views: 227
Here is a closeup of the installed door, giving me wiring access to whats behind to some degree. After talking about this on and off with Knightfly I decided "how hard is it to install a door?".

Well, since everything is cut to fit, the door had to be done that way too. So, I traced out the door on the side, cut it out by doing drop cuts with the circular saw (whoever was on the webcam probably got a good laugh!), and made a nice square opening for the door. THEN I framed behind it for the door opening, a place to attach the hinges, etc. Came out considering nothing was really measured, eyeballed, but cut to fit. All the wood involving the doorframe fit very tightly, no shims necessary.
 

Attachments

  • im000408.webp
    im000408.webp
    21.3 KB · Views: 217
Hey frederic, nice work man! I thought you said you couldn't build worth a dang. You were pullin my leg huh?:D Well, I know a woodworkin guy that would hire you in a New Jersey minute. Me. But I don't think I could afford ya! Ha!
So you got a webcam online in there too huh? Doggone, now you've upped the ante for us DIY'ers. I guess I'll have to put one in the shop too.
Now, you did DOUBLE check those 19.125 spacers, right? :p Just kidden. Nothins worse than to absolutely KNOW you cut it right, only to find out you didn't KNOW didley squat. AFTER its too late! Ha! Believe me, I've done it and I NEVER make a mistake:rolleyes: RIIIIIGHT. Hey, seriously, its lookin great frederic. Your going to have a one killer studio when your done.

So what kind of finish are the walls etc. going to have? I don't think you've told us yet have you? Maybe I just missed it, although my memory sucks anymore. Ha! Anyway,
keep the pics coming frederic. Its always cool to see how people are building stuff.

fitZ:)
 
I checked MANY times the rough opening of the racks, just because thats one measurement I can't fix with spackle :)

I even loaded several "blank" panels into them just to be sure, before I tightened everything up. Thats one advantage of making all the peices with an interference fit, any adjustments necessary could be made before applying screws and other fasteners! Turned out to be unnecessary which was suprising considering everything surrounded the racks is slightly off true.

Right now, spackle and paint, with the expectation of applying auralex behind the console table on the short wall, foam bass traps in the corners of the same wall, and the rest of the room may receive foam, diffusors, or slatted resonators depending how things turn out acoustically.

I've decided to figure that out "later" after the room is complete, so I can test it, and have to time to thoroughly re-read Sayer's "Recording Manual" as well as the SAE paperwork, so I can post my acoustical results with intelligent questions.

And don't be too impressed, low resolution pictures and low resolution webcams hide a lot of serious defects :)

heh-heh
 
Back
Top