A
ap
Member
Logic Tip #1- Getting Started w/ Automation
Hey, man. Sorry to take so long. I've since figured out how to get a jpeg of a screenshot so I've attached pics of what I'm doing. Should be a little easier than last time.
First off, according to the bible Chapter 6, verse 9, anything you do under the "Track Mixer"(ctrl+M) during recording is automated and easy. This is crap, but let's start here anyway since it illustates a few things and in a way, may be easier since you don't have to create a playback object. We'll move on to automation in the arrange window and audio environment w/ plug-ins etc. later.
Using Track Mixer for Automation
This will help but is not necessary:
Open a song w/ several tracks and effects etc. Save it as experiment so you don't have to worry about messin' it up.
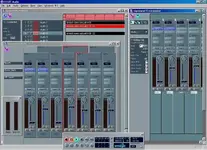
Hit ctrl+m to open Track Mixer(notice I'm using capital letters to distinguish it from a generic "track mixer"). Size and move your windows around so you can see the the Arrange tracks, the faders and inserts in the Audio Environment(ctrl+8), the Track Mixer faders and inserts, and of course, the Transport(ctrl+7). Be sure the icon that looks like a chain is lit in every window. See attached "Screen Shot 1.jpeg"
Click hold the record button on the Transport and check Replace Mode(the modes are explained on 6-88, forget merge, update may be handy at times.) Do NOT select any tracks for recording, hit the record button, and wait about 5 seconds while the music plays, then move the fader on the Track Mixer corresponding to a track for which audio is present and has been from the beginning. Just move it slowly down, and back up. Hit the Stop button. Now go back to the beginning(I have mine setup so that hitting Stop again, takes me back to the beginning.) Play it back and watch it move.
Note: while play is stopped, move a fader. Notice that the fader in the other window didn't move. Now click in the general area of the other fader and notice that it jumps to the correct position. Keep this in mind when faders don't seem to be doing what you expect. I haven't got this one figured out, something to do with channel splitters- hey, I never said I was an expert!
Beware- the fader is only automated for the time that you are moving it and this can cause some screwy things if you aren't paying attention. Try this: Playback the song, but this time Stop when the fader gets to the bottom. Now playback from the beginning and notice that the fader stays down. There is no automation data in the first 5 seconds so it doesn't know to move and stays where it was last- in this case at the bottom. There are several ways to prevent this. The best and most sophisticated way is to do a snapshot record:
Snapshot
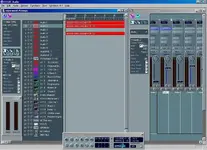
Set your SPL(song position line) to wherever you want a snapshot. In this case just go to the beginning(when you do this for real, you may want to set it *before* the beginning since it can sound funny *if* it changes drastically.) Hit the pause button and then the record button. Click anywhere on the fader to be automated in the TM(Track Mixer). Notice that the fader is outlined in red, the track in the AW(Arrange Window) becomes highlighted, and the objects on that track do also, but, even if you select more tracks at once by clicking and holding shift, only one track stays highlighted (and one fader in the TM)while the objects on those tracks stay selected. In Screenshot2.jpeg, the objects on tracks 1 and 4 are selected, and fader 4 in TM is selected. But only *track 4* in the AW is selected. Point: you can only record one track at a time using this method. Now, select that fader in the AE(Audio Environment) by clicking the name text under the fader. Select 'Options>Send Selected Fader Values' and notice a new object is place on that track in the AW. If you want to do more than one fader, don't stop the record/pause mode just yet. Select the next track by clicking the corresponding fader in the TM, then the AE, and then Options>Send....You get the idea.
You don't have to click the fader in the AE. Under 'Options' in the TM there is 'Send All Fader Values', but this sounds suspicious to me. I'm afraid it might do something I don' t want it to.
Using 'A-Playback' and Inserts
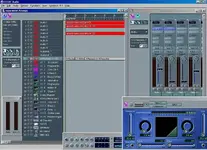
You can't automate fx or inserts in the TM to my knowlegde, so close it. Get a view of AW and AE. Screenshot3.jpeg. You may have a track called 'A-Playback' which was automatically created when you installed Logic. If not, try click/hold over the name of a track in the AW and select 'Audio>A-Playback.' You're almost done! Open any effects you plan to automate, click the record button on the A-Playback, record on the Transport, and start tweaking. Snapshot record works the same way except you can do several tracks at once.
Special note about FX: supposedly you can only do the first 4 inserts on each channel, and only the first 16 parameters of each effect. Never tried more.
I don't know how to snapshot fx. Is it possible?
Bus Automation
This is essentially the same as 'A-Playback'. In AW, click-hold a track and select 'Audio>bus automation.' Proceed as before.
********************************************
If you have no A-Playback or Bus Automation in your selections, or if they don't seem to do anything, you may have to create channel splitters in the AE, cable 'em up, rename 'em appropriately, and add 'em to the arrange tracks. This is another thread.
Hey, man. Sorry to take so long. I've since figured out how to get a jpeg of a screenshot so I've attached pics of what I'm doing. Should be a little easier than last time.
First off, according to the bible Chapter 6, verse 9, anything you do under the "Track Mixer"(ctrl+M) during recording is automated and easy. This is crap, but let's start here anyway since it illustates a few things and in a way, may be easier since you don't have to create a playback object. We'll move on to automation in the arrange window and audio environment w/ plug-ins etc. later.
Using Track Mixer for Automation
This will help but is not necessary:
Open a song w/ several tracks and effects etc. Save it as experiment so you don't have to worry about messin' it up.
Hit ctrl+m to open Track Mixer(notice I'm using capital letters to distinguish it from a generic "track mixer"). Size and move your windows around so you can see the the Arrange tracks, the faders and inserts in the Audio Environment(ctrl+8), the Track Mixer faders and inserts, and of course, the Transport(ctrl+7). Be sure the icon that looks like a chain is lit in every window. See attached "Screen Shot 1.jpeg"
Click hold the record button on the Transport and check Replace Mode(the modes are explained on 6-88, forget merge, update may be handy at times.) Do NOT select any tracks for recording, hit the record button, and wait about 5 seconds while the music plays, then move the fader on the Track Mixer corresponding to a track for which audio is present and has been from the beginning. Just move it slowly down, and back up. Hit the Stop button. Now go back to the beginning(I have mine setup so that hitting Stop again, takes me back to the beginning.) Play it back and watch it move.
Note: while play is stopped, move a fader. Notice that the fader in the other window didn't move. Now click in the general area of the other fader and notice that it jumps to the correct position. Keep this in mind when faders don't seem to be doing what you expect. I haven't got this one figured out, something to do with channel splitters- hey, I never said I was an expert!
Beware- the fader is only automated for the time that you are moving it and this can cause some screwy things if you aren't paying attention. Try this: Playback the song, but this time Stop when the fader gets to the bottom. Now playback from the beginning and notice that the fader stays down. There is no automation data in the first 5 seconds so it doesn't know to move and stays where it was last- in this case at the bottom. There are several ways to prevent this. The best and most sophisticated way is to do a snapshot record:
Snapshot
Set your SPL(song position line) to wherever you want a snapshot. In this case just go to the beginning(when you do this for real, you may want to set it *before* the beginning since it can sound funny *if* it changes drastically.) Hit the pause button and then the record button. Click anywhere on the fader to be automated in the TM(Track Mixer). Notice that the fader is outlined in red, the track in the AW(Arrange Window) becomes highlighted, and the objects on that track do also, but, even if you select more tracks at once by clicking and holding shift, only one track stays highlighted (and one fader in the TM)while the objects on those tracks stay selected. In Screenshot2.jpeg, the objects on tracks 1 and 4 are selected, and fader 4 in TM is selected. But only *track 4* in the AW is selected. Point: you can only record one track at a time using this method. Now, select that fader in the AE(Audio Environment) by clicking the name text under the fader. Select 'Options>Send Selected Fader Values' and notice a new object is place on that track in the AW. If you want to do more than one fader, don't stop the record/pause mode just yet. Select the next track by clicking the corresponding fader in the TM, then the AE, and then Options>Send....You get the idea.
You don't have to click the fader in the AE. Under 'Options' in the TM there is 'Send All Fader Values', but this sounds suspicious to me. I'm afraid it might do something I don' t want it to.
Using 'A-Playback' and Inserts
You can't automate fx or inserts in the TM to my knowlegde, so close it. Get a view of AW and AE. Screenshot3.jpeg. You may have a track called 'A-Playback' which was automatically created when you installed Logic. If not, try click/hold over the name of a track in the AW and select 'Audio>A-Playback.' You're almost done! Open any effects you plan to automate, click the record button on the A-Playback, record on the Transport, and start tweaking. Snapshot record works the same way except you can do several tracks at once.
Special note about FX: supposedly you can only do the first 4 inserts on each channel, and only the first 16 parameters of each effect. Never tried more.
I don't know how to snapshot fx. Is it possible?
Bus Automation
This is essentially the same as 'A-Playback'. In AW, click-hold a track and select 'Audio>bus automation.' Proceed as before.
********************************************
If you have no A-Playback or Bus Automation in your selections, or if they don't seem to do anything, you may have to create channel splitters in the AE, cable 'em up, rename 'em appropriately, and add 'em to the arrange tracks. This is another thread.
Attachments
Last edited: