flipfloor Vocal Booth

  • Thread starter Thread starter frederic
  • Start date Start date
frederic

frederic

New member
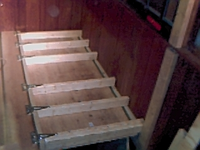
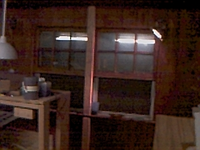
I had promised a while back some pictures of my flip-floor vocal booth, and this thread contains them.

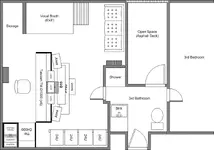
The first picture, attached here is the floorplan so you all can see why I attempted such a looney idea.

You can see in the floorplan that at the very top is the vocal booth over the stairwell, that leads outside as well as to the garage, which is underneath. The 2-car garage is technically underneath the studio, the "3rd bathroom" and the "open asphalt deck". To the right, the "3rd bedroom" is over the main part of the house. Strange layout, I know, but I'm dealing with it.

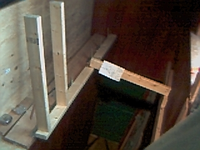
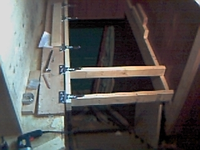
The goal of the flipfloor was to allow me to have the vocal booth on the same floor, yet still use the stairwell to get in and out if I need to.

Anyway, flip floor pictures attached on subsequent posts.
 

Attachments

  • studio.design.webp
    studio.design.webp
    44.8 KB · Views: 193
This is the picture of the unmolested stairwell, so you can see what I'm starting with. Ignore the ugly teal drapes, they were there when I moved in.

Also, notice the cedar tongue and groove paneling EVERYWHERE.

Smells nice even though its 60 years old.
 

Attachments

  • jam001.webp
    jam001.webp
    72.3 KB · Views: 171
stairwell looking up.

All those boxes at the top of the stairs are in the "sofa area" on the floorplan as outlined on the first post. In those boxes are a lot of rackmount outboards, snake cabling, spare computer parts, a cisco router, and a huge collection of 2.8" MD floppies for my Roland MKS100 sampler. Scary, huh?
 

Attachments

  • jam002.webp
    jam002.webp
    77.2 KB · Views: 148
Here is a picture of my mounting a 2x6 against the back wall of the stairwell, below the floorline. The flip part will rest on this 2x6 when the floor is down, thus allowing the floor to be level. I measured this six times before I was confident enough.

I mounted it with four deck screws to hold it against the wall, then used lag bolts into the studs behind the cedar. The deck screws were only temporary so I didn't break my neck standing on a ladder, resting the 2x6 on my shoulder, then trying to drill bolt holes.

The 2x4's that are vertical between the two windows will be the side of the roughed doorframe. There will be a window inside the vocal booth by doing this, but that was better than having the doorframe in the middle of the window. At least this way I can make an internal shudder that will be hinged on the left side and flip into the room against the wall when I want the window open. Close shudder which will have foam/carpet on it like the rest of the booth will have, for a nice closed sealed booth. The window on the outside will remain as-is, maybe with a little painting.
 

Attachments

  • jam003.webp
    jam003.webp
    56.8 KB · Views: 136
distance shot - this illustrates the doorframe starting to be formed between the windows. In the front you can see my old hutch (which is long gone - I recycled the wood actually) which I posted pictures on here a while ago. Sorry its so dim, the JamCam I use is clearly a piece of crap and can't adjust the flash right.
 

Attachments

  • jam004.webp
    jam004.webp
    87.2 KB · Views: 127
left footer

I mounted a 2x6 on the floor at the top of the stairwell, drilling through the existing floor and inserting concrete bolts. The floor of the studio is currently covered with crappy office tile from 1960-something, and the stairwell wall has more cedar, which extended above the floor anywhere from 1/4" to 1". I trimmed them down to be level with a circular saw, so the 2x6 did not rest on the cedar paneling tops. Bolted hinges at pre-measured intervals that will eventually bolt into the flip-frame.
 

Attachments

  • jam005.webp
    jam005.webp
    88.5 KB · Views: 108
Here I'm creating the flip-frame. Ordinary douglas fir 2x4's of premium quality bolted together with deck screws. The hinge backing is another 2x4, making a basic frame. There are six 2x4's that will go the width of the stairwell.
 

Attachments

  • jam006.webp
    jam006.webp
    80.1 KB · Views: 112
jam7 - this is the same picture as before, except the floor is flipped down. This way you can see how it rests on the opposite 2x6.

There will be plywood top and bottom, and in between will be cut to fit 2x4's up and down in the picture, like a grid. The grid will be 1'x1' square approximately.
 

Attachments

  • jam007.webp
    jam007.webp
    78.8 KB · Views: 111
last picture... jam8

This is the particually finished flipfloor. The plywood underneath does not quite meet the 2x6 at the wall, but instead simply holes the 2x4's straight. its a structural piece, because it helps to avoid twisting of the flipfloor.

I don't have anymore pictures, but there are now horizontal 2x4's going left to right (which is up and down in this picture) between the flip-floor studs, all screwed together well. On top of that is 3/4" premium plywood (just like the bottom) except it extends to the end of the 2x4's on the right of the picture, so there is a very small gap between the wall and the flipfloor. Underneath the edge of the top plywood is a door sill rubberized piece that hangs out about 3/8" from the side, and on the wall above the 2x6 this all rests on is a polished 2" strip of brass. When the floor flips down, the rubber seals against the brass plate, which hopefully will add some air/sound isolation. Hopefully :)

The walls have been built on the inside of the room facing the console area, so the room is now completely framed out. The walls are constructed using 2x4's, then a sheet of rubber, then two layers of 3/4" MDF, chaulked all around to seal up the area. On the inside there is three layers of carpeting between the studs (on the walls) and in front of that will be auralex foam. Not idea, but with the door closed clapping my hands produce no noticable echo from the acoustically (but lamely) treated areas. Now to do the sidewall and the back wall (with the window). The side wall is easy because the flipfloor doesn't quite reach the back (top left in this picture) because I measured the thickness of the carpet layers and allowed that much clearance :) I'll do the brass strip/door sealer thing on that side as well.

The door is a outside wooden door, prehung in a frame, with the bottom of the frame cut out. This is because the vocal booth floor doesn't quite reach the top of the stairs because there will be a sofa right there. I've already cut out a stair-stepping box that I toss on the top two stairs that gives a stable flat surface so people can walk in and out of the vocal booth without having to step down two steps, then step up into the booth. it was quite complicated actually LOL.

Enjoy :) Don't try this at home !
 
Sorry, forgot to attach the last picture.

Frederic <--- dunce
 

Attachments

  • jam008.webp
    jam008.webp
    76.2 KB · Views: 149
frederic said:
Sorry, forgot to attach the last picture.

Frederic <--- dunce

Turns out I do have some more pictures of further stages, so I'll post them later tonight.

I am suprised I didn't get any "are you nuts?" comments :)

heh-heh
 
Back
Top