Finishing quilted maple

  • Thread starter Thread starter WhiteStrat
  • Start date Start date
WhiteStrat

WhiteStrat

Don't stare at the eye.
Anybody done it? Any advice or pics to show the results of your methods? Thanks!
 
Done it plenty of times. What finish are you looking for? What do you intend to use? What instrument is it on? What prep work have you done if any?

Pics would be useful.
 
Done it plenty of times. What finish are you looking for? What do you intend to use? What instrument is it on? What prep work have you done if any?

Pics would be useful.

I knew my question was woefully inadequate. Thanks for the reply, though. I've bought a guitar body--quilted maple top on mahogany. Completely unfinished. It's not here yet, but I'll post a pic of the body, as well as a finished guitar with the look I'm going for.

In my brief research, I've come across a two step process (using dye, not stain) whereby you color once, sand the high spots and color again--creating more contrast and "pop" in the pattern. Sound familiar?

I've got no spray equipment, and if that means I absolutely can't get a deep glossy shine, I'll hand that part off and just do the color--though I'd love to do both.

Anyway, that's the plan. Pics will follow later today.
 
Okay...the unfinished body I bought, and the "goal." Going for the same amber color.
 

Attachments

  • guit_body.webp
    guit_body.webp
    27 KB · Views: 607
  • goal.webp
    goal.webp
    25.3 KB · Views: 614
I assume that you are aware of MIMF.com. A lot of great info over there. Nice folks too!!!:)
 
I assume that you are aware of MIMF.com. A lot of great info over there. Nice folks too!!!:)

Excellent, I was going to suggest the same place. I believe this guy did the kind of finish you're talking about. Make sure you post pics when you've got it done.

Oh, and I know you have to have heard this a billion times, but whatever you do, test on scrap first. In particular, I think putting dyes directly onto wood can be a bit tricky to get right. I bet you can find some moderately figured maple at Woodcraft to practice on.
 
Right thats a single colur on the finished body and i't most likely done by shooting an amber aneline dye and then clear coating on top. Those dyes come in two flavours. Water soluble and alcohol soluble. If you go that root you want to look for water soluble as they give you more working time and slightly easier mix and prep. I use alcohol dyes but have a good deal of experience with them. They can be tricky.

Back on topic. You have several options to get a high gloss finish and it's not really harder than spraying just takes longer and requires some housekeeping and prep.

Option one. Water stain and waterborne lacquer. LMI and Stewmac sell good products. You can use other finishes but I'm not familiar with the US range others may help you there. Any finish will brush on if it can be sprayed you just need to adjust the thinning accordingly.

For all methods the prep is the same. Sand from 240 through to 1000 grit. I sometimes go to 2000 depending on the timber. When you think you've done enough of each grit go back and do it again. Then once more that may well be enough.;) Seriously careful sanding will save you all manner of time and effort so don't cut corners just to get to the wet stages.

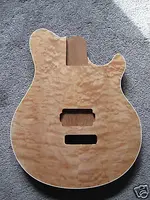
You'll need to fill the grain on the mahogany unless you real lucky. The maple is close grained and won't need any grain fill. Do that before any final sanding. What you use is really down to personal choice. I have used everything from pumice and shellac to clear epoxy resin, which may be your best bet. Avoid the off the shelf fillers from hardware stores they are rubbish and invariably shrink if not right away in a few months or even years down the line. Have a word about what grain fill you want to attempt once you've done some research and I'll offer any advice I can.

Once you've done the prep work you need to think about the colour or stain.

Mask off the neck pocket and binding using masking tape and pin stripe tape. Get a bunch of similar colour maple sample blocks to test. They don't have to be quilted but some figure is a good idea as it's the figure that grabs the colour. Mix up your thin amber dye in water and test wipe it onto your test piece. You will get an idea of the the depth of colour when it is wet but it will look like crap when it's dry. Don't worry your final coats will sort that. Once dry add as many subsequent ragged on colour coats till you get to the depth of colour your after. Also try to get a feel for rubbing the colour on evenly without rubbing through previous colour coats. Water stains don't build that well so you may need to mix up a stronger stain. The important thing here is not to go to hard. You can get it as wet as you like just work evenly and wipe off evenly. Once your happy with the stain, lightly rub or brush on a shellac sealer coat, then a few more. Go easy you don't want to move the colour about. This will give a barrier coat and seal in the colour. The shellac will also help "pop" the grain. When working with stains and dyes always try to keep a wet edge and don't go back over and area you've done until it's completely dry.

Popping the grain is a process that involves getting some darker or in this case translucent material into the end grain that is the figure. It adds contrast and improves the figure. I always pop the grain with an oil or shellac. That's what gives that great 3d effect. Simply using a darker colour stain doesn't do that. The light needs to bounce right back out of the grain. I do it before any colour coats but that's not so easy with water based stains as the oil or shellac can seal the timber in places resulting in uneven colour. Not a problem with alcohol stains.

Now you can start on the actual guitar and get the colour on and seal it in.

Once you've done that you can turn your attention to the clear coats. You can brush these on quite happily it just requires a practiced hand and a very good quality brush. you'll also need to flat out more often between coats that if you were spraying. Again practice on test pieces first to get a feel for the flow and keep a wet edge at all times. Don't go back over runs if you spot any you'll just drag the finish. Cut them out when dry with 400 grit and re coat. Work in a meticulously clean area, dust is you enemy. Keep the area dust free and avoid opening and shutting doors too much when you have a wet coat on. Your first three or four coats are the hardest because you need to get enough build on there to avoid cutting back into the colour coat. I would advise no cutting back for the first three coats just a light denib with 400 grit.

Nearly forgot you would have removed the masking from the binding after sealing in the colour and cleaned up with a sharp razor blade. Don't take any colour off the wood go carefully. It's better to have the colour lap over the binding than have a white line where you've gone through the colour to bare wood.

Once you have a good build of four or five coats of lacquer, flat out any runs and build another three or four final coats. Keep these as even as you can. Once done put it aside for a week or so depending on what the manufacturer recommends. If in doubt a week in a warm dry well ventilated area is a minimum. After that you can flat out starting with 600 grit working to 1200 grit. The burnishing can be done with T cut or whatever your US car suppliers burnishing product is. Final buffing can be one with cotton wool and a fine jewelers paste like rouge or similar. Test every stage on scrap first and don't rush.

option two is to do a similar process but with a preval spray system. These are a useful inexpensive spray setup that fills the gap between rattle cans and a proper spray setup. Although not ideal a really good finish can be done with them with practice..

You could spray your colour coats too which may make things easier. Other than that the process is essentially the same. You would save some time cutting and flatting if you get the layup evenly sprayed.

Option three, find a friend with a spray system and get him to do the colour and build coats. You can do the flatting and burnishing yourself.

Option four. The nitro rattle cans. I really really don't like these but they are out there. If you use them do so in a well ventilated area and watch all safety requirements.

Option five. Get it finished out. I know it's a cop out but finishing can be tricky unless you have the patience and skills required. Be patient, careful methodical and test every step on scrap first.

Did I mention test on scrap first.;)
 
I assume that you are aware of MIMF.com. A lot of great info over there. Nice folks too!!!:)

I've been recommending Mimf here for years. Just don't take any cave like behavior there with you.;)

They are a good bunch but Deb can be a bit well..... nuff said.

Just registering to read the archive is worth it.
 
Wow, Muttley--so much good information. I'm blown away. Thanks. I'll begin to seriously consider an inside job vs. outsourcing. Either way, I appreciate the educations. Don't be surprised if I ask a detail question or two once I get going.

One other thing--should I test on scrap?
 
Well they are "luthiers" after all. I'm just the bozo with the bandsaw!!!:D

I'm a full time luthier that doesn't change anything really does it? I think if you ask light he'll say much the same. Great place shame about the pious trappings that often pervade there. Hey I like the site and post there on occasion but, well just but really. The place is well worth visiting and signing up. I'm not knocking it as a source of excellent info.;)
 
I found that,for me, building guitars was a great way to turn a dollar into 50 cents!!! I must suck!!!:D
 
I found that,for me, building guitars was a great way to turn a dollar into 50 cents!!! I must suck!!!:D

No sometimes thats how it feels.;)

I wouldn't want to even think about what my hourly rate really is but I got a house, a workshop and the wife and kids don't starve. I guess that just about beats working for a living.:D
 
Can't afford any of that in Vancouver...well, I have a wife.:p
 
The real key to finishing figured maple is dyes. Like Muttley, I use alcohol based aniline dye (I get them from LMI, but unlike him I like to rub them in by hand. The real trick is to do it in stages. after each round of dye, I sand it mostly off. What happens is the dye sinks in deeper in some parts of the wood, and when you sand the deeper areas remain. As you build up layers, you get more and more depth to the figure. After you are happy with the color, you can do the clear as normal.

The other big thing to remember, as with any finishing, is that the better job you do sanding, the better the final finish. It is impossible to overdo it when it comes to sanding.


Light

"Cowards can never be moral."
M.K. Gandhi
 
Thanks Light. So you find the alcohol based dyes to be workable by hand? (Of course it's different for you than for me!) I guess I've just read that the water based lends itself to more working time. What're the advantages of alcohol based? Compatibilities with a greater variety of finishes?
 
Thanks Light. So you find the alcohol based dyes to be workable by hand? (Of course it's different for you than for me!) I guess I've just read that the water based lends itself to more working time. What're the advantages of alcohol based? Compatibilities with a greater variety of finishes?


Alcohol looks better because it penetrates deaper, but it is a real pain in the ass to work with. The water based is easier to work with, but it raises the grain too much for me. Raising the grain is not such a problem when you want to sand between applications of dye, but it is a very real problem when you've got your last round of dye on and want to start spraying finish.

By the way, for the color you are after, I would do a round or two of dye, and then spray a transparent color coat (lacquer for me, but what ever you are using). If you are spraying color, it helps a LOT to hold your spray gun as far from the instrument as practical, which helps keep the color even.


Light

"Cowards can never be moral."
M.K. Gandhi
 
What if I wasn't planning on spraying? Can the same thing be accomplished with a brush--assuming of course that it's slower and involves more sanding?
 
The real key to finishing figured maple is dyes. Like Muttley, I use alcohol based aniline dye (I get them from LMI, but unlike him I like to rub them in by hand. The real trick is to do it in stages. after each round of dye, I sand it mostly off. What happens is the dye sinks in deeper in some parts of the wood, and when you sand the deeper areas remain. As you build up layers, you get more and more depth to the figure. After you are happy with the color, you can do the clear as normal.

The other big thing to remember, as with any finishing, is that the better job you do sanding, the better the final finish. It is impossible to overdo it when it comes to sanding.


Light

"Cowards can never be moral."
M.K. Gandhi

I spray single colour finishes and the ground coat and hand rub sunbursts. I still reckon to get that high 3d effect you need to pop the grain with something that will reflect light as it hits the end grain.

I wouldn't advise sanding back colour coats on a single colour finish, although with sunbursts it's essential if you hand rub. A good sunburst is an art form on it's own. I often put them out these days to a guy I know he does a fantastic job and saves me the headache.I don't know what I'll do when he retires. Back to my old half baked efforts I suppose.:o
 
Alcohol looks better because it penetrates deaper, but it is a real pain in the ass to work with. The water based is easier to work with, but it raises the grain too much for me. Raising the grain is not such a problem when you want to sand between applications of dye, but it is a very real problem when you've got your last round of dye on and want to start spraying finish.

By the way, for the color you are after, I would do a round or two of dye, and then spray a transparent color coat (lacquer for me, but what ever you are using). If you are spraying color, it helps a LOT to hold your spray gun as far from the instrument as practical, which helps keep the color even.


Light

"Cowards can never be moral."
M.K. Gandhi

He doesn't have spray equipment so that may not be an option. I'd agree that with finishing the KISS approach is best especially when starting out.
 
Back
Top