Diy Dc Jr

  • Thread starter Thread starter JCH
  • Start date Start date
JCH

JCH

El Nacho
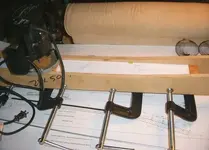
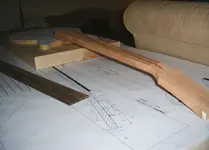
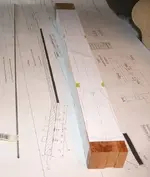
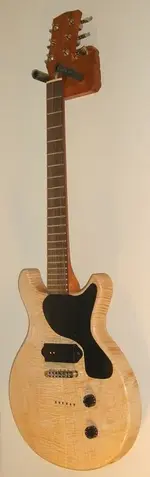
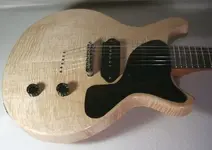
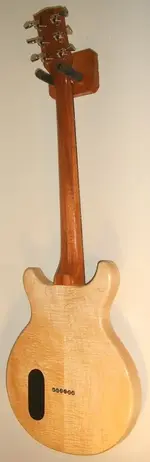
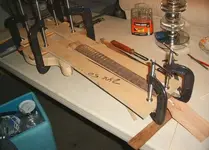
It's almost done. I'll wind a pickup for it today, and string it up. This is my first build that is this involved. I've made others, but they were all bolt-on necks. I glued the blanks for the body, and neck several months ago. I was pretty busy racing all summer, and didn't have much time for projects, so I really didn't start until a few weeks ago. I wasn't trying to create the ultimate guitar on this build, but rather hone my skills, and set up the needed tooling. I've always liked Juniors, and I didn't own a P90 guitar so here it is. The body is two piece curly maple, and the neck is 4 piece laminated 1/4 sawn Honduran mahogany with a rosewood board. I debated with myself what seemed like forever on how to treat the bridge, and ended up with it strung through the body behind a T-O-M. The tuners are recycled vintage 18:1 full size grovers. Medium frets 12" radius. I'll know by tonight whether I built a stud, or a dud. Wish me luck.
 

Attachments

  • hdwr.webp
    hdwr.webp
    13.1 KB · Views: 187
Is that a full maple body? :eek:

Edit:
Just actually read your post. That's gonna be a bright sucker! Post clips when you can :D Very nice work
 
good luck.... a stud or a dud....the looks are great so you made it past that level. you even wound your own pickups!
 
Well according to Les Paul solid maple guitars are heavy and prone to feedback a lot of the time, but they sure do look cool :D
 
Thanks Everyone.. I got it all put together tonight. So far I'm real happy. I still need to file the nut, and dial in the intonation, but it plays, and sounds pretty nice as it is.
 

Attachments

  • done.webp
    done.webp
    23.2 KB · Views: 167
Nice clean lines and understated, I like it a lot JCH. I get a lot of people bringing me guitars they have made for an assessment and comment and see quite a few made by students at the place I do some lecturing at. I often see people trying to put too much into a design. You have kept it to what it needs and what is appropriate and resisted the temptation to add more for the sake of it. Well done indeed. An "A" from me on that one, it took me a few years to get that one out of my system.

Any chance of a pic of the neck joint you've used and whats the finish?

Thanks for the good report card. I do like to keep things simple. Never had the urge to own an explorotelebackerberg, and probably wont be building any.

I fussed over the neck tenon for way too long, but ended up with everything where it belongs. The layout is so critical. one small f'kup, and everything could be wasted. I'll post a picture later of how i jigged it up. The finish is nitro. Good thing I didn't explode. I'll give it a final polish in a couple months.
 

Attachments

  • joint.webp
    joint.webp
    12.1 KB · Views: 160
I think it was in one of the guitar history coffee table style books with all the huge colored pictures, there was something about the sustain being so great, that with any kind of volume Les was getting a bunch of feedback, and he thought the guitar was too heavy so they split the thing down some more, and made the top out of maple..... I can't remember the name of the book anymore though. I got it out of a public library in a town I no longer live in.:rolleyes:
 
I think it was in one of the guitar history coffee table style books with all the huge colored pictures, there was something about the sustain being so great, that with any kind of volume Les was getting a bunch of feedback, and he thought the guitar was too heavy so they split the thing down some more, and made the top out of maple..... I can't remember the name of the book anymore though. I got it out of a public library in a town I no longer live in.:rolleyes:

Ahhh.. So they hypnotize you with big shiny pictures of exotic guitars, and then they brainwash you. I see how it's done. ;)

I'll plug it into a few different amps today to see what the feedback characteristics are, but I don't anticipate any problem.
I haven't weighed this thing yet, but there's a chance it could end up chambered in the future to make it balance a little better for playing seated.

muttley; here's a picture of how I setup to rout the neck mortise. The angle is at 3.5 degrees. I was mostly focused on the height of the P90, and it's relationship with the bridge. The next one will be much easier.
 

Attachments

  • tenonjig.webp
    tenonjig.webp
    29.2 KB · Views: 156
JCH, that is a beautiful guitar. As Muttley said, it has what it needs and no more. The maple is quite striking, particularly since it's a solid piece rather than a cap.

Nice work. :)
 
I think it was in one of the guitar history coffee table style books with all the huge colored pictures, there was something about the sustain being so great, that with any kind of volume Les was getting a bunch of feedback, and he thought the guitar was too heavy so they split the thing down some more, and made the top out of maple..... I can't remember the name of the book anymore though. I got it out of a public library in a town I no longer live in.:rolleyes:
Well just for the record maple is no more prone to feedback than other timbers. In fact probably less so. He did have a lot of experience trying to attach crude pickups to maple hollow body archtops, maybe thats where he got the idea because they will feedback, although I've never heard or read the quote.
 
Ahhh.. So they hypnotize you with big shiny pictures of exotic guitars, and then they brainwash you. I see how it's done. ;)

I'll plug it into a few different amps today to see what the feedback characteristics are, but I don't anticipate any problem.
I haven't weighed this thing yet, but there's a chance it could end up chambered in the future to make it balance a little better for playing seated.

muttley; here's a picture of how I setup to rout the neck mortise. The angle is at 3.5 degrees. I was mostly focused on the height of the P90, and it's relationship with the bridge. The next one will be much easier.
I got yer, so it's an angled mortice into the body matching the neck taper? I thought you had some sort of dovetail joint going on there. How have you resolved the back of the joint? I can't quite make that out from the pics. Probably me just having a dumb day. Is there a step or have you feathered it to the heel?
 
I got yer, so it's an angled mortice into the body matching the neck taper? I thought you had some sort of dovetail joint going on there. How have you resolved the back of the joint? I can't quite make that out from the pics. Probably me just having a dumb day. Is there a step or have you feathered it to the heel?

The plans showed a step, but I feathered it into the heel instead. I figured I liked the look better. The bottom of the tenon is parallel to the fretboard. The angle is in the mortise. I wasn't sure of the best way of making that cut. My solution is in the picture. I clamped the boards alongside the neck then shimmed them to the proper angle. I used a forstner bit to remove the bulk of the material, and then finished it with a router. If there's a better way to go about this I'm willing to learn.
 
The plans showed a step, but I feathered it into the heel instead. I figured I liked the look better. The bottom of the tenon is parallel to the fretboard. The angle is in the mortise. I wasn't sure of the best way of making that cut. My solution is in the picture. I clamped the boards alongside the neck then shimmed them to the proper angle. I used a forstner bit to remove the bulk of the material, and then finished it with a router. If there's a better way to go about this I'm willing to learn.

That looks fine as a method if your doing a handfull a year, simple and effective. Your time is in the setting up your centre line I would assume and thats no bad thing you need to get that right.. Cavity's like that I do on a CNC

The closest jig I have for cutting similar would be a dovetail setup for my archtops. The only difference being I design them around locating pins so that when I pop the workpiece in the jig I know everything is lined up. On the Body its the end pin location which always finishes hidden, and at the other end I have an arrangement that clamps to a centre line. The angle is on the neck. I cut that off a jig that references on the truss rod cavity. I'm always keen to see how others do things so thanks for posting the pics.
 
That looks fine as a method if your doing a handfull a year, simple and effective. Your time is in the setting up your centre line I would assume and thats no bad thing you need to get that right.. Cavity's like that I do on a CNC.... ....I'm always keen to see how others do things so thanks for posting the pics.

I didn't nail the center perfectly from the neck to the body. I'm off by 1.5 mm. My reference line must have been bad because it was perfectly parallel to the body. I need to be more careful sometimes.

here's some pictures of how I cut for the truss rod. I managed to find center this time lol. No CNC here. Just more homemade stuff.
 

Attachments

  • truss.webp
    truss.webp
    24.9 KB · Views: 138
  • truss1.webp
    truss1.webp
    16 KB · Views: 139
  • blank.webp
    blank.webp
    29 KB · Views: 139
Thats not far short of what I do. I don't put as much bow on the channel and I use a U section style rod most of the time but your good to go with that.

What are you using as your fence there? Is the router running off the inside of the rails?

The point I made earlier about using locating pins on jigs is to avoid that 1.5mm off centre sort of thing. If I was to build a jig based on what you have there I would Have a big block of wood at the end with a pin that would locate exactly on the centre line where the strap button would go. That way you have your far point fixed and it can't go anywhere. The rest of the jig would be about setting the rails for the router cut and the slope to give the angle. An arrangement of sliding adjustable fences that can be locked down when they are in place would be my choice. I like designing jigs and spend quite a bit of time building them and refining them. Prototypes in MDF production stuff in marine ply and melamine.

I'll try and take a few shots of some of mine when I have a chance. I have a load somewhere but not on this laptop.

Are you familiar with this site it's got tons of info for all instrument makers both pro and newbies. I don't have time to post there a lot but I know a lot of the folks that do. Stick to the rules and they are a good bunch. Register and browse the library you'll be hooked. ;) MIMF
 
Back
Top