Budget Home Studio Solutions: Share Your Tips and Tricks

Yair Matayev

New member
As someone who loves recording music, I know it can be challenging to achieve professional results on a tight budget. That's why I thought it would be great to create a thread where we can share our favorite cost-effective gear, DIY solutions, and other tips for building and maintaining a budget-friendly home studio.

Whether you've found an affordable audio interface, discovered a great free plugin, or built your own DIY acoustic treatment, I'd love to hear your tips and experiences. To get the conversation started, consider sharing the following:
  1. Your current budget home studio setup, including gear and software.
  2. Any cost-effective alternatives or DIY solutions you've found useful in your recording process.
  3. Tips for maximizing the potential of budget gear and achieving professional-sounding results.
  4. Challenges you've faced while setting up your budget home studio and how you overcame them.
  5. Resources or tutorials you've found helpful in learning about budget recording techniques.
Let's help each other make the most of our home studios without breaking the bank! Looking forward to hearing your tips and tricks.
 
I built all my acoustic (bass) traps, using compressed rockwool from ATS (no local source). I fought the idea of needing acoustic treatment for years, using different rooms, comforters, all the usual mostly-ineffective attempts. It really does make a difference in curbing those unwanted room reflections.
 
I can't really give any advice on actual recording, mixing etc but with my electronic techs hat on...
Do buy a Digital Multi-Meter if you don't already have one and learn to use it! Invaluable for checking cables, measuring phantom power volts and checking batteries. You can also use the AC voltage range to measure signal levels and there are several 'calculators' on the net that can turn volts into dBu or dBV . Gaining a bit of electronic knowledge can save you time and money.

A few years ago I would have suggested investing in some kit to make your own cables but they are SO cheap and good these days there is little point. You might need the odd 'special' though?

Dave.
 
No. 1::
Room Treatment.
Without it, you are fighting everything. You can't hear for the room, usually from the low-mid mud and unwanted reflections.
Treat the room instead of thinking "new gear" will improve things.
Home-made treatment is fine, as long as it kills the problem frequencies.
Even a cheap mic sounds better in an acoustically good environment.

No.2:
Gain Staging.
Let the signals flow at the correct levels through your chain, and make the most of the sound quality available to you.
The "sweet spot" where gear sounds the best varies, but it's usually much narrower with cheap (digital) gear, so set levels conservatively and find where the equipment feels "relaxed" to your ears.

No. 3:
Experiment.
Never be afraid to try things. "They Say" you shouldn't use a fig-8 or Omni mike in an untreated room...well, heck, try it anyway; you never know what it might sound like.
If your room has nothing else, it may have a great slap echo.

C.
 
See related image detail


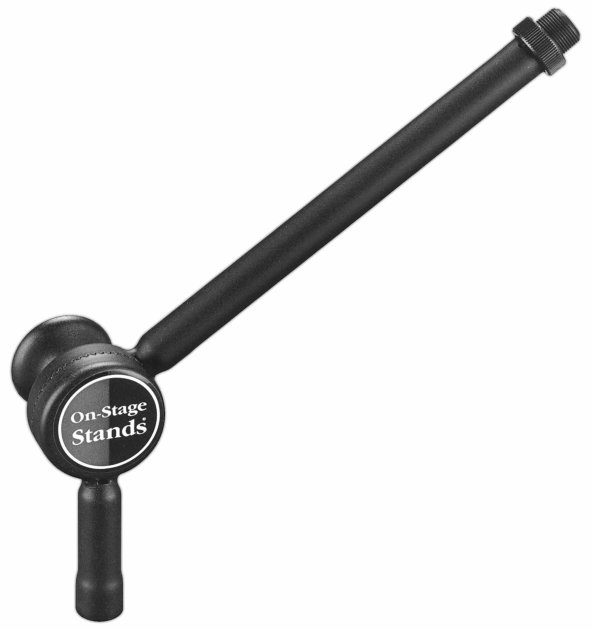
If you aren't familiar with this little On-Stage arm yet, I highly recommend it for any number of tasks.
The beauty of it is that the mechanism is spring-loaded and has "teeth", so when it is locked, it is LOCKED. No droopy friction nonsense here.

Put it on top of a mic stand to get clearance from the base; the arm will support LDC mics without any problem.

A floor stand for an amp mic? This does it, just add a base.

Put on base, position arm straight up, put t-bar on it with a pair of pencil condensers, and voila...coffee table elevated 'spaced pair' for casual voc/instrument recording.

Anywhere you need a small, yet solid "holder', this little guy is perfect, and affordable.

C.
 
Last edited:
See related image detail


If you aren't familiar with this little On-Stage arm yet, I highly recommend it for any number of tasks.
The beauty of it is that the mechanism is spring-loaded and has "teeth", so when it is locked, it is LOCKED. No droopy friction nonsense here.

Put it on top of a mic stand to get clearance from the base; the arm will support LDC mics without any problem.

A floor stand for an amp mic? This does it, just add a base.

Put on base, position arm straight up, put t-bar on it with a pair of pencil condensers, and voila...coffee table elevated 'spaced pair' for casual voc/instrument recording.

Anywhere you need a small, yet solid "holder', this little guy is perfect, and affordable.

C.
Link?

Is this the one you're talking about?

 
It comes down to your situation and goals. Are you recording just your self in your bedroom, no more than two tracks at a time or do you want to track your five piece band in warehouse or what? That drives the minimums on the gear part of the equation. Room treatment is an entirely different rabbit hole.
 
To start what a great thread!! I have an Aston Element condensing mic, Focusrite Solo AI and 5" M-Audio monitors. I use Reaper for recording and mixing. My goal is very simply to record my own voice using backing tracks for the purpose of vocal improvement. I was shocked at how the mic picks up very subtle nuances that are seemingly missed with my dynamic mics like the Shure Beta 58a, for example. Reaper has a great discussion forum and supporting videos to help beginners and others better understand the complex world of recording and mixing. Have fun!
 
I think personally, that unless you have a room that soaks up the kinds of things small rooms have - like reflections and parallel surfaces, the choice of microphones is really difficult. In reviews everyone concerns themselves with what goes in the front of the mic, yet in so many studios, with less than ideal acoustics, the mics get dealt sound arriving from a multitude of directions - I'm coming around to the view that this makes some mics appear better and others worse. The best we can do is get a flavour, that's all.
 
I've been experimenting with an artificial, triangle-shaped corner. A closed closet door on one side, a bedroom door on the other side swings to provide variable angles. I use an AT2020 XLR on a boom stand with the mic's back facing the inside of the corner. This helps cut down on room reflections, especially when recording my acoustic.

mic corner.jpg
 
Back
Top