B
boyd_boyd_boyd
trial / error based
Hi there
Not sure if this will be of much value, but I personally rely heavily on seeing stuff like this on forums and couldn't find a ton of info when I looked...
I bought a used PL20 today off craigslist. Very excited to record instruments and voice with it. Got it home, listened to it and loved what I heard. Then I started messing with a perfectly good mic and... broke it. I twisted the bottom thinking it would unscrew like other mics I've tinkered with, but instead I twisted the XLR leads with it until they snapped from their solder posts.
Reasonable questions to me might be "why mess with it if it works??" or, "after a couple turns with no threading-out, why keep spinning it?!?" I know, I know. Clearly a dumb move, learned another lesson, one more thing I've broken that I have to fix (and risk making worse).
I'm posting this stuff because I didn't see much in the way of pictures for this mic assembly, and there seems to be some confusion over how to take it apart and what size hex wrenches etc. If you already know all this, sorry for the redundant info, go ahead and stop reading now...
The bottom section of the mic is essentially held together by two screws: a set-screw that keeps the xlr pins in place, and a hex bolt that keeps the bottom end of the mic fastened. First you unscrew the set screw. To free it, you screw counterclockwise, since the screw is reverse threaded this moves it down so it can slide out. I nudged the xlr piece out a bit using the screwdriver in the same set screw hole, then pulled it out gently with my fingers. If it were stuck you could try pliers but careful not to squeeze to hard and damage or crimp the xlr pins.
here's a pic of the set screw:

and the manual image showing the disassembly

To me the manual is sort of confusing because there is also a tiny round notch that holds the mic stand adapter in place that I initially confused for a teeny tiny set screw (the set screw for the cage at the top of the mic is really small, I read somewhere that is it 0.9 mm but I can't verify that). Really though if I had read the manual with a bit more patience it would have been clear.
So, after the xlr piece slides out, you can see the bolt that holds the bottom of the mic together (noted C in the manual diagram). I tried quite a few hex wrenches before I found the right size. I used a 9/64 wrench, a 3.5mm wrench should probably work too but my cheap one just didn't fit. I'm pretty sure it's metric so I was careful with the 9/64 wrench..

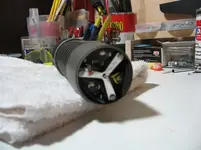
And here's what I had done by spinning the bottom around:

The wires from the xlr pins can be attached to different posts to achieve different impedance. The green wire always goes to the same terminal, and the red goes to one of three terminals depending on what impedance you're after (actually printed in the plastic by each post). The mic comes stock at 150 ohms, and that's where I wanted to put it back. The different posts are shown in this shot from the manual:

And here's my mic:

And, after soldering the wires back in place:

And the success shot, blurry mic with barely noticeable meters moving in the background:

It works again!!! Happy. Sounds like I have some degrading foam around the capsule to look forward to in the coming years - at the moment it's in fine shape and does not produce any rattle or thump when moved. I'll put up pics of that repair or preventative action when/if I do it.
Not sure if this will be of much value, but I personally rely heavily on seeing stuff like this on forums and couldn't find a ton of info when I looked...
I bought a used PL20 today off craigslist. Very excited to record instruments and voice with it. Got it home, listened to it and loved what I heard. Then I started messing with a perfectly good mic and... broke it. I twisted the bottom thinking it would unscrew like other mics I've tinkered with, but instead I twisted the XLR leads with it until they snapped from their solder posts.
Reasonable questions to me might be "why mess with it if it works??" or, "after a couple turns with no threading-out, why keep spinning it?!?" I know, I know. Clearly a dumb move, learned another lesson, one more thing I've broken that I have to fix (and risk making worse).
I'm posting this stuff because I didn't see much in the way of pictures for this mic assembly, and there seems to be some confusion over how to take it apart and what size hex wrenches etc. If you already know all this, sorry for the redundant info, go ahead and stop reading now...
The bottom section of the mic is essentially held together by two screws: a set-screw that keeps the xlr pins in place, and a hex bolt that keeps the bottom end of the mic fastened. First you unscrew the set screw. To free it, you screw counterclockwise, since the screw is reverse threaded this moves it down so it can slide out. I nudged the xlr piece out a bit using the screwdriver in the same set screw hole, then pulled it out gently with my fingers. If it were stuck you could try pliers but careful not to squeeze to hard and damage or crimp the xlr pins.
here's a pic of the set screw:
and the manual image showing the disassembly
To me the manual is sort of confusing because there is also a tiny round notch that holds the mic stand adapter in place that I initially confused for a teeny tiny set screw (the set screw for the cage at the top of the mic is really small, I read somewhere that is it 0.9 mm but I can't verify that). Really though if I had read the manual with a bit more patience it would have been clear.
So, after the xlr piece slides out, you can see the bolt that holds the bottom of the mic together (noted C in the manual diagram). I tried quite a few hex wrenches before I found the right size. I used a 9/64 wrench, a 3.5mm wrench should probably work too but my cheap one just didn't fit. I'm pretty sure it's metric so I was careful with the 9/64 wrench..
And here's what I had done by spinning the bottom around:
The wires from the xlr pins can be attached to different posts to achieve different impedance. The green wire always goes to the same terminal, and the red goes to one of three terminals depending on what impedance you're after (actually printed in the plastic by each post). The mic comes stock at 150 ohms, and that's where I wanted to put it back. The different posts are shown in this shot from the manual:
And here's my mic:
And, after soldering the wires back in place:
And the success shot, blurry mic with barely noticeable meters moving in the background:
It works again!!! Happy. Sounds like I have some degrading foam around the capsule to look forward to in the coming years - at the moment it's in fine shape and does not produce any rattle or thump when moved. I'll put up pics of that repair or preventative action when/if I do it.


")
")