Basement Studio Build

  • Thread starter Thread starter DrumArtist23
  • Start date Start date
DrumArtist23

DrumArtist23

New member
Hey everyone, I just wanted to say this website is amazing! I have been lurking for about 2 months, and finally decided to register about a week ago. I spend just about 8 hours a day reading through old posts (and new) because I have a pretty simple job that has me at a computer all day.

A little background before I begin with the studio build.
*If you don't care then by all means stop reading and just check out the pics*

I just medically retired from the US Army after only 5 years of service. I was in the Infantry, for what it's worth, I would rather like to leave the rest of that story untold, and now I do electronic data discovery for a company in my home town.

So now I am back home with my wife, and dog. No kids, and have been dreaming about a home studio since I was about 14. I am only 25 yrs old, and just bought my first house, and now have the money (rather, some money) and time, (actually very little time) to begin my project!

Well that pretty much brings it up to date!

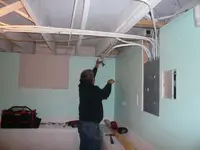
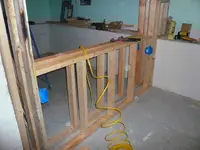
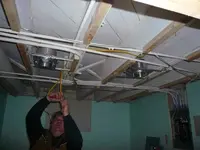
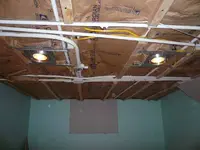
This has been my introduction to the boards, now on to the build!
 
Borrowed a friend and his truck and picked up some things...
 

Attachments

  • P1180880.webp
    P1180880.webp
    59.7 KB · Views: 692
Here is where we are going to put the drum room. It is going to be a long couple days. Just FYI, I have a problem with being overzealous, and wanting things done fast, from start to finish. But as with anything it is usually hurry up and wait.
 

Attachments

  • P1180882.webp
    P1180882.webp
    29.6 KB · Views: 685
After some structural work was done where the window use to be, we framed in the now solid wall and added batt insulation, and sheetrock. No need to tell me that batt insulation is not ideal for creating a quieter room.
My uncle is an eletrical engineer, so he came over and re-wired alot of stuff, and moved conduit around so we could drop slats on the cross beams to lower the ceiling. (in order to cover the rest of the conduit)
 

Attachments

  • P1180897.webp
    P1180897.webp
    32.8 KB · Views: 675
Skip forward a half dozen hours... We got the frame up for the double stud wall.
 

Attachments

  • P1180912.webp
    P1180912.webp
    43.9 KB · Views: 686
Got the slats in to drop the ceiling, the breaker box rewired to allow for independant breakers (1 for control room, 1 for vocal booth, and 1 for the room we are working on). Also you can see the can lights being wired up.
 

Attachments

  • P1180906.webp
    P1180906.webp
    39.5 KB · Views: 663
Lights are wired to a dimmer in the control room. Put in 12" of batt insulation. in the ceiling.
 

Attachments

  • P1180946.webp
    P1180946.webp
    37.7 KB · Views: 669
this is a cool project. good luck and hope you have some good recordings ahead of you.
 
Thanks everyone! It has been a project for sure.

Here in this pic, you can see the build out for the conduit. Couldn't think of an easier way to do this, so a few minutes of trig and a few dozen cuts on the chop saw we got this thing in.

In old houses like this one (1905 Victorian) Nothing seems to line up right, so the measurements are all off nothing is square. I guess that should help with reflection... /sarcasm
 

Attachments

  • P1180944.webp
    P1180944.webp
    28.7 KB · Views: 653
Put in 5/8" soundboard, and 5/8" sheetrock.
 

Attachments

  • P1180949.webp
    P1180949.webp
    28.8 KB · Views: 639
Putting in the ceiling was not as easy as it could have been, but I had tons of help from my uncle and my cousin. Again 5/8" soundboard and 5/8" sheetrock.
 

Attachments

  • P1180970.webp
    P1180970.webp
    31.4 KB · Views: 633
Well here we are, all up to date. All the sheetrock and soundboard is in. Still have to do the 6' x 3' window, mud & tape, plus numerous other little things.
But I have stopped because of one little drawback.


I was letting a friend borrow my car (91' Honda CRX) while his was in the shop getting a new starter put in, and on his way to bringing my car back to me, someone blasted through an intersection and hit him.

Going to be a few days more on the build until I get all of this figured out.
 

Attachments

  • P1180978.webp
    P1180978.webp
    33.3 KB · Views: 640
Lights are wired to a dimmer in the control room. Put in 12" of batt insulation. in the ceiling.

Very cool project, sir. Nice to see some others from my part of the midwest, too! One comment on the quote I noticed above... be careful if any audio equipment is plugged into the same circuit as the dimmer switch - these have a bad habit of creating buzzes and hums in your audio chain. I think I read that the live room lights were on their own circuit, which should alleviate any issues; just sharing something I had to find out the hard way.
 
Hey, Drum. Sorry about the little mishap with the car.

Stay on course! Keep sharing how things are going. Love the progress pics.

Best to ya!
 
Very cool project, sir. Nice to see some others from my part of the midwest, too! One comment on the quote I noticed above... be careful if any audio equipment is plugged into the same circuit as the dimmer switch - these have a bad habit of creating buzzes and hums in your audio chain. I think I read that the live room lights were on their own circuit, which should alleviate any issues; just sharing something I had to find out the hard way.

Got them wired on different breakers. All lights are running independant from all grounded outlets.
 
man what are the odds? :eek: That stinks.


Hey, Drum. Sorry about the little mishap with the car.

Stay on course! Keep sharing how things are going. Love the progress pics.

Best to ya!

Thanks guys. Things look like they may well be progressing soon. I am getting the windows framed in by wednesday, and will begin working on other little things to make sure it all comes together before Feb 15th.
 
Back
Top