ANyone have any diagrams for build-it-yourself studio desks

  • Thread starter Thread starter tubedude
  • Start date Start date
tubedude

tubedude

New member
I want to build one. Looking for something similar (or just like) this:


http://www.musiciansfriend.com/srs7...9335/g=rec/g=rec/search/bigpid/base_id/89513/

Desk surface height: 27"
Desk surface dimensions: 18" x 20"
Desk space in front of bridge: 16"
Clearance below bridge: 11.7"
Nearfield monitor height: 39.7"
Video monitor shelf width: 74"
Includes adjustable keyboard/mouse shelf

Looks like one piece of 3/4 or 1 inch (4x8 sheet) of nice stainable plywood would cover the main work section, the top section for the monitors/speakers, and maybe a few scraps left here and there. I think with rack rails, stain and all this could be built for under $250
Whatchu think?
 
You should be able to do it for that much. Your probably looking at 3 sheets of 4'x8' for the whole thing. The cost really just depends on your choice of wood and the hardware.

You might try doing it with Melamine. That is the stuff they use for most office and studio furniture. It's just like plywood with a colored veneer. You can get white and sometimes gray at the home depot but black can be a bit tougher. I got some from a plywood wholesaler for around $25 a sheet. They have an edging that you can apply with an iron so it looks pretty nice.
 
Thanks...
I think I can pull it off for closer to $175, but I didnt wanna say that outright, but I'm pretty sure of it.
 
You might try doing it with Melamine.

Tex, melamine can create headaches for edgebanding as well as solve pre-finishing problems. When you cut melamine, ithe thin melamine"color" tears out along the edges real EASY. Unless you have a blade especially designed for melamine, even 80 tooth carbides will slightly tearout the thin laminate along the cut line. Thats why pro shops even have a scoring blade on the opposite face that the main blade is cutting from. But you CAN route off the cut 1/32" or a 1/16th if you oversize your pieces, but your fence on the router has to be a jointer fence. I made my jointer fence for one of my router tables out of 1/2" clear plex. Or make a jig to route the pieces from the sheet with a bearing cutter. As far as ply is concerned, use ONLY furniture grade Birch or other species, as you will get voids in regular fir ply. oEven A/B has plugs nowdays. Hell, I even like the exposed edges of ply, but I've already posted a LONG ASS description of that scenario.
But yea, simple plan, easy to do if you plan your pieces. I lay all my stuff out in CAD first. Optimize your cuts for saving money. Makes for odd cutting sequence sometimes though. Of course, I'm a cheapskate, so I make use of EVERY piece. Even the leftovers are used for "boxes". I make black melamine "Harley Davidson" or "Cadilac" boxs with it. Ha! Gloss black real laminate is better though. Which reminds me, you could even make this console out of particle board, and post lam the parts with black matt or gloss laminate. Or if you want to stain it, for the uprights you need a substrate with an "A" side on both faces. For paint, use MDF, as the edges are designed for painting. But all this stuff depends on how persnickety you are about finishes. You could bang togeather some 2x4 saw horses and be done with it. Hahahaha! Myself, I used welded steel tubing. Of course, theres lots of hardwoods and gloss black laminates AND black melamine on it too. But I've already posted that so enough already.:D


fitZ
:)
 
RICK FITZPATRICK said:
Tex, melamine can create headaches for edgebanding as well as solve pre-finishing problems. When you cut melamine, ithe thin melamine"color" tears out along the edges real EASY. Unless you have a blade especially designed for melamine, even 80 tooth carbides will slightly tearout the thin laminate along the cut line.


An easy fix is to put some masking tape over all your cut areas. It usually keeps the veneer from chipping.
 
OPPS, thanks Tex. Completely forgot. Alzheimers sucks.:D
 
How about this one:

Clickety

Anyone have a way, the will, and the desire to lay something like that out in cad for me? Someone mentioned the other one being too big, and I think they may be right. If it ever needed moved, it would suck. I am trying to design it myself on paper but I dont know how well that'll work. 2 whole sheets and some rails and I probably have the whole thing.
 
I like this one a lot, keeps the monitor down low, and looks easy enough.
http://www.8thstreet.com/product.asp?ProductCode=6427&Category=Recording_Accessories

I started drawing on it, I think I would make it straight across in the front (rounded corners and edges), and angled in the back so the the rack spaces face more towards the center.
A couple questions for those in the know....

1) Do I want 1 inch thick board? 3/4 ok?

2) What the ideal distance to have between monitors? I kind of want them to sit actually behind the desk on stands, which will be about 2 feet from the wall, but I can put them on the desk I guess. Whatever. Whats the standard height? 36" ?

3) Are rack rails 19 inches apart from center of screw holes or from the outside? How big should I make the opening then, exactly?

I think thats it for now...
 
Looking at the picture for that last one, I'd say thats enough angle on the racks...

WHat I think I could do is build two rack boxes, I wont need much space there, maybe put 6 space rails in them, and then set them where I want them and put lay the top piece on it. Might not even really be necesary to attach it, but I could do it with those l brakets and screw it on for stability, where it would be quick and easy to take it off if I wanted to move or modify it.

Then, build two more rack boxes, slightly slanted maybe, and attach them to the top of the desk, via screws or liquid nails. Possibly wouldnt even put the 2 space racks under the moitors, could just leave em flat, although that looks nicer with them. Could store CD's in there or something, put two two space drawers there? Hmmm.
My mixer (M8) for headphones and such will be mounted on its own tilting roll-a-rack on the left side nest to my chair, and another idenical roler rack on the other side with lots of blinky things and toys in it too. Probaby never find a use for the racks on the bottom of the desk, but you never know what could come up. Could mount a tape deck and CD player there I guess.

Rambling now so I'll go...
 
6 rack space rails on both bottom sides, with a 2 space drawer on each side at the top!!! Pens, paper, CDs, etc.... nice!
I gotta do this.
 
TexRoadkill said:
An easy fix is to put some masking tape over all your cut areas. It usually keeps the veneer from chipping.
I've found that cutting laminate surfaces with a router keeps the laminate from chipping. I've never tried the masking tape route.
 
Hey Michael, I have. To SOME extent it works. But with Black melamine, every little chip shows up. Of course you can use a little paint stick, but then when you edgband.... ESPECIALY if you are putting on a hardwood edge.......nevermind. Who cares. I try and explain these things and it just makes me look stupid. I'll just keep doing what I do correctly. You are right about the router, but simply having a melamine blade saves lots of time. Of course, I don't have great A/D's or pre's either. Let alone a good room. Ha!
fitZ

On second thought, heres another couple of tricks. Take em or leave em. When edgebanding, the edgeband is 13/16" usually. That means you have to trim off BOTH edges after applying. Using a utility blade or knife is ok, but a pain in ass, as the blade wants to drift and cuts into the melamine or leaves a jagged edge. For $10 you can get this little plastic handtool that is spring loaded with 2 blades set at an angle. You simply compress the two halves on the board with your hand and pull. Voila! perfect trims. Woodworking stores sell them. Maybe even homedepot.

Dados. Use stop dados and shoulders. Use a router table for your dados and the shoulders. Dado the top and bottom edge 1/2" deep on the end pieces. That way you can screw the tops and bottoms into the ends and the screws don't show. Stop the dados 1" from the front. Then shoulder the tops and bottoms on the router table too. See the drawing. The purpose of this is to PRE edgeband which is MUCH easier, as then you can run the handtool trimmer all the way. Otherwise the tool stops about an inch from the inside corner if you do it after assembly. Thats 4 edges per corner to trim by hand. 16 edges per box face. PITA!
Now, IF you have to dado something like a permenant shelf, that is set back say an 1 1/2" from the face, HOW YOU GOING TO DO IT? Same thing. Stop dados and shoulders. See the dwg. This way you can pre-edgeband the shelf. Try and cut a precise edgeband in between ends and then post trim it! PITA! These are techniques used to facilitate easy assembly. You don't have to screw the shelf either. Just glue it, as the tops and bottoms are screwed and the shelf ain't going nowhere as its in dados.
Another thing. MOST of the time, like on garage type cabinetry, flexable edgebanding is fine, but you will find that the the success of the glue on consumer edgebands when applied, depends on the speed at which you draw the iron across the face of the edgeband. It is a heat sensitive tape, and is NOT very good. Commercial tapes(edgeband roll) are much higher temperature and grade, and the edgebanding machine pulls the shelf through at an even and predetermined speed. Therefore, when I do edges by hand that are in a rough environement, like kitchens or such, I use edgebanding with NO glue. I contact cement them. Takes much longer but is far superior for projects that need a better finish. AND, the edgeband is PLASTIC LAMINATE to match the melamine. Usually it is either white or black, so thats readily available.
Ok, last tip. When glueing panels to the face of melamine, like in BUTT joints, even TITE BOND yellow glue will NOT stick to the melamine. Yea, screws work, but I've had situations where screws could not show. In those situations, I use a glue just for melamine. Works great, but is fairly espensive. I bought a little bottle a couple of years ago, and have only used it a few times, but when you need it you need it! Ok, enough of my rambling again. I know these tips are a little beyond the needs of a one time DIY'er for studio stuff. But, how good do you want the project to come out?

ok, heres a couple of illustrations. Ignor the dim' on the box. It could be any size, and you could reverse the procedure or use combinations. Its the principles that count. I'm going to try and post both on this reply. May not work.
 

Attachments

  • meldado2.webp
    meldado2.webp
    3.1 KB · Views: 298
didn't work. heres the second one.
 

Attachments

  • meldado1.webp
    meldado1.webp
    10.4 KB · Views: 301
Last but not least, use 1/4" mel on the back and dado it into the tops, bottoms and sides, if you don't want the edges of the back to show. Or you can cut the tops and bottoms short too. But make the dado's 1/2" deep for a screwing surface. Well, hope these tips help someone.

fitZ:D

PS, this is all assuming you are putting a SEPERATE TOP on. That covers the screws in the tops.
Thats why the UNIRAX have seperate tops, as I believe these are exactly the techniques they use. Or similar.

Actually, heres ONE MORE TIP. To cut perfect holes in melamine, like for cables etc. Pre drill a hole with a hole saw, in a scrap piece of particle board(drilling jig), then clamp the jig to the piece you want a hole in,(on the back side)with the hole in the jig positioned where you want the hole in the piece of melamine. Drill a 5/8" hole into the melamine through the hole in the jig, which allows you to insert a 1/2" flush cutting routerbit into the 5/8" hole. Now you have a perfect hole to flushcut the melamine. Makes for flawless holes.
 
Last edited:
Damn! Thanks! I dont have access to a table saw to set up a dado. I guess I could route the dado, but I'm probably too lazy.
Is 3/4 thick enough for the most part?
 
Tubedude, this stuff is all irrelevant if you don't have a tablesaw. Cutting panels of melamine with a skill saw is doable, with a clamped on straightedge, but is a REAL pain in the ass, because frankly, SQUARING THE PIECES, is the key to making boxes. ONE out of square piece will cause ALL others to NOT assemble squarely. It is frankly impossible to get 4 cuts on a panel piece perfectly square with a skill saw. Even ply, no difference. Even if you use butt joints, SQUARENESS, AND PARALLEL cuts are a pain in the butt without a table saw and even with one, the very first cut is the end off a sheet. HOW THE HELL DO YOU DO THAT? Unless you have a fence that will reach 95 1/2" from the blade, and even THEN, your simply transferring the OTHER ENDS out of squareness to the end you are cutting.:rolleyes: DOH!! Hence the use of PANEL SAWS for squaring the sheet, NOT table saws.
AND think of this. In a cabinet shop, SQUARING two edges on a panel is the first thing you do, as most people think that a 4x8 sheet is already square from the manufacturer. Nothing could be further from the truth. In reality, all panels come from the factory with the width out of square to the length. There for you must square an end cut first. Otherwise, all cuts using the factory edge at the end will transfer the out of square edge to all other parallel cuts, which in turn, transfer the out of squareness, to perpendicular cuts. Thats why most DIY'er boxs and cabinets come out like.....well, you see the problem.
Its only when you go to assemble the pieces that assumptions become evident:rolleyes: 
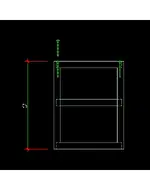
CABINET makeing is NOT as easy as everyone thinks. Even a simple box, without the pieces being perfectly in square and parallel, is a lesson in assembly frustration as 3/4" panels do NOT want to bend to take up the gaps. Also consider this. There are 6 faces to a box. If all of them are out of square. the first two pieces you assmble starts spiraling the square, the third piece, depending on rotation, either doubles the spiral, or sends the square back into the same plane, but out of square perpendiculary:D 
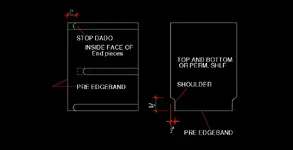
The FOUTH piece is where you begin to see the REAL problem. Now try and line up the faces. Impossible if you've screwed the previous pieces. So take a tip. IF you are intent on building these simple boxs, cause thats what they are, have a cabinet shop cut the pieces for you. They usually have a panel saw that squares the sheet right from the gitgo. Then, YOU can ROUTE the DADOS, NOT CUT THEM ON A TABLE SAW!!! Dado blades are the worst thing you can do on sheet goods. Only for hardwood boards, and even then, most shops use router tables for this type of machining. Here is how to do it without a router table. You need a FENCE on the router. Some come with one. Heres how to make one.
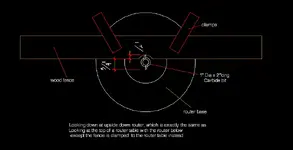
Simply clamp a small board to the router behind the bit, on one side of the router faceplate, turnon the router, and SLOWLY pull the board into the bit. For a 3/4" wide dado, you need to perfectly line up the fence face perpendicularly to the carbide cutter. See the picture. In reality, its better to use a 1" wide routerbit, and cut into the fence 1/4", which now will trim the dado perfectly. Your depth and width of cut determines the accuracy of your pieces at assembly. Route TEST pieces first, and check the width and depth. Well, with out writing a book on this area of woodworking, this is about all I can do in this scope of woodworking. Many people think this stuff is easy, and it is IF you understand EXACTLY what it is you are trying to do and have the tools to do it. BOXs are easy if you understand SQUARENESS. All fixtures, furniture, cabinets and other types of casegoods depend on this, otherwise you might as well buy them.
Ok heres a pic of the router. Actually, a router table is MUCH easier and safer to do this stuff, but in a pinch it will do.

fitz
 

Attachments

  • router1.webp
    router1.webp
    16.8 KB · Views: 283
Hey Tubedude, here is my current console bellyrack project I'm working on. It's for all the digital interface and 2 computers and a patchbay. I am using the exact techniques I described in building this. Out of black melamine no less, with a steel underframe support as the span is over 100" and the equipment is heavy. I haven't got the cooling ducts drawn in yet, as these are "floating box in a box" isolators for the computors. Noisy mofo's, hence the design. The inner boxs hang by springs and isolate the vibration from the computer harddrives, and the cooling comes from another unit below the floor. The computers themselves will have new proprietary CPU cooling mechanisims, but still need to supply and return air from the interior boxs. This will illustrate the depths I go to to design my DIY' stuff in my studio. I build EVERYTHING.

fitZ

:)
 

Attachments

  • tempstdio_1.webp
    tempstdio_1.webp
    26.6 KB · Views: 282
Here is a zoom to the console.
 

Attachments

  • belly box2.webp
    belly box2.webp
    22.8 KB · Views: 278
Back
Top