Hello Michael, so you found an Anigre sample on the net huh? Cool
")
Now you see why they use it for almost ALL this type of work. Not all, but most everything I've seen is done in it. You know, a guy in the shop told me he was from Portugal, and before he moved to the US, everyone in the countryside used Anigre as FENCE POSTS

!! Hahahahaha! If only they knew. But about 20 yrs ago, someone used it commercially for an interior. Caught on like fire. You won't find much hardwoods though. Almost all that is imported is made into veneer, as the grain only really shows like this. We had to use alder or birch to match to it when we needed hardwood edges etc.
Ok, for the glue, DO NOT use wood glue, as it takes too long to dry for a veneer. You can get bubbles in it. Only use water based contact on MDF. Probably, for the scale of your room, I would go with 1/2" thick MDF, and use 1/2" wide reveals. But naturally, its your choice.
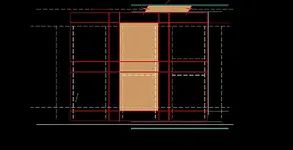
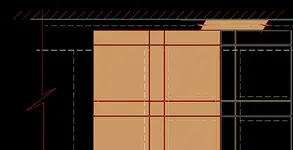
Couple of more things. Imagine the cleating as a flat frame with the "studs" centered on the vertical reveals, and blocking(mullions) centered on the horizontal reveals, and overlapping at the top and bottom. See the drawing as an illustration. Usually, this "frame" is pocket bored at the joints, since its flat. Pocket boring solves TONS of problems. You can purchase a hand pocket boring jig at woodworking stores.
Another KEY to this work, is at outside corners, it looks great to carry the horizontal reveals right on through. That means, the panel above and below the horizontal reveal MUST be MITERED. Use a 1/2" wide piece of 1/8" masonite as a spline. You cut a slot(45 degrees on your tablesaw)perpendicular to the miter, right close to the heel. On both pieces. Then glue the mitered/splined pieces togeather prior to assembly. You ALWAYS start the assembly sequence in each direction FROM an outside corner.
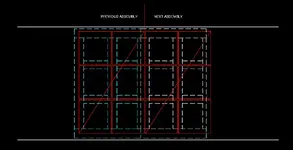
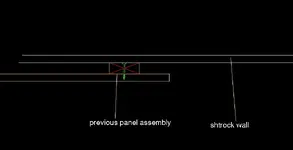
Those columns in the third picture are a perfect example. We did TONS of column enclosures. Very simple. They assemble two sides vertically, with splines, leaving a loose joint(splined miter) untill they are joined around a column, usually concrete or steel, and the loose joints are glued and taped in the field. They build out a furring frame, that is attatched to the existing column, at top and bottom just as I told you. The panels are attatched to these via the "fastening cleats" Then they silicone the mitered base, and maybe a crown like the base, or just pin nailed or screwed through the top cleat, which is assembled in such a way to allow a reveal at the ceiling the same width as the rest of the reveals. Simple really. But such an awsome look when done.
Well, thats about it, unless you have some other questions Michael. Check the pics out. I'tll take 3 posts to attatch them. This is kind of a complicated design, but will illustrate the concept, I think. I'll post some sections tomorrow. I'm tired.
fitZ


")