Zaphod B
Raccoons-Be-Gone, Inc.
Turn the light on! 
Turn the light on!
")
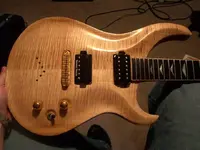
You have no idea how hard it is to take decent snaps of a guitar. Those aren't bad. If you use too much light it bounces all over the place even on a semi gloss. With those we can see the detail. You could run them through photoshop to set the balance and contrast a bit but as pics go they are fine.
Not picking on you by the way ZB, please don't flame or neg me, please please please.

Thats looking good fella.
If I could point out a few things more to get you thinking about it than critisism.
When I talked about the arching earlier I can see a few things that you may want to look at next time. Not slagging here, I hope you can take it as constructive and feel free to justify, explain or defend if you feel the need.
The recurve on an archtop is critical. Yours is very.."sudden" for want of a better word. The curve from the top should flow into the recurve in one clean move. Much as light was saying about the curves in the outline, you don't want to see two curves that just kind of join. Also you can run that recurve right up to the edge or binding if you have any. I know some of it is probably down to the lighting but thats one good way to check on those archings, shine a light right across it or turn the lights out and just use a window as a light source. You'd be amazed what you miss if you work under just one light source, and what you notice if you look at your progress under a different light.
A nice touch on an arch like that is to flow the point where it stops around the horns a bit more slowly so you can't see that the recurve has stopped. I have in the past even put a very shallow curve right up to the point of the horn. Thats where cabinet scrapers are handy.
The curve round the waist is looking good, maybe a little less "pinched" that has a kind of PRS feel to it those I find are very stop, start. As I said it's the detail so not quite as critical as getting the curves to flow from one to another seamlessly. I'll try and find a pic to illustrate what I'm talking about.
As a matter of interest what is the arch hight and how deep have you cut the recurve?
How thick is the fingerboard? I ask because the binding looks quite substantial. Not a critisism again just that a standard neck binding might not be that wide or thick. Personal choice again but with a f/b radius of 12 to 14" the binding would end up about 6mm + any banding lines. Yours also seems to be wider at the nut than the 5th fret? Is that a camera illusion?
Like I said these arn't picking holes it's meant to give you some things to think on for the next one. When I learned these things I was lucky to have some seriously good violin makers and the like to look to for help. Have a look at the cruves on violin tops and backs. That is an art in itself.
What have you done with that bridge saddle? Is it recessed? Any reason for that?
I'll leave it at that for now as people will just think I'm being picky.
Stick at it you have a fine instrument to be proud of and the confidence to get building again I'm sure.
, and 2) it's a million times better than I could do.I think it looks great. I'm not gonna say a bad word about it because 1) I'm not really sure what I'm talking about
Thats kind of why I asked and harks back to my earlier posts about the benefit of careful planning. The string length centre line and break angle are the very first things you decide on at the design part. Everything else flows from them. The string length in particular. The reason why I make these points after 30 years of doing it is because I can remember being there myself. Kind of been there, done that, made that mistake, we all have.Might the recessed bridge might be because there's not sufficient angle on the neck to have the bridge mounted in the normal way?
There may of course be another reason. Like the tone and volume are recessed, why not the bridge. Nothing to stop it working that way.Kind of been there, done that, made that mistake, we all have.
 :rolleyes:")
 - sort of.)
")
....This is perfectly normal, and is usually the last thing most new builders get down. Well, aside from getting a really great finish. I know guys who have been doing it for ten years who haven't got that part down yet.
I wasn't looking forward to that, and to be honest that's the main reason I decided on the oil finish. I need alot more practice before I commit to any fancy finishes.
Also, there is a 12" radius on the board and the board itself was 5/16" in the center, with just enough removed to get the radius on there. I'm sure it's still close to .300" thick.
I have to say, I disagree with that idea. Why work so hard to get the woodworking right, and the when you finally have it down you start learning finishing? Why not get the experience in finishing when you are still learning the woodworking? I mean, it would be a shame to finally get to the point that you feel your woodworking is everything you want it to be, and then ruin the instrument when you go to finish it. The only real trick to getting a great finish is sanding. Lots and lots of sanding. Sanding until your arm feels like it is about to fall off. You can't even imagine how much time I spend sanding. I wouldn't be surprised if I spent as much time sanding as every other task involved in building guitars.
Light
"Cowards can never be moral."
M.K. Gandhi
Have you used Tru Oil?I wasn't looking forward to that, and to be honest that's the main reason I decided on the oil finish. I need alot more practice before I commit to any fancy finishes.
Have you used Tru Oil?
Ignore the name. Its more of an oil varnish than an rubbed oil like tung. It's made from Linceed and polymer additives. More like a traditional violin varnish and an excellent choice for finishing your first few instruments.
As light has mentioned, the real trick to finishing is the prep work, more so with tru oil. Sand down to 2000 grit minimum, don't cut corners ad do a solid job grain filling.
Tru oil was developed as a gunstock finish.