Disassembling FATAR keyboard to clean - Help!

John,

After attaching the 2nd pressure ribbon to the pins under the Mod Wheel, and hooking everything back up, the pressure on the White keys still did not work.

My Kurzweil is dismantled again, as I type this.

Did you say that you thought the pressure strip would work, regardless of which way the plug was connected?

Also, what do you know about Pressure ribbons? How do they work? Is it possible the ribbon itself is defective (doubtful, but maybe?), or is it really critical to have it placed Just Right at precise point location(s) under the sticky felt beneath the white keys? Again, I don't think my ribbon has moved, but the more information I have, the better.

Dementedchord, any ideas on the Pressure Ribbon on my white keys not working, even after having connected it once?


At this point, I'm just going to try reconnecting the ribbon to the pins, but with the connector flipped around 180 degrees.


Hi Toddskins,

Sorry to hear the aftertouch ribbon still isn't working. As I mentioned, the connector on mine was hooked on backwards but still worked. I don't think there's any dangerous control voltage that will short out if the ribbon is not plugged in right. However, avoid trying to conenct it by skipping pins, I dunno what that would do. Your best bet at this point is to try to connect it reversed to what it is at the moment. You might also want to check out the wiring harness that connects the modwheel & pitchbend & ribbon pc board to the other boards in the K2500. Another test is to connect the white keys ribbon (not working) to the black keys connector (working), to see if it is the ribbon or the input connector or circuit that has the problem.

As far as I can tell, the ribbon seems to just be a very long capacitor. there are 2 conductive strips with a sort of "S" pattern to them, (with a layer of thin insulation between them - I don't know, but if it is capacitive, there would be a layer of insulation). When the key is pressed hard, an area of the "S" pattern on the topside of the ribbon is put closer to the "S" pattern on the underside, thus the capacitance varies. The more keys are pressed, the more the capacitor value changes. If the ribbon is strictly resistive, it would be the same idea - the more "S" shapes that touch each other, the resistance value changes. The way to measure this is with an ohmmeter that also has capacitance measurement capabilities.

I noticed you have to press the keys really hard to get any pressure reading on the diag screen, press and hold, press further just to check if any reading at all on the diag screen.

Placement of the ribbon is important - it cannot move much anyways as it is glued and sandwiched between rubber padding and then the felt running all along underneath each row of keys, black or white.

The ribbon is fragile so check if it is not broken, especially at the connector end. If the ribbon is very bent anywhere, it is possible it may be broken. Check the opposite end too, all the way at the right of the keybed and make sire it is not shorted against the casing or the 2 layers shorting each other. Another test to do: hook the ribbon up and power on the K2500 & set it to the diag screen. Press C0 key. No data ? test over, there's a problem from that key all the way to the circuit chip. If there is data, keep going up the keyboard. As soon as you lose aftertouch data, backtrack until you get some. When the data resumes you found the break in the ribbon!

Did you notice there are a few trimmer potentiometers on that PC board ? I don't know if they are to calibrate or offset the wheels or if they affect aftertouch info. You could play with them but be sure to note EXACTLY where they are set currently so as to return to that position in case these pots don't affect the ribbon. Would be a good idea to recheck that the wheels are behaving properly afterwards too - those pots are old and probably scratchy by now... Oh I wish I had a schematic and service manual for the unit. If I ever find one, I'll make sure to share it with you :)

I never noticed if the ribbon did much difference when playing piano or organ patches. I did find this tidbit of information, which says that aftertouch data can also enhance expression...

"Some keyboards respond to additional pressure on a key subsequent to the initial note-on action. Often used for vibrato etc. You can't emulate aftertouch in software - it has to be a function of the physical keyboard in order to be present."

and

"Manufacturers seem to be taking it out more and more, its like we are going backwards. you'd think that by now channel aftertouch would be obselete because everything would have poly aftertouch.

I use aftertouch all the time but I only discovered it because my TR had it. Imagine all the people who don't use it because they don't know what it is. It adds an essential extra dimension for any performance synth.
I was quite offended in a lecture a while back, on MIDI, where the lecturer said "and then there's the poly aftertouch message. like the channel aftertouch, its a bit pointless as no-one uses it, they could have used the message type for something more useful"."

An interesting and really good thread on how & what aftertouch does:
http://forums.musicplayer.com/ubbthreads.php?ubb=showflat&Number=1744405


I hope this helps a bit!

John
 
Last edited:
I have a problem that I seem to have drawn a blank on and surprisingly can't find any reference too anywhere.

I have taken apart my Kurzweil PC88/Fatar keyboard (must be about 15 yrs old) as I had a key not working properly.

That fixed the problem but having put it back together again I've now got sticky keys.

Considering this more - the problem seems to lie with the fact that the key is getting stuck on the rubber stopper that the key sits on.

I've tried everything to get them to pop up 'freely' but with little joy - cleaned them, rubbed a little silicone grease on them etc but none have improved it.

(I have taken some pictures but find out how to load these )
 
Sticky keys ?

I have a problem that I seem to have drawn a blank on and surprisingly can't find any reference too anywhere.

I have taken apart my Kurzweil PC88/Fatar keyboard (must be about 15 yrs old) as I had a key not working properly.

That fixed the problem but having put it back together again I've now got sticky keys.

Considering this more - the problem seems to lie with the fact that the key is getting stuck on the rubber stopper that the key sits on.

I've tried everything to get them to pop up 'freely' but with little joy - cleaned them, rubbed a little silicone grease on them etc but none have improved it.

(I have taken some pictures but find out how to load these )
Sticky keys possible.jpg


Hi Hugh,

Without seeing a picture of the inside of your keybed, its hard to diagnose the problem somewhat.

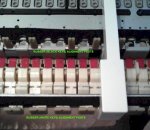
I'm trying to visualise how your key(s) could get stuck on the "rubber stopper" but I'm having a hard time picturing how this could happen. Look at the attacehd pic. The plastic key tab is resting on the red felt tip. As the key travels down, it pushes against (and slides onto) the felt that is mounted onto the keyweight. Unless the felt is missing, loose or out of place, the key could not be sliding on the rubber holding the felt.

Things to check:
1 - with the key removed, push down gently on the weight with a screwdriver. Is it moving freely or is it getting stuck.
2 - there is sometimes glue seepage from the felt, it hinders smooth key tab travel.
3 - make sure that the felt is not loose and "bunching up" somehow when the key tab slides onto it.
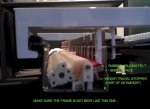
4 - less likely since everything worked before but... make sure your frame is not bent or twisted anywhere. There is very little space for the weights to travel, particularly where I've indicated "small space" on the pic. Anything from a loose felt tip to a slightly bent frame (angle "A" and "B" must be a perfect 90 degrees) or any debris clogging the space, can decrease that space and cause a part to rub. Also, make sure the rubber holding the felt is snug against the keyweight and not sticking out a bit.
5 - check your re-assembly of the keybed onto the unit's bottom casing - is everything tight, no interference from cables, nothing causing the frame to be out of shape, etc.


I agree, posting pics is somewhat comvoluted here but once you get the hang of it, its kewl. Do try to post an illustrated pic of what is going on.


John
 
Keys getting stuck

Hi John,
Thanks for your response and suggestions.
I'll try and figure out how to post a pic later - a video might be better.

What I see the problem as being is the 'friction' created by the key against the rubber 'stopper' at the front of the key pad.

Diagnosis as follows
I can take the different key from somewhere else on the board and replacing the sticky key and it still sticks.
The weights are fine - moving freely and everything intact.
It simply the friction of the key against the rubber part is stopping the key returning up.
(As I mentioned - with the keys that move freely, I can put my thumb at the front and gently move the key from side to side and whilst the movement is microscopic - some movement can be detected. With the keys that are sticking - I can't move the keys from side to side at all (because they are resting against the rubber). V.Strange !

I am wondering if I have done something to the 'rubber'. Seeing that they were sticking I popped a bit of silicone grease on them. Would that have caused the rubber to expand a little ?

I take the point about the key bed etc and will try and have another look later.

Thanks again for your response.


Hi Hugh,

Ok, I think I got it now... so as per the pic I'm posting with this post, we are talking about the "rubber coated alignment post", right ?

And yes, when the key is on the post, there is a bit of give-and-take on either side and the key can be wiggled just a bit. There too, there isn't much space for the key to move so any bent plastic or deformed rubber will cause the key to stick. If the post is bent just slightly, that too will cause the key to stick. Would be the last thing to check though, realignment can be a hit and miss kind of thing and unless you bent it by mistake its probably well lined up.

I'm no expert when it comes to rubber and silicone grease so I don't know what that may have done to the rubber. I would have used a tad of teflon spray (like Gig-A-Loo) applied to the inside of the key instead. As always, test the substance you are going to use on an unused area of plastic in case there's an unfavourable reaction between the teflon and plastic.

You will have to completely remove any silicone grease on the rubber and inside the key; then clean both parts thouroughly and then try the teflon spray on the key only. Inspect the rubber for obvious deformity and if its deformed, you may want to relocate it to either end of the keybed to a seldom used key.

Hopefully, Toddskins will also log on and come up with other suggestions. I think the teflon will work, I've used it before and it really makes things slippery for a long time :)

John

RUBBER ALIGN POST.jpg
 
Hi John,
That's it exactly as detailed in your pic and text.
I'll give those ideas a go and post any progress.
Thanks for your help which is much appreciated.
Hugh
 
Sticky Keys PC88

have taken apart my Kurzweil PC88/Fatar keyboard ...having put it back together again I've now got sticky keys.... the problem seems to lie with the fact that the key is getting stuck on the rubber stopper that the key sits on. I've tried everything... cleaned them, rubbed a little silicone grease on them etc but none have improved it.

I had several sticky keys in my Ensoniq ZR76 with Fatar keys. It turned out that the weights rest on a rubber strip at the bottom of the board. Someone spilled a sticky liquid that dried on the rubber strip. I ended up removing just the side panel, made a long thin strip of wood, glued a cloth to the end of it and put a bit of powder on the cloth. I rubbed in into the sticky section of the rubber. Its fine. I have pics on one of the early pages of this thread. However my board is somewhat different than your PC88 so it might not be the same problem.
 
I had several sticky keys in my Ensoniq ZR76 with Fatar keys. It turned out that the weights rest on a rubber strip at the bottom of the board. Someone spilled a sticky liquid that dried on the rubber strip. I ended up removing just the side panel, made a long thin strip of wood, glued a cloth to the end of it and put a bit of powder on the cloth. I rubbed in into the sticky section of the rubber. Its fine. I have pics on one of the early pages of this thread. However my board is somewhat different than your PC88 so it might not be the same problem.

Wow. Talk about a Mission Impossible tactic! I nominate Joegrane for the MI6 award. lol


No, no ideas from this side of the world for guessing at what might be the problem on fixing sticky keys. Not without a good talcum powder rub down, that is. <grin>
 
Hi - Well I fixed those sticking keys - I don't really want to admit what I did
Since I couldn't remove the rubber and all other solutions didn't seem to be getting nowhere - I simply took a nice sharp stanley knife and cut a slither of one side of the rubber -
Sounds a bit drastic but the rubbers remain in place and fine.
Job done...
Thank you for everyone's contributions on here - it's been an interesting read gave me the confidence to open it up and sort the issues out.
 
MIDI Solutions Velocity Converter

Originally Posted by Roloway:
Concerning using it as a MIDI-controller... I hooked it up to my machine and tried various virtual instruments like the Lounge Lizard Demo (really great Wurlitzer and Rhodes Instruments, also a Hohner if I remember right) and the free Tascam CVpiano (basic piano, but better than whats on the keyboard). Unfortunately, the velocity is too soft. In order to get some good, somewhat piano-like dynamics and loud sounds, I have to almost slam the keys with all I've got. If I use the headphones and the instruments on the keyboard, the dynamics are fine. Is that normal?

Isn't LoungeLizard nice ? I love some of the sounds & use it all the time. I prefer Pianoteq for realistic piano sounds and they do make a very decent Rhodes & Wurly too :)

I noticed the same thing you did concerning key velocity. I fooled around with the midi velocity maps but it didn't do any good so I learned to live with this problem for now. There is a Canadian company that makes a sort of "booster" for this kind of problem but I haven't tried the product and can't find the link right now...

John

This message is for Roloway and anyone else who needs to convert velocity data from a Kurzweil to any other MIDI hardware box or virtual instrument software:

"MIDI Solutions Velocity Converter":
"The MIDI Solutions Velocity Converter applies selected velocity curves to incoming MIDI notes. Curves can be selected from 40 preset curves or a user defined curve. Even though the 40 presets offer a wide range of curves that are enough to cover most needs, the user curve makes the Velocity Converter a completely versatile device by allowing one curve to be created to an exact specification."

I have not tried this product but where I work, we have various other MIDI boxes from this company and they are good solid products.

Link to product specs: MIDI Solutions Velocity Converter; MIDI Velocity Processor

Hope this information is helpful.

John
 
Hi - Well I fixed those sticking keys - I don't really want to admit what I did
Since I couldn't remove the rubber and all other solutions didn't seem to be getting nowhere - I simply took a nice sharp stanley knife and cut a slither of one side of the rubber -
Sounds a bit drastic but the rubbers remain in place and fine.
Job done...
Thank you for everyone's contributions on here - it's been an interesting read gave me the confidence to open it up and sort the issues out.


At least you now have it working and that's a good thing. Shaving the rubber would also have been my last ditch effort too, in a case like that!

John
 
I am thinking of doing his to my Fatar. Questions.
(1) did this make a difference in the playability?
(2) the keys on mine are a bit loose and noisy. Is there something I can do about that?
thanks
 
I am thinking of doing his to my Fatar. Questions.
(1) did this make a difference in the playability?
(2) the keys on mine are a bit loose and noisy. Is there something I can do about that?
thanks

Hi,

1 - definite imporvement in playability, especially if you have broken weights !

2 - The black keys on my K2500XS are somewhat noisy, especially when they go back up. But it is not a noise that indicates failure of the keys, I think they are just plain noisy, possibly "normal" noisy. I forget if they were that bad before I revamped the keybed... at any rate, I tried out a PC3K and other recent Kurz models and the keybed is a lot more natural and feels "smoother" than on my 'ole 2500XS.

If you hear loud tapping, thumping and "click clack" noises on some keys but not on others, it may be worth your while to take the unit apart and check out the condition of the keyweights, felts and keys. If you read most of the thread, Toddskins and I have outlined the major and usual problems with this older Fatar keybed and how to go about fixing some things. You need good mechanical abilities and lots of patience if you decide to undertake this job. In my case, the revamp is a success so far. I have intentions of opening the unit again in july (will be 6 months of usage on it by then), to check on how the repairs are holding up.

John
 
No sound from a couple of keys

Hello everyone. I recently bought a Casio Celviano AP-20 digital piano. It has the Fatar 88-key weighted keyboard. I got it cheap cause it came with four keys that make no sound, which are the lowest A, F, C#, and D. I took the keyboard apart and did the cleaning procedure before coming to this thread because I already had some experience with all my older keyboards. Apparently some liquid had been spilled on the piano keyboard, possibly milk cause the piano belonged to a little 6 year old and her 12 y/o sister. I thoroughly cleaned the contact circuit strip and and the carbon contacts on the rubber pieces with pure alcohol. The keys still make no sound. So I'm thinking I probably have to replace the contact circuit strip. Is that piece available for purchase anywhere? I've Googled it and have had no luck. Any help and tips would be greatly appreciated! Thanks so much in advance.


UPDATE: I found it. If anyone needs this part, here are the links: (just add the missing http and www at the beginning cause I guess I'm not allowed to post url till I've had five posts)

midi-store.com/Fatar-Key-PCB-Contact-Board-BELOW-C-p-17718.html

midi-store.com/Fatar-PCB-Key-Contact-Board-ABOVE-C-p-17602.html

midi-store.com/Fatar-Key-Contact-PCB-Bundle-p-17719.html
 
Last edited:
I'm the guy who in this discussion, described the repair of the same problem with an Ensoniq ZR76 with the Fatar keyboard. I was able to just clean the contact board and replace the contacts. The contacts only cost $5. or so. The boards are expensive! Good luck.
 
I don't have any new/helpful info for this thread but just wanted to say thank you to everyone who posted. I've learned a lot by reading through it!
 
WOW!! You guys are awesome... I've learned so much reading through the entire thread...
I just purchased a used k2600s. most of the keys feel good and tight except for one white key that has a constant max velocity problem ..and thanks to you guys I'm confident that I can take care of that problem.. however, I also have a few black keys (4-5) that when fully depressed make a thumping sound as if they are hitting against something without felt to mute it...These keys are otherwise functioning complete normal.. the only time these keys don't make this thump is if I gently and slowly fully depress the key.. I'm not sure if this means a broken weight or a missing felt or something completely different... I'm hoping someone here can offer some advice as to what this may be and possibly a solution..
In addition I would also like some suggestions as to what type of cleaner/solution I can use to clean the sliders contacts... I might as well do this while I have the board apart.. Thanks
 
Hi Svenusto,

"white key that has a constant max velocity problem" - likely a dirty contact, easy to fix by cleaning the PCboard contact area and the rubber contact with 98% or better, alcohol. Don't use any "rubbing" alcohol that has oil in it. You might be able to get this at the drugstore. Possibly a music store that still has "tape head cleaning alcohol " is another good choice. Go spare on the alcohol, it tends to dry up rubber. Ensure you don't touch any contact surfaces with your fingers, you don't see it but fingers are naturally oily!

"black keys (4-5) that when fully depressed make a thumping sound as if they are hitting against something" - likely a broken tab on the keyweight; see Toddskin's post # 110 for a fix, or buy a replacement keyweight. Worse case scenario: broken keyweight, fix as per instructions mentioned in the earlier posts of this thread. After opening the unit, remove the keytops of the offending keys and one or two adjacent keys so you have space to see and work. use the eraser end of a pencil to push the weight to observe its action & travel. its OK to grab the weight to lift it up completely to check it - the offendng keyweight should travel the same distance as a good (adjacent key not broken) note's keyweight when manually lifted. You may "force" lift the weight upwards a bit to see if it is not partially cracked.

John
 
UPDATE ON ORIGINAL REPAIR DONE ON DEC 2010 - JANUARY 2011:

Hi Folks,

As promised, an update on the lifespan of the repairs on the keybed! I'm happy to report that I've used the K2500XS pretty extensively since then and since it is my practice keyboard, all the 88 keys have been evenly used for the last 6 months. Apart from a very slightly noisy spring on D4 and sometimes on F4 when first using the keyboard for the day, everything else is holding up nicely and working just as well as day one when the unit was rebuilt. I guess its a "success story" thus far :) The unit has not been transported to any gig though so I have no idea if things would have broken due to extensive shaking in a truck, or mishandling by road crew.

So if you have a K2500 / K2600 keyboard that you want to keep alive and you have lots of time on your hands, this extensive repair is well worth it. If anything should start to go bad, I'll keep this thread updated with problem/solution.

Cheers everyone :)

John

PS: if anyone's interested, I sometimes post to the Yahoo K2500 and K2600 user groups on technical stuff mostly. The groups have knowledgeable people on diverse topics such as programming, modifying, buying parts, etc. They also have some patches and ... tada! ... service manuals and schematics of the K2000 series racks and boards.
 
Hi John
Thank you for a quick and informative response... I did get my hands on a service manual which should help me open and close the 2600... I'm going to open up the board this weekend and start to work on it.. I'm sure that between the instructions on this thread and the service manual, I should be able to do this job without glitches... I'll keep you posted and try to post some pics as well... thanks again
Sal
 
Back
Top