Hello all,
I've been thinking a lot of studio wiring over the past few weeks. My Tascam M3700 is nearing completion and though the studio itself is still a ways out I'm starting to try and figure out the best ways to wire everything together.
I am trying to keep things flexible and, where reasonably possible, inexpensive.
My Tascam is 32 channels, which right off the bat poses a problem for me. Patch bays come in two varieties, 1/4" with 48 jacks, 24 per row - or - TT/Bantam with 96 jacks, 48 per row. The 1/4" bays mean I can't use just a single row for each connector type on my console, the TT patchbay means each row of jacks has 16 more than I need per row to fill my console. Switchcraft does make a 64 jack panel that is TT on one side, DB25 on the other but at $700 each.. they are a bit beyond my reach!
So.. I've been thinking.
Here's the plan and I need some help figuring out if I'm insane or not
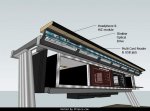
I'm thinking about getting a series of patch bays that are the 96 jack TT with the 3 Pin Edac on the back.
I've not done a full map of the patch field yet but I see reason for 5U of bays to make good safe use of normals/half normals.
1.) Live room Patch field < Normal > Tascam Mic Pres
2.) Insert send <half Normal > Insert Return
3.) Direct Out on Tascam < Half Normal > Recorder Inputs (either DAW or Tape)
4.) Recorder Outs < Half Normal > Tape Input on Tascam
5.) All 32 'Line Ins' need also be on the patch field, perhaps half normalled to racked Mic Pre's or whatever.
I could move the Line In jacks to somewhere else on the patch field but I like to keep console channels in a single vertical line on the patch field. Further, in the Live room I have a custom snake that, instead of being wired for XLR jacks, is wired for Neutrik Combo jacks. I can plug a Mic in and have it normalled to a Mic Pre or plug in a line level signal in the live room and I can break the Mic Pre normal by patching the Live Room jack into the Line In.
So far so good...
So, what do I then do about rack gear to which my collection seems to always be growing?
I will be building custom racks for the studio so I'm thinking about wiring each rack to an Elco connector. I can set up a rack for compressors, a rack for Reverb/delay, ect and then wire them to an Elco on the back. I can then Elco the rack to a spot on the wall behind and then, from the wall Elco, wire up to the patch bay.
This should allow me two things...
1.) I can keep things neat and tidy in the studio without having to worry too much about cable strain and moving things about.
2.) I can set things up to allow some level of portability. I can break down what goes into each rack case so that I can pull one or two racks for a mobile gig or I can pull a rack out to work on it without having to tear it all down.
This, it seems, would also allow me to start assembling racks now and getting the bulk of the wiring done now, before the studio is done... which will let me use more of the gear I have before it's all safe and sound in it's new home.
So... am I insane? Does this make sense? Does anyone else have other ideas or input?
All are welcome!
Robert
I've been thinking a lot of studio wiring over the past few weeks. My Tascam M3700 is nearing completion and though the studio itself is still a ways out I'm starting to try and figure out the best ways to wire everything together.
I am trying to keep things flexible and, where reasonably possible, inexpensive.
My Tascam is 32 channels, which right off the bat poses a problem for me. Patch bays come in two varieties, 1/4" with 48 jacks, 24 per row - or - TT/Bantam with 96 jacks, 48 per row. The 1/4" bays mean I can't use just a single row for each connector type on my console, the TT patchbay means each row of jacks has 16 more than I need per row to fill my console. Switchcraft does make a 64 jack panel that is TT on one side, DB25 on the other but at $700 each.. they are a bit beyond my reach!
So.. I've been thinking.
Here's the plan and I need some help figuring out if I'm insane or not
I'm thinking about getting a series of patch bays that are the 96 jack TT with the 3 Pin Edac on the back.
I've not done a full map of the patch field yet but I see reason for 5U of bays to make good safe use of normals/half normals.
1.) Live room Patch field < Normal > Tascam Mic Pres
2.) Insert send <half Normal > Insert Return
3.) Direct Out on Tascam < Half Normal > Recorder Inputs (either DAW or Tape)
4.) Recorder Outs < Half Normal > Tape Input on Tascam
5.) All 32 'Line Ins' need also be on the patch field, perhaps half normalled to racked Mic Pre's or whatever.
I could move the Line In jacks to somewhere else on the patch field but I like to keep console channels in a single vertical line on the patch field. Further, in the Live room I have a custom snake that, instead of being wired for XLR jacks, is wired for Neutrik Combo jacks. I can plug a Mic in and have it normalled to a Mic Pre or plug in a line level signal in the live room and I can break the Mic Pre normal by patching the Live Room jack into the Line In.
So far so good...
So, what do I then do about rack gear to which my collection seems to always be growing?
I will be building custom racks for the studio so I'm thinking about wiring each rack to an Elco connector. I can set up a rack for compressors, a rack for Reverb/delay, ect and then wire them to an Elco on the back. I can then Elco the rack to a spot on the wall behind and then, from the wall Elco, wire up to the patch bay.
This should allow me two things...
1.) I can keep things neat and tidy in the studio without having to worry too much about cable strain and moving things about.
2.) I can set things up to allow some level of portability. I can break down what goes into each rack case so that I can pull one or two racks for a mobile gig or I can pull a rack out to work on it without having to tear it all down.
This, it seems, would also allow me to start assembling racks now and getting the bulk of the wiring done now, before the studio is done... which will let me use more of the gear I have before it's all safe and sound in it's new home.
So... am I insane? Does this make sense? Does anyone else have other ideas or input?
All are welcome!
Robert

")
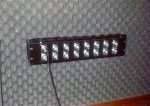

") I'd love to see some more detailed images of your racks and your setup. I recognize a few of the items but I bet you have some real gems tucked away in there. You have such a clean logical setup... I love the handles at the base of your racks on the right hand side.
I'd love to see some more detailed images of your racks and your setup. I recognize a few of the items but I bet you have some real gems tucked away in there. You have such a clean logical setup... I love the handles at the base of your racks on the right hand side.


 Well after 3 months of bitching, I WAS hoping the webmaster here had fixed the attatchment thing by now. No such luck. Fuck him. As far as posting a few hosted pics, this site has become a complete and utter joke.