Rear Wall Options.

RICK FITZPATRICK

New member
Howdy guys. Its been a LONG time since I've posted anything in regards to my studio progress. Ha! Progress, wtf is that? :D Fact is, I just purchased a Tascam M3700 mixer, which has changed TONS of details and plans. Not only my console(new thread coming up), but my monitor soffit design(geometry) as well. But not to confuse things, I'm going to start my studio design thread with a subject I have been trying to solve for a long time :rolleyes: Basically, it has to do with deciding which is more important.

1. Space and ergonmics
2. Acoustics
3. Time and finances.

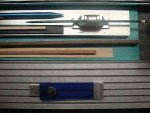
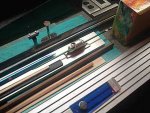
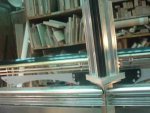
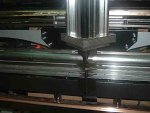
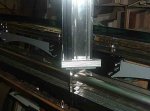
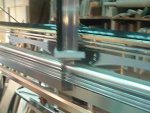
Heres the problem. I have what I consider a perfect rear wall(closet) scenario for many options. My first plan was to incorporate a Tape Machine Fixture that houses TWO MRS-16 R2R machines. I built this over 5 years ago and was in my previous small studio. I still need to use it, but if I don't put it in the closet, then it takes up an enormous amount of space(24"x 54") along my side wall, which I don't want to do as my studio is only 12'wide as it is. However, I also want excellent acoustics. Ha! Thats where the problem comes in. If I DO put the fixture in the closet, then I can't see the meters on the tape machines while recording. I do have a couple of small Video cams, but thats another scenario to deal with. Plus, I have to run unbalanced lines almost 35' between patch bays in the console and the machines at the rear wall. While grappling with this problem, I started realizing there are literally TONS of options for utilizing this closet for acoustical purposes. Thats when I decided to exploit these options as I know them. However, the more I got into it, the more I realized...shit...I don't think anyone REALLY has a perfect answer to the solution. So, with Seekers thread on rear wall use leading the
way, I figured its time to start posting these options.

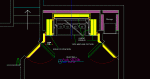
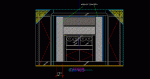
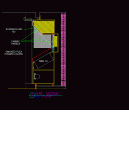
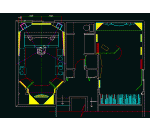
Another problem is time. These files take an enormous amount of it to convert and upload, not to mention drawing, which is done. So, with no further adoo :D , here is the first option. I have over 50 files to upload to my server, but untill I see how they post here, I'm only going to post the first Option to see the resolution/size etc. Once I know how to best set my parameters, I'll upload the rest and post them. Hang with me on this as I have little time. OK, heres a PLAN, VERTCAL SECTION, and ELEVATION of the closet using OPTION 1. I'll also post a full plan of the studio to give you an idea of how the rear wall relates, but remember, the rear wall is NOT a finished plan in the Studio plan. Here goes. Oh, for now, untill I upload to my server, I'll only be able to post a few attachments with each post. Eventually, I'll post hyperlinks which will appear here as drawings.

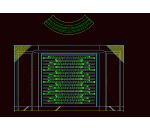
Ok, here is the studio plan(without the new M3700 mods which is a whole 'nuther animal :D
fitZ
 

Attachments

  • PLAN A.gif
    PLAN A.gif
    32.9 KB · Views: 83
Rear Wall-Option 1 Tape machine fixture and absorption.
fitZ :)
 

Attachments

  • OPTION 1Tape Machine Fixture  PLAN.gif
    OPTION 1Tape Machine Fixture PLAN.gif
    27.1 KB · Views: 48
  • OPTION 1Tape Machine Fixture  ELEV.gif
    OPTION 1Tape Machine Fixture ELEV.gif
    42.1 KB · Views: 38
  • OPTION 1Tape Machine Fixture VS.gif
    OPTION 1Tape Machine Fixture VS.gif
    21.6 KB · Views: 36
Ok, that sucks. I have to upload before the links appear as pics. :rolleyes: So much for that idea. Give me a few hours and ...I'll be back. Ha! :p
 
Looks good.

Check back in with pics next month so we can see how it turns out. :D
 
Hi C7, well, there is a ton of decision on cieling, sidewall and other details that interface with the rear wall. Whats NOT shown yet, is the sidewall/cieling SUPERCHUNK and REAR CIELING quasi QRD that has to die into the finished rear wall design. Fuck. Sometimes I wonder about myself. :rolleyes: :D
 
Cool layouts, man. I understand your dilemna with the unbalanced run putting the dual MSRs in the back, but man what a great fit that would be. What you could do, is before you decide on a final design, hook a few channels up to the board and see what kind of noise, if any, you're getting in your cable run. What is it they say, like 15' or so as a rule of thumb for unbalanced until you start getting problems?

Another option is to leave the assembly you built on the side as shown. 2' width is not the end of the world in space. I don't know enough about acoustics to know if the cabinet you made would throw the sound off in any way when mixing.

Another, and I'm sure less desirable option, would be to disassemble and rebuild (or not) the console you made for the MSRs. I know that would be heartbreaking, but just thinking about the big picture for the best utilization of your space. I think my MSR is only about 12" deep or so, give another 2" back clearance for the cables so you don't bend the ends, and that doesn't seem so invasive.

I'm excited to see some more concepts! :) :) :)
 
Howdy Seeker. Man thanks for the feedback. Its a long time comin but I've really got to finish this thing now. Just a matter of decisions and time. I work full time which don't leave a lot of time to spend on the studio though.

As to the rest of the rear wall designs, I discovered yesterday that my host server site domain name had expired, and my "server guru" had told me about it two months ago and I never picked a new name. So I called him and this morning he is setting it all up again for me, but I am swamped this morning so won't be able to upload the drawings untill tonight. Sorry. In the meantime I'll post some other stuff.

Ok, here is some considerations that I've never exploited here. So here goes.

First, is design CONCEPT. From the time I became interested in studio design, this was the primary question in my mind. And then I found Alton Everests book..."The Master Handbook of Acoustics". Once I found "LEDE"(Live End Dead End)that did it. From that time on, my design vision was based on the principles laid out in that book. Yea, over time, after finding HR, Studiotips, John Sayers site, and lots of other input, I've come to learn other acoustical principals, but my design is still based on info in that book, although a couple of concepts have been altered to a degree and acoustical design/concepts have evolved since then. But there is one thing I am interested in that few others have delved into. Guys, professionally, I am whats known as a "detailer". I turn architectural and interior design conceptual drawings/visions into "buildable" drawings...in other words....shop drawings. Especially for fixture/specialty items. I "detail" via Autocad or hand drawn on board, drawings that any shop or mill can build from. I've done it for 20 years. Which has "given" me a view and access to tons of "design details" and construction concepts. Especially since I've "detailed" over 300 Macys interiors and Store fixtures/Architectural millwork. I worked in a GIANT Architectural mill whose specialty was Store fixtures. It was there that I became familiar with a broad range of fabrication techniques and materials. It was only natural that I became excited about using these for my studio design.
Guys, I've got a confession. I'm compelled. I'm so fucking compelled by a vison, everything I do towards my studio design goal is governed by it. And that is DETAILS. Like they say, "...its the details tha counts"... so to speak. But without understanding the criteria of the design, it would be difficult to justify some of what I am doing. In that regard, here is the criteria.

My studio is a standard HR recording wannabe-cum-bedroom space. :D :D
My first criteria is it has to make me happy. PERIOD. :rolleyes: Guys, I live in a very unusual home. It is 1 mile from downtown Coos Bay Oregon, along the Oregon coast. Very remote area with dense forests. My home sits up at the top of a hill with a 100' deep ravine on each side, one quarter mile off Interstate 101, at the end of a street that makes my home very isolated from ambient sound. This one fact makes it possible to concentrate my energys on studio design/treatment, instead of "soundproofing". In fact, its so quiet most of the time that I don't hear anything, nor can anyone hear whats happening in the studio. In that light, I've spent a great deal of time concentrating on achieving my original vison of my HR studio in the "80's". In my studio, I don't have to satisfy ANYONES criteria but my own, as I will be the sole arbiter of what takes place. In otherwords, I only need to satisfy what makes me happy.
One of the things that makes me happy is ANALOG. :D
Another is color.
Another is materials. Unusual materials, which I have tons of, or access to. Veneers, hardwoods, black melamine, laminates, colored plexiglass, unusual aluminum extrusions...hardware...lighting and lighting trusses, LED's, lasers etc.
Another is art.
But the real thing I love is DIY.

Like I said, one of the areas of design that I am very interested is details. In order to make my design really work, these details must be complete. Like 6"brushed .06 thick Stainless Steel wall base. And a band along each sidewall of 6" wide aluminum SLATWALL extrusions, for guitar hanger brackets, mic booms, cable hooks, monitor brackets or whatever I want to use these for. Another is a TRUSS, over my console that supports a mic boom/ video monitors/or whatever. Hard to describe, but its what I've envisioned.

But what really makes the design work is acoustical treatment, monitor soffits, correct monitor axis geometry and rear wall depth. My whole design is based on these concepts. All other is simply manipulation of materials and visual context to fit.

In that light, here is the first of 5 or 6 "material palettes" as a reference to visual details in the studio. There are many many details that these materials will be used for. I litterally have a ton of very unusual aluminum extrusions(12' lenghths) that are from a company called Stylmark. They are used in the manufacture of store fixtures, interiors, showcases etc. I'll be using these for things such as studio art, console parts, diffusers such as QRD's(Quadratic Residue/Prime root) and trim, and other uses, such as custom jack/plug plates/boxes etc. Here is one of those palettes laid out on my work bench. There are more, but this may give you an idea of what some of my elevations entail detail wise. Autocad 2d drawings do NOT give a clue to the real visual context. Hence the next set of pics. More on how they relate later. Well, thats all I have time for this morning. More later tonight.
fitZ
 

Attachments

  • MATERIALS4.jpg
    MATERIALS4.jpg
    28.3 KB · Views: 35
  • MATERIALS5.jpg
    MATERIALS5.jpg
    34.5 KB · Views: 33
  • MATERIALS7.jpg
    MATERIALS7.jpg
    33 KB · Views: 30
  • MATERIALS10.jpg
    MATERIALS10.jpg
    21.4 KB · Views: 31
Dig the blue piece. Is that a plexiglass of sorts? Awesome for architectural detailing if you can get more at different sizes.
 
Here are some pics of one of the sidewall "art" pieces that illustrates some of aluminum extrusion "detail concepts. Understand that this is temporarally mounted on my radial arm saw in the shop and does NOT illustrate the finished item PERIOD!! Needless to say, some of you may not agree with my choice in materials OR vision, as C7sus referred to this as..."redefines the word..HIDEOUS!"..Hahahahahaha! Little does he know that this is one TENTH of the finished product. Anyway, heres some pics of the so called...well, I'll leave the description to you. Its only to illustrate the aluminum extrusions and how I will use them in my.. ahem..palattes. :) Ok, now you can laugh. :p
fitZ
 

Attachments

  • ARTPIECE0.jpg
    ARTPIECE0.jpg
    21.5 KB · Views: 28
  • ARTPIECE3.jpg
    ARTPIECE3.jpg
    27 KB · Views: 26
  • ARTPIECE5.jpg
    ARTPIECE5.jpg
    22.4 KB · Views: 22
  • ARTPIECE7.jpg
    ARTPIECE7.jpg
    25.6 KB · Views: 23
  • ARTPIECE8.jpg
    ARTPIECE8.jpg
    17.1 KB · Views: 22
Back
Top