Please advise on how to get Best output from by home based recording studio

ssroycal

New member
My home recording studio has configuration like this:
Hardware:
1. M-Audio Fast Track Pro - USB
2. Beta Three - Digital Delay DD2
3. Behringer Large Diaphragm Studio Condenser Microphone C-3

Software:
1. Sony Acid Pro 7.0
2. Sony Sound Forge Pro 10.0

Procedure I follow:
1. I use 48kHz, 24-bit audio for the Hardware & Software
2. I load the music track into AcidPro, and then dub the voice there
3. While voice recording through Behringer C-3 Condenser Microphone I use: Cardioid polar pattern, and activate the low cut filter.
4. I use Digital Delay DD2 – to put some delay/reverb effect online during recording
5. Then I render the Vocal track from AcidPro in 48kHz, 24bit WAV format.
6. Then I load both the Vocal & music track in SoundForge (both in 48kHz, 24bit WAV format)
7. Then I usually process the recorded vocal track like this:
a. I Normalize the recorded vocal track using, RMS, Normalize to: -14 dB, & 'Use equal loudness contour'
b. Then I put REVERB effect in the vocal track using, Deep Hall, Decay Time 2.0 sec, Pre –Delay 100 ms
c. Then I mix the vocal & music track, keeping the Vocal track FIXED at -3.0 dB, and setting the gain of the music track as I feel it should be according to the gain of the vocal track. Most of the cases I set the gain of the music track between -3.0dB to -10dB.

Here I’d like to mention that I am a vocalist and I don’t have any formal training on sound engineering. I learned these techniques through experiences only after a lot of trial & error. And the sample of the output I got using the above techniques & parameters can be found in the Attached .MP3 file

I just wanna ask you all in this forum that, in the procedure I am using for processing and mixing the audio – am I missing any vital thing and are there any tricks to make it much more better.
Please advise, Thanks in advance 

~Sanjoy Sinharoy
 

Attachments

  • Crazy.mp3
    6 MB · Views: 16
Last edited:
Well, a few things jump out at me from your description of your workflow.

First, I wouldn't add any delay/reverb at the time of recording. Conventional wisdom (which I agree with) is that you're better off recording dry and adding the reverb (if you want any) during the mixing. This gives you far more options and a lot more control. Also, I certainly wouldn't add reverb while recording then add more/different reverb during the mix--this is a recipe for muddying your sound somewhat. I personally find the reverb on your track a bit disturbing--a bit more like a "special effect" than just putting your vocal "in a space". Perhaps that's the effect you're after but, to me, it sounds a bit like the two 'verbs fighting with each other. Reverb is a dish best served sparingly.

Second, in addition to the normalising you do, you might want to experiment with some light compression on your vocal track. The will help to even out the differences between the quiet and loud phrases and help your vocal to stand out alongside the backing track. In the track you posted, the peaks (which approach 0dBFS) sound a bit over the top while the quiet bits (which seem to suit your voice best, at least to my ears) sometimes get a bit lost in the music. Compressing the vocal (again sparingly, like reverb) would help even this out.

Third, once or twice I think I head a few pops/plosives on the vocal...a cheap pop shield in front of the mic would help this.

Fourth, when working with pre-recorded backing tracks, a trick I sometimes use is to use a bit of graphic EQ on the music to reduce slightly the frequencies where the main part of the vocal sits--say from 250 or 300Hz up to around 2kHz. Only do this slightly or the music will start to sound flat--but 3 or 4 dB of cut to the music in this range can help the voice sit nicely.

Finally, rather than just setting the vocal and music to preset marks and letting the mix happen, it's worth tweaking things on a phrase by phrase...or even note by note--basis. It's years since I played with the Sony software (must have been around 2000 I did a trial) but I believe it has some form of volume envelope you can use to ride levels.

As for your moving between Acid Pro and Soundforge, I can't comment on how effective that is--maybe another user will pop along and discuss that.

Anyhow, hope some of this helps.
 
Thanks a lot Bobbsy for your valuable advice. But I am a but confused on how to use the compression technique in SoundForge Pro.
The help says that ... "The Graphic Dynamics effect allows you to precisely tailor the gain at all input levels of a signal. Use Graphic Dynamics to create dramatic to subtle compression and expansion." - is that what you want me to do on the vocal track?
As I have never used compression technique - I am not accustomed with it. Could you please explain it a bit with the configuration parameters I should use with it. I can see parameters like Envelope graph, Attack/Release time, Threshold, Ratio etc... please advise me on how to set these parameters.
I have attached a screenshot of the "Sony Graphic Dynamics dialog" for your reference.

Thanks in advance
~Sanjoy
 

Attachments

  • Sony Graphic Dynamics.jpg
    Sony Graphic Dynamics.jpg
    60.6 KB · Views: 49
Compression is one of the more difficult tools to understand--but one of the most useful things in your arsenal.

Basically what it should allow you to do is raise the level of the quieter bits of your vocal and limit the peaks to a lower level, thereby evening everything out. Done too much, and it can sound artificial with the sound pumping but used properly it just helps you keep your voice nice and clear.

You may be lucky and, in the presets section of that effect, find a setting suitable for vocals. If not, try setting the Threshold control to about -20 and the ratio to, say, 5:1. You can leave the the attack and release where they are. You may want to lower the output gain by 6dB or so to keep everything where it should be.

(When giving these numbers, I'm basing it on what I saw in your posted mix. However, really to set the threshold you need to be aware of the levels in your recorded vocal track. Have a look at the quiet bits of your vocal and set the threshold to be at or just below the "average" level not including the loud peaks.)

If your Sony software works like the version in my Audition DAW, you can also make these adjustments by dragging the line on that graphic. Drag the box at the top right down to -6 or so and set the other one to so it intersects -20 on the horizontal scale at about -12 on the vertical scale. Those graphic displays make things easier to understand once you realise that the scale across the bottom represents the levels as recorded and the vertical one up the side is what you want the levels to end up as.

Finally, I suggest a bit of reading about the whole principle of dynamics processing/compression. Once your brain clicks and you see what's going on, you'll have a great tool to use. One of the best resources to teach yourself about compression etc. are the Rane Notes HERE.

...hope this isn't too confusing and makes sense.
 
Thanks a lot, now the Compression technique is much more clearer to me.
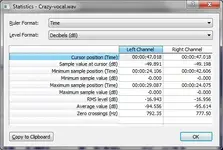
But one thing is still not clear to me, as you wrote "... really to set the threshold you need to be aware of the levels in your recorded vocal track. Have a look at the quiet bits of your vocal and set the threshold to be at or just below the "average" level not including the loud peaks." - but how to get this average level (not including the loud peaks) ? Are you talking something like RMS level in this context?

There is a tool called "Statistics" in the SoundForge (I have attached the screenshot of it). Can I use it to get that "average" level - you are talking about? If yes, then how?

~Sanjoy
 

Attachments

  • Statistics.jpg
    Statistics.jpg
    40.9 KB · Views: 45
Sorry, I probably shouldn't have used the word "average" since that can have a specific technical meaning. Perhaps I should have said "general level" or something similar. What I meant was take a rough guess "by eye" and then tweak the effect you get "by ear".

Here are a couple of screen grabs of a vocal I recorded.

Vocal raw.jpg

This first one is the raw recording. You can see there's one big spike around -9dB, a bunch of peaks around -12dB and tons of stuff down around -18 or -20dB. For purposes of setting up compression, I take the "general" level as about -20dB.

Here's a second image of the same file after I applied compression with the settings of Threshold -28dB and Ratio of 5:1. I also applied -10dB of output gain since the basic settings resulted in a file hotter than I like to mix with.

Vocal comp.jpg

You can see how much more even the levels are in this file which causes them to stand out from the rest of the mix. I actually started by trying a threshold of -20dB as per my "start at the average level" suggestion but, in this case, it's quite a complex mix with a large chorus and thick orchestration and this track (the lead vocal) needed a lot of help to stand out--this is heavier compression than I would normally wish to use but "by ear" it needed it--and I chose it as an example because it makes the effect of the compression easier to see.

The only other thing to point out is that I would usually use compression as a "real time" effect so you don't actually see the change to the waveform, just hear it. I made a processed copy just for the sake of this post.

Hope this helps!

Bob
 
If you like most musicians, getting great-sounding drum recordings seems like one of the world's great mysteries. You can hear big, fat drums on great albums, but when you try to record your drums, they always end up sounding more like cardboard boxes than drums.
 
One last question, which one should be applied to the vocal track first: Normalization or Compression? What's your opinion?

Thanks again for your comprehensive help. :)

~Sanjoy
 
Generally compression...and if you get the output gain setting right when compressing you likely won't need to normalise at all.

Just to be clear, they do two different things. Normalising just changes the level of the highest peak on the entire file to the level you've preset but doesn't change the relative levels. If you have a single high peak in a 60 minute file, the rest of the file is kept lower by that one peak.

Compression changes the whole dynamic range by limiting the peaks and allowing you to raise all the other levels around it.
 
This always helped me early on when trying to grasp compression.

"The key to understanding compressors is always to think in terms of increasing and decreasing level changes in dB about the set-point. A compressor makes audio increases and decreases smaller."

;)
 
Hi Bob, here is a "remix" of the song I have done following the tips you have given me. Please listen to it and give me your valuable comments / suggestions.

~Sanjoy
 

Attachments

  • Crazy-New.mp3
    6 MB · Views: 3
Well, if I'm honest I still find the delay/reverb effect to be quite unpleasant. If that's the effect you're after, fine--but it's not to my taste. At times, it's dramatic enough to almost sound like you have a stutter. It certainly stops your voice from melding nicely with the backing track.

The other thing I notice is that the dynamics processing has brought up quite a few lip clicks and breath pops--it would be a simple matter to use envelopes to fade them out--and the mix would be improved without them.
 
Dear Bob, thanks a lot for your comments. I am going to record another number very soon, and this time I'll try to follow your guidelines more stringently, and then I'll post that mix for a further review.

Regards,
Sanjoy
 
Back
Top