Patchbay Width Question...

Should the Patchbay be setup side by side, or one on top of the other?

  • Side by Side

    Votes: 1 11.1%
  • On On Top of the Other.

    Votes: 8 88.9%

  • Total voters
    9
  • Poll closed .

sr71rules

Member
I've just committed to buying a modest 32 channel console (Tascam M-3500) for my studio, an upgrade from a 16 channel board. In my efforts to take a 'pro' approach to setting up my studio I have 6 or so 48 point, 1/4" patchbays. (As you may know, a 48 point patchbay means you have two rows of 24 points (places to plug gear it), one on top of the other in a 1U rack space.) I'm quite happy with 1/4" patchbays instead of the higher end tt patchbays but it does leave me in a bit of a quandary.

With 32 inputs, 32 tapes returns, 32 inserts and 32 Direct Outs to wire (among many... many other items), should I do two patchbays side by side to keep things neat and clear with all like items in one row, or do a single column of patchbays with like items being forced down into the next patch bay? (ie: One patch bay would handle, for instance, Lines 1-24 and the second would handle 25-32, should I put that second bay to the right of the first, or below it.)

I'm inclined to setup the patchbays side by side, but the resulting 40" wide patch field may seem to visually heavy. I know it's a personal preference thing but I'm still curious about what others would do. Mentally, keeping like items in a long row would be easier to keep straight for me.

(As a side note, I'm moving my studio to a new location and am going to be undertaking a substantial construction project to enclose and build a new space, so needing to make physical modifications to accommodate the patchbays isn't an issue... so long as I make the choice now. :D )

Any input is welcome!
 
Good luck with the M-3500...I've had mine for 20 years now, and (knock on wood) it's never failed me.

AFA the PBs...I originally started out using 1/4"...and as my studio grew, I realized it would take way too many to cover all my I/O points...so I bit the bullet and switched over to the TT/Bantam PBs.
Mine are single column...on the right side of my 3500.
(you can see my setup in my studio pics.)

That said...how you lay out your PBs is really a personal choice, though of course, a certain amount of logic should dictate the basic order of things....though I agree that side-by-side PBs is going to look rather weird.

You might consider breaking up your 3500 I/O layout nto blocks of 16 rather than 32...and then use the additional 8 on each PB for other things. That way you can go one column and still not end up with strange overlaps.
I never bothered wiring in the direct outs…as I figured I would simply patch right to my tape deck or DAW interface (they are also on my PBs) if I didn’t want the signal going through the mixer.
I don’t really use the preamps of the 3500, as I have several outboard pres…so the direct outs are of no particular use to me…but it’s easy enough to tap into them if I ever need them.
 
Used patchbays may make this all more palatable.

I'm come across Mr. Patchbay who seems to sell used patchbays at prices I should be able to afford.

Doing it properly now will be best in the long run...
 
I wish I had his contact info...but there was a guy I found on eBay (several years ago) who had older, but brand new 96-point ADC TT PBs, and was selling them real cheap. I don't think I paid more than $100 each for them.
I bought one to see what it was like...then bought a few more.

Mine required soldering the cables to the PB points...which took time, but not a terrible way to go.
The ADC PBs will probably last me forever. I find a lot of the cheaper, 1/4" PBs just crap out very fast...especially the ones using the plastic/nylon jacks with just thin, weak little contact clips inside them.
The ADC stuff is all metal and made with thick, brass contact clips...good for thousands of insertions.

Yeah...check eBay...sometimes you find guys who had big studio dreams and then decided to move on...so their gear is in like-new shape, and often priced to sell. Especially in the next month or so...you will find LOTS of good deals as people try to put some cash together for their holiday needs by unloading gear they don't want/use anymore.
 
I was lucky and my M-3500 came with a diy patchbay attached. The custom "stand" was designed to house 2 boards but the original owner decided to just fit a patchbay instead of the second board. It houses 9 asymmetric and 4 symmetric modules, the function remote for the ATR-60/16 and a Behringer headphone amp. You gotta be careful with heavy cabling to the bottom/backside jacks. They might disconnect if not properly strain-relieved.

tascam34b:tascam34b-m3500.jpg


I agree with you on "doing it properly" though.

Cheers
Tim
 
Your setup looks great Tim. I've been reading your posts and website about your M-3500 refurb process and it's the first thing I plan to do with mine. I'm going to check every connection, button, knob and fader to make sure it's in tip top shape and then attempt to make mine look half as good as yours does. :D Your process, descriptions and pictures have been a wonderful resource for me.
 
side by side mounting will require longer patch cables to reach across the two sections of 19" rack rails. now you potentially need 40" or longer patch cords. that could be detrimental in itself. i use 4 1/4" patch bays for my 32 channel setup - they are mounted vertically - and my patch cords are standard length.
 
I just recently re-did my patch bays (for the 4th time...sigh)

Initially I had them evenly placed on each side of the mixer/monitor/keyboard area.

A few (those i deemed as most used) were placed facing up through the desk (and an angle) and those I didn't use as much mounted horizontally down the front...

There was a massive rats nest of cables underneath... and I'd still left things out of the patchbays that I didn't think I'd need/use often :rolleyes: as it turned out, those closest tot he floors got used the least... and even those near the top of the rack (just below the desktop) saw some use... but overtime, I reached for what was easiest to get to. And despite my seemingly well thought out location of patchbays and gears I still found myself needing longer cables to patch something on the left side to something on the right.
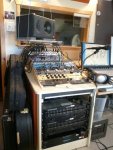
and 'going in" to the rats nests of cables to make a change was an ordeal.

So this go around I have literally put EVERYTHING that is rear jacked into patchbays. This included all 48 XLR's fromt studio (don't ask why i have so many... seemed like a good idea at the time), as well as all XLR I/O (40 total) as well as 2 48 balanced TRS patch bays (I have 2 unused plugs....)- and while I could have added another TRS patchbay and normalized some thinsg- I opted to have everything 'manual'

and if I should need to add another... which I sure as hell hope isn't for quite some time... there is some room which can be 'made available', although my hope is that replacing/upgrading existing gear will be more the objective over adding more pieces of gear.

I still need to make some shorter patch cables (especially the XLR's to get rid of some of the slack)

On the opposite side of the keyboard/mixer/monitors (which you can't see in the picture) is my TSR8

so my reason for posting a reply- REALLY put some thought in how you work, typical workflow for you, and what the most bizarre/odd/unusual signal chain you can conjure up that you might one day use

Good luck!
 

Attachments

  • patchbay.jpg
    patchbay.jpg
    56.9 KB · Views: 114
Back
Top