HR design and build thread part III - The build.

maybe put that lower cut back a bit to mirror the angle of the bridge p'up.
I'd want a volume for each p'up ..... personally I'm indifferent as to tone controls ..... I rarely use them ..... I'm also indifferent to control location as long as they aren't too close to the strings where I might hit it while playing.

I had the lower cut back as you describe an I think for this body thats the way to go. I'm fighting with an old accepted principle that the "nicks" or centre of the f hole should line up with the string length. Thats just some thing I grew up with. It's not cast in stone but it's always my starting point. I think you are right though... I'm going to make a final decision in the morning....

I like as little as possible on the body as far as tone and volume goes. I generally max them out and use the amp and a pickup switch to get the tone I want but thats just me... We do need to choose an option though.
 
I like as little as possible on the body as far as tone and volume goes. I generally max them out and use the amp and a pickup switch to get the tone I want but thats just me... We do need to choose an option though.
me too ..... I very rarely use the volume controls, mostly leaving them wide open and I never use tones actually ..... that's why I didn't even have any on my Stinnett.
But I know some people like tone controls so probably need one or two.
I'm not sure about the master volume ...... I don't really see the point and I'd personally find it to be just another control in the signal path that i'd leave wide open and never use.
 
My guitar is almost never dimed. I don't really use pedals. I set my amp a little past early breakup and control everything from my guitar. I set the pickup levels to suit what I'm doing in the song and don't touch them while playing. The masters are for adjusting during performance.
 
I made the cuts a little smaller than the original drawing to leave enough room for whatever configuration to vol/tone we choose. Also they just looked to big to my eye and they can be enlarged if needed.

I really want to decide on the controls today so I can glue up the top and fingerboard and crack on.

lightningfhole.jpg
 
Looking Good! The holes really compliment the body shape. I like the detail on the fingerboard end, but I think it would look better if it cut back at more of an angle. It seems somewhat random the way it is, plus I like the look of a bit of the frets being cut away on the bass side of the board.
 

Attachments

  • bolthole.jpg
    bolthole.jpg
    160.2 KB · Views: 54
That looks excellent though I rather liked the size in your mock up - more of a statement.
 
I meant to say that the cuts are not finished yet. They have to have the points added. When you cut off a router with an outside pattern jig it leaves rounded ends where the lines meet. That will add about half an inch to the length on these and sharpen them up.

I may increase the size a little though just to make it easier to get the tone pots in there.. I'll look at it later today.
 
Looking Good! The holes really compliment the body shape. I like the detail on the fingerboard end, but I think it would look better if it cut back at more of an angle. It seems somewhat random the way it is, plus I like the look of a bit of the frets being cut away on the bass side of the board.

That's possible. I like to avoid having frets that are less than half the width of the board. They can be a PITA down the line..
 
Larger cuts for the f holes....

lightningfinished.jpg

Next, what about the tone/volume controls and also what would you'all like this to have for binding?
 
Apart from Milnoque who wanted iveroid binding which I hate...:o 
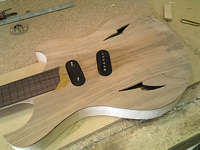
no preferance has been offered so I'm going with a simple three line purfling of ebony and boxwood with some figured maple binding strips I have left over from a recent build. I want to get this done as it's taking up one of my bench tops at the moment and I have a lot of work coming in soon so...

The maple should contrast well with the top and also with the body which will be a solid colour.

First cut the binding channel.

binding channel.jpg

Normally I would install the purfling and binding in one go but figured maple is a PITA to bend at 2mm thick and also tends to snap if you go too quick. These days I put the purfling in first and then carefully glue up the figured binding.

binding2.jpg

The purfling is in and so next bend the maple on an heated side bender.

binding ready3.jpg

The binding is then glued up, cleaned up and flushed to the body..

bindingdone2.jpg

Fingerboard on next and frets n. After that it's back onto the pickups and finishing..
 
awesome ....... the reason i didn't jump in on the binding is that the only one that cropped up in my head was that black and white 'checkerboard' binding Rickenbacker used to use. I figured you wouldn't want to fool with that much work so I kept quiet

:)
 
awesome ....... the reason i didn't jump in on the binding is that the only one that cropped up in my head was that black and white 'checkerboard' binding Rickenbacker used to use. I figured you wouldn't want to fool with that much work so I kept quiet

:)

To me that belongs on an acoustic along with herringbone.

It's actually a lot easier than it looks. You can make up enough for a whole bunch of guitars in no time. When this goes into production I'll get back to you...;)
 
My vocab is expanding at a rapid rate (expodentially?) and I check this thread a couple of times a day even if I don't comment that often.
Great stuff so far.
 
Last edited:
Back
Top