APEX 205 Ribbon tension/mods (question)

evm1024

New member
Hi All,

I should be getting a pair of APEX 205 ribbons for Christmas. With that in mind I have some Lundhal transformers coming in the mail and plan on doing the well documented transformer upgrade as well as the pull the wind screens off mod which is also well documented.

However, ribbon re-tensioning is not so well documented. I don't expect to need to retension the ribbons but I may need to. And I may replace the ribbons at some time in the future.

There is some documentation of the procedure to deal with the ribbon without tearing.

The question is how to set the ribbon tension correctly and what tension to set this specific ribbon to.

From my reading it appears that the tension sets the resonate frequency of the ribbon and that a specific freq will tell you that the ribbon is set right.

I'm speculating that one could play some pink noise and then look at a FFT of the output of the mic to see the resonance peak. Is this the way high level mic modders do it? Is there another way?

Regards, Ethan
 
The right way, I think, is to use a strobe light at the correct frequency. Tap the element slightly and if the ribbon appears to almost stand still, you're pretty close to the right tension.

The hack way is to tap the element and see whether you've got a spike in the right FFT bin. Should work, I'd think.

Either way, it's probably easier to find the resonant frequency of the foil in the absence of outside sound sources. Trying to do it with white noise or pink noise, I'd think you would run the risk of getting massively wrong values due to variations in speaker amplitude at particular frequencies, particularly when you're talking about frequencies (30-40 Hz) that require ported cabinets to reproduce at any decent level....
 
Using a strobe to probe the resonate freq would be more precise than the typical FFT package. Thanks for the info. Anyone do this?

--Ethan
 
Sant was kind

Santa was kind to me and did indeed give me 2 Apex 205 ribbons. The serial numbers were within 40 or so from each other but the build quality was different.

The first had a good build with the ribbon tight (too tight?) and the wires dressed nicely. The second has a sagging ribbon and the wires were longer and not so well dressed as the first one. Also one of the magnets is offset. I'll see abouut repositioning the magnet when (and if) I ever replace the ribbon.

I went ahead and re-tensioned the sagging ribbon using the eyeball method. Which is to say take out the sag until there is about 1/2mm sag and test by taping the yoke. You shold just see the ribbon flutter at the edge of persistance.

I am quite interested in finding the ribbons resonance using spectrum analyzer software. The Apex 205 should resonate at around 20 Hz. (all this from Michael Joly's posts, credit due to him. Errors are mine, all mine!).

I've not done any before/after testing.Just thought to take the nets wisdom and use the modded mic as the baseline.

Mods done:

- remove inner liner of basket mesh
- remove front and back silk screed mesh
- moved motor to center of mounting frame (adjusted the number of nuts and washers.)
- re-tensioned the sagging ribbon
- installed Lundahl LL2913 transformers with PCB
- installed foam on sides of frame (OK it is foam centered double stick tape)
- installed foam in lower mic body (around transformer and so on)


Regards, Ethan
 

Attachments

  • sag.jpg
    sag.jpg
    69.2 KB · Views: 332
  • reset.jpg
    reset.jpg
    67.6 KB · Views: 324
Wind screen

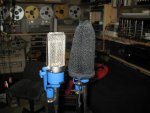
Oh, one more thing came to mind. I wanted a wind shield for these mics with there more exposed ribbons. A plastic bag wold work nicely but I came across a mesh bag that I hope will work great.

The Azio External 2.5" hard drive enclosure (ENC211S31) comes with a nice mesh carrying bag. I needed a few of these and kept the bag for the mics.

Here is what it looks like:
 
I went ahead and re-tensioned the sagging ribbon using the eyeball method. Which is to say take out the sag until there is about 1/2mm sag and test by taping the yoke. You shold just see the ribbon flutter at the edge of persistance.

Could you provide a bit more detail on how you went about re-tentioning the ribbon without tearing it? I've moded the mic but skiped this part because the ribbon was not too bad and I did't want to damage it.
 
Took some digging

There was a writeup that described how to seet the tension. It took a bit of searching to find it.... So let me paraphrase (errors are mine)

The suggested tension for a 205 (long ribbon) should resonate at about 20 Hz. Ribbon tension can be set visually by adjusting the tension between excessive sag and too tight. Sag should be less than or equal to 0.5 mm - this limits the too loose side. Tap the mic and observe the ribbon. If you cannot see the ribbon vibrate it is too tight. Yo should have it loose enough so that when tapped you just see the motion (tap the mic not the ribbon just to be clear)

There is a suggestion to prestretch the ribbon. Suggest you do a search on that if interested.

How to set the ribbon....

I used some craftsman long metric sockets to loosen the nuts that hold the ribbon locking bar in place. I thought that using the socket gave me more control and less risk of a small wrench going wild.

I selected the locking bar to loosen based on what the free end of the ribbon looked like. This is what I would need to tug on. In my case I saw that the end of the ribbon had been folded which made pushing and pulling on it less worrysome.

I found the ribbon to be less fragile than expected....

Once the ribbon bar was loosened I turned the mic over so the bar would fall down and be caught by the nuts (no need to take them off). This allowed me to use a bamboo rod (I use Sish-ka-bob skewers) that was sanded to a flat (screwdriver like) tip to poke gently at the ribbon to free it from the lower mounting block. My ribbons came free without problems.

Eventually I used a bit of thin magnet wire (26 guage?) that was formed into a line with a small triangle on it (kinda like a fish hook on the end of a line but a triangle instead of the hook) The flat of the triangle was sized to grasp the fold that came in the foil. I taped the line to the mic body and adjusted it so as to pull the ribbon to the tension I wanted. All very gently. Being taped It ended up held in place and gave me two hands to tighten the nuts.

Others have used matchsticks and even stainless tweezers to grab the ribbon.

I'm not sure of the thickness of the stock ribbon. I expect to (someday) replace it with 1.8 micron stock....

Hope this helps - have fun, be careful.

Regards, Ethan
 
Helpful tip from somebody who has actually torn a ribbon: when ribbons tear, it's usually because it sticks to the top (removable) block, which you then remove. Do not under any circumstances unscrew either screws fully until you have knocked the ribbon completely loose from the upper block. :)

P.S. Is there any way the mods could hack vBulletin to add a little Javascript to fix these annoying wide images? :D

<script language="JavaScript" type="text/javascript"><!--

function capwidth()
{
// alert("test");
var images = document.getElementsByTagName("img");
for (var i=0; i< images.length; i++) {
var img = images;
// alert('img');
if (img.complete) {
capImgWidth(img);
} else {
img.addEventListener("load", capImgWidthHandler, true);
}
}
}

function capImgWidthHandler(evt)
{
capImgWidth(evt.target);
}

function capImgWidth(elt)
{
if (elt.offsetWidth > 800) {
alert("wide");
var newHeight = (elt.offsetHeight * 800) / elt.offsetWidth;
elt.width = 800;
elt.height = newHeight;
}
}

// document.addEventListener("load", capwidth, false);
document.addEventListener("DOMContentLoaded", capwidth, false); // If you want IE to work, you may have to add this to the onload handler for the page...

// --></script>
 
Last edited:
$8 Blumlein bar for the ribbons

I more or less finished up the ribbon mods. perhaps a new set of ribbons when I get some foil that I like. But now to use them. The primary use is for Pipe Organs with plenty of Classical on location recording.

I needed a Blumlein Bar to mount the mics to. Blumlein or MS.

A tril to my local hardware store yielded a 36" aluminum bar that I cut in half and drilled some holes in. The cost of the bar stock and a few stainless screws was about $8.

Here is the results. Mounted on a typical stage stand I can get the pair up about 9'. Might like to be higher in a large church. (plus use sandbags on the stand base just to keep it from being knocked over.)

--Ethan
 

Attachments

  • blumlein-bar.jpg
    blumlein-bar.jpg
    64.6 KB · Views: 272
Back
Top