My desk design...thoughts?

Myriad_Rocker

New member
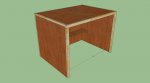
This is just the middle section that will hold my control surface and monitor. I'm also going to put in a keyboard tray but I didn't draw that because, frankly, it's enough of a pain in the arse to do this stuff.

There will be two flanking rack cases, which I will build like the link below, but as single racks instead of doubles.
https://homerecording.com/bbs/general-discussions/studio-building-display/diy-argosy-style-rack-162305/

So, my main question for those of you with woodworking experience: Is this design sound? I'm joining the 4 main pieces with 1x1. The front is trimmed with 1x1.5. Then there is a bracing/footrest piece under the desk.

I may keep these dimensions and totally chunk the design, though. Chunk it in favor of a design that's more like the rack cases linked above. In fact, the more I think as I type this...that's the way I'm leaning.
 

Attachments

  • Middle Desk.jpg
    Middle Desk.jpg
    51.6 KB · Views: 269
Last edited:
I'm tossing around the idea of building a desk. I'm currently using a folding table and it isn't exactly the right height.

I think the only dimension missing is the most critical and that would be height. From floor to keyboard should be 29" or something close.

Cool, please keep this updated, I want to follow along and see how it comes out.

It's roughly 31" to the top surface of the desk. I measured my other two desks that I have in the house and they were both about 31".

We'll see where I come out...I'm putting together my table saw today and hopefully I'll be slinging wood here pretty soon. However, my first objective is to build out all my treatment. Maybe I'll make a My Studio Build thread. I enjoy those. Although I don't know if anyone would enjoy mine...might be on the boring side.
 
It depends on what will be on top of the desk and how you like to work, how tall you are and the height of your ears/monitors when you are seated (assuming you prefer to work seated at the mix position). If it all ends up being a bit too high, your arms/shoulders are not going to be comfortable, and you will get a lot more early reflections off the surface from the monitors.

I built my own racks/desk...and my console's table top is only 24" off the ground...with the console on it the surface at the front of the console is at about 27.5" and the back at about 31" (the console slopes up toward the back).
The slightly lower height allows me to see more "down" at the controls of the console rather than having to always "hover" over the surface.
Of course...the overall depth also comes into play. If your desk is 4 feet deep it's not going to be as comfortable up higher as it might be if it's only 2 feet deep.

Just consider all the angles, monitor placement and ergonomics before you build. :)
 
I built my own racks/desk...and my console's table top is only 24" off the ground...with the console on it the surface at the front of the console is at about 27.5" and the back at about 31" (the console slopes up toward the back).
The slightly lower height allows me to see more "down" at the controls of the console rather than having to always "hover" over the surface.
Great point here. That's a huge helpful bit of information and something I didn't entirely consider. My habit, as it always has been, is to "ride the floor" in my chair. That is, I lower it all the way...always. So for that to keep happening, I should really consider the height of my control surface so I'm not always trying to see over knobs and such.
 
On a side note...got my new table saw set up! Got a killer deal on this saw. I know Craftsman isn't what it used to be but this particular saw has gotten pretty good reviews and I got it on sale + a percentage off (don't remember exactly what percent), putting it in the low 400's total. I slapped a Freud blade on it after it got assembled and it cuts like a hot knife through butter!! :D
 

Attachments

  • DSCN0446_edit.jpg
    DSCN0446_edit.jpg
    62.8 KB · Views: 236
Some guys like to stand up muost of the time...so they would probably prefer a taller mix postion. You have to examine your own work habits and build to suit. I hate when a desk is too high and you HAVE TO stand up to reach for and look at your gear.

Besides the height of your work surface..keep an eye on where you monitors are going to end up and their horizontal and vertical position relative to your ears and to the floor/ceiling. You want to have everything end up in the "sweet spot" if possible.
 
Hey Myraid, heres a few ideas to tryout your new tools! Just kidding. But seriously, if you can envision it, you can build it. However, the formost thing is your monitoring geometry. Personally, I think you need to layout your monitor geometry in your room first. This will tell you various things. Like where your speakers have to be in relationship to your desk. Although its not written in stone, a 60 degree equilateral triangle is the norm, and a starting point of 38% of the room length from the front wall will allow you to start laying out your desk. Many other things need to be addressed as well, like are you using free standing monitors or near fields on your desk, how many rackmounts do you plan on, any midi controllers, or other gear on the desk top too.

BTW, I'm not a fan of "boxy" console designs. I like things open and very flexible to modifications later. One idea for console tops is a simple hollow core door with a subtop under it for fastening from below. And if you do build a box, keep the back open for easy cable manipulation.


Anyway, just a few ideas to think about. There are thousands of ways to build a console. But the important thing is it works for you. Nothing is worse than sitting down after you've built it and find out you forgot to leave room for a piece of gear, or the monitors are in the wrong place, or any number of other things. That's why I lay out EVERYTHING in Sketchup first.:D

is.php

is.php

is.php

is.php

is.php


Oh btw, those legs in the second picture would be a good project for that new router bit I told you about in your other thread!:D
 
fitZ, thanks a lot! I like your drawings here.

are you using free standing monitors or near fields on your desk
I'll be using free standing monitors on stands. One is a pair of Event ASP8's, which I'm thinking of upgrading. The others are the stereotypical Yamaha NS-10's. I should probably buy my chair and build my monitor stands first, huh?

how many rackmounts do you plan on, any midi controllers, or other gear on the desk top too.
Two free standing rackmounts, each one flanking the desk. I'll have a Mackie control surface with two extensions on the desktop. I'll also have an LCD along with a wall mounted LCD on an extending swing arm.

BTW, I'm not a fan of "boxy" console designs. I like things open and very flexible to modifications later. One idea for console tops is a simple hollow core door with a subtop under it for fastening from below. And if you do build a box, keep the back open for easy cable manipulation.
I went with the "boxy" design initially because I hate seeing cables. I like a very clean look. But, with some cable management on the back of the one you posted, I can still make it clean.

Oh btw, those legs in the second picture would be a good project for that new router bit I told you about in your other thread!:D
I've got to ask here...how? Can I cut out the entire leg with the router? I expected I would have to use a bandsaw or jigsaw for something like that after I got it rough cut or something.
 
I've got to ask here...how? Can I cut out the entire leg with the router?
Yes. The key word though is TEMPLATE. You need to make a perfect one first as a template. Now, most pros would simply trace 4 pieces on a sheet of sheetgoods, such as MDF, or better yet, Marine grade ply, leaving enough room between each for the router bit path, fasten the template to one outline, and then simply route it using the bit I showed you. Mind you, it is far easier to have the template screwed on top of the sheetgood, and using the TOP bearing to ride along the edge of the template. Thats the point of a DOUBLE BEARING. You can cut or trim with a template either on top or bottom. I use both depending on the circumstances. In this case, it works better from the top as you can SEE the template and guide your router accordingly. The trick is a POWERFUL router..such as the Bosch 3 1/4HP model.
Unfortunately, those are rather expensive, so to workaround that, it is really easier to route if you cut out each part about 1/4" larger than the outline, then fasten the template and TRIM route. That way you can use a 1 1/2HP router such as the Porter Cable I showed you. However, ALWAYS use router bits with a 1/2" shank for routing 3/4 material, and ALWAYS move the router in the direction of the cut. I'll show you in a little while how to do this.

And btw, I mention Marine grade ply, as this material has 11 layers with NO voids. Plus you can finish the edge with clear finish or Paint. Also, it is much stronger than MDF. Even Home Depot carries a similar Ply in 4x8 sheets, as the Marine grade comes in 5'x5' sheets only, and it is expensive. I used it to make my bedroom furniture. Looks great. It's actually called Baltic birch. Most cabinet shops use it for drawer sides, which is the 1/2" thick version. The legs require the 3/4" material, doubled up to make a 1 1/2" thick leg. You would need to either glue and clamp two pieces togeather, and dress the edges with a sander or screw them together from the inside face. Also, after you have them together, personally, I would then "bevel" the edges with a 45 degree bevel bit. About a 1/8"-1/4" bevel. Makes a nice pro looking edge.

Anyway, I'm outta time. Gotta go. I'll be back with more tips and tricks.:D
 
You're full of info, fitZ.
Well, that's better than full of "you know what".:D

Ok, that router looks good too. Never used one, but they make good tools too. Earlier I mentioned the "Bosch" 3 1/4HP. I goofed.:p I meant a Freud. Hitachi makes a good router as well.
Ummm, I think we need to make an "off subject thread"...someone might get the wrong idea here.;)
 
Love the ideas here. Great idea to mount the foam panels to peg board then hanging the whole thing like a big picture.

I checked those argosy cabinets, lot of money for something with a laminate finish. I'd guess that's a nice way of saying vinyl, or mac-tac.
 
Back
Top