You are using an out of date browser. It may not display this or other websites correctly.
You should upgrade or use an alternative browser.
You should upgrade or use an alternative browser.
Console Desk Design
- Thread starter technominds
- Start date
technominds
New member
wow, no replies :|
technominds said:Tell me what you think of this design i have done for a console to keep my equipement in order, its a first design... not accurate at all.. but tell me what you like/dislike about it..
Honestly, the drawing itself.

Your perspective is off.
technominds
New member
Yea, but it was all freehand... just to get the idea... do you think the bridge would work and be sturdy?
Nick The Man
New member
from the looks of the picture that is gonna be a huuuggggeee desk really long
Nick The Man
New member
...........two boards for thecno
Nick The Man
New member
ohh im not to sure that the bridge would be very study your gonna need some more support for that ....it looks like its like 5 feet long with legs only on the ends put some towards the middle some where too
RICK FITZPATRICK
New member
That depends on material, span, weight, connections etc.do you think the bridge would work and be sturdy?
Thats why, as a CAD detailer, over the years I have found that design without actual construction in mind is useless. For instance, what materials are you using to span the rackmounts. Same with the monitor bridge. And the rackmounts themself are simply lines. Most materials to fabricate fixture work with have thickness. Even sheetmetal needs an edge formed to keep it straight.
Mine is 9 feet long, supported by angled Stainless Steel tubing legs with NO feet. They die into the floor as cable chases, and the support frame had to have a clear span of 104". No way would MDF or Ply span 36" let alone 104" without deflection. So I had to build mine of welded steel rectangular tubing of various dimensions. But then you REALLY have to plan for structural members, assembly of components, types of fasteners, etc etc. Mine took 3 months to fabricate. Over 150 drilled and tapped holes for various connections and fasteners and hardware, such as threaded inserts, bolts, screws, hinges, brackets, rails, wood endcaps, linear roller bearing tracks and carriages etc.
I would suggest you start drawing some construction sections of the unit to really see if your design flys. Not to mention dimensioning the equipment itself so you KNOW its going to work. Looks nice, but design sketchs can fool you. When you REALLY try to build it on paper is when the REAL design becomes apparent. Thats not to be negative. Only truth. Once you come to grips with
exactly what you have to use, and do to build it, you face the reality check point. Believe me. Here is a section and a detail of mine to illustrate my point. I have pics, but I'll post those on my own thread soon. I'm almost finished with the latest modification. Which is why I like DIY, cause you can change things if you plan for modifications.
Of course, this is only my perspective because of how I wanted my console to be. Good luck.
fitZ
Attachments
RICK FITZPATRICK
New member
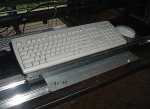
Oh well, here is a pic of the linear motion track and carriage. This pic has the wrist pad removed. The keyboard "floats" over my mixer, and can be moved out of the way. There are two of these carriages, one for keyboard/mouse and one for clipboards, ashtray, pencil,lights, etc etc. All the cantilevered decks are adjustable and removable. My whole console is built for flexibility and modification. Its my "toy" Mostly, my setup is geared for a hybrid of analog and digital. There are both a digital and analog mixers and tons of other things like two aircooled/soundproof computer bays below, patchpays, adjustable audio monitors brackets, and TONS of other things. Even the "hood" opens for servicing the cables etc. Anyway, thought this might give you some ideas
fitZ
Mostly, my setup is geared for a hybrid of analog and digital. There are both a digital and analog mixers and tons of other things like two aircooled/soundproof computer bays below, patchpays, adjustable audio monitors brackets, and TONS of other things. Even the "hood" opens for servicing the cables etc. Anyway, thought this might give you some ideasfitZ
Attachments
technominds
New member
wow, so it kinda slides around... that is brilliant.... would seem very difficult to do.... i basically want something to keep everything in the same place and for it to look good... i was thinking to add supports in the middle.... the desk will only be about 7ft long... i might have to go for a sliding tray (although i hate them).
ps: people STILL cant understand that its a design sketch, NOT an accurate drawing!!!
ps: people STILL cant understand that its a design sketch, NOT an accurate drawing!!!
technominds
New member
Also, materials available to me are minimal... whole thing probably made of wood...
technominds said:Also, materials available to me are minimal... whole thing probably made of wood...
MDF? Particleboard? Plywood?
What thickness? 16mm? 19mm? 1"?
How will you construct it? Cams+dowels? Biscuit joints?
All these questions need to be answered so someone can tell you if the thing will actually stand up and not fall apart.
technominds
New member
Ok, im not experienced in that kind of thing... im only 17 and havent had a great past of woodwork.... but i think it shouldnt be a problem to make as i am good with my hands in general.... what would you recommend as wood-type/size?
RICK FITZPATRICK
New member
Before we can help you, it would help if you actually went out and looked at materials that are available. Generally, if there is a Home Depot, Lowes, or those type of places there are many materials that they carry. Other than that, a lumber yard may have a variety or even a cabinet shop.
To give you a few clues to designing the unit, think in terms of MODULES or sub assemblies. Such as:
Rack mount boxes
Main support frame(metal, solid wood or boxed beam
Equipment Decks(panels or cheap solid door will work too)
End Caps.
Bridge support(personally I would use angle iron for the span)Bridge Deck
Backs
Legs, feet, or bases for the rackmount boxes.
And generally speaking, if you use sheet goods you will be using cabinet type joinery. Here are a few tips.
Cabinet work is only as good as your squareness of cuts. If you have no table saw, I would suggest laying all the parts out as a cutting bill and have a cabinet shop cut the parts. This will assure proper fit and ease of assembly. Remember, one panel out of square will make not only assembly difficult, but will affect openings, levelness, connections etc.
Panel or sheet goods require not only squareness of the panel, but perfect 90 degree cuts perpendicular to the face. Rabit joints facilitate assembly. Pre-drilling pilot holes and countersinking for screw heads also make for ease of assembly. If you have access to a router and a few carbide cutters, this will help emencily, but its not impossible to build things without them. If you don't have a router, maybe the cabinet shop can do the few rabits that will facilitate the assembly process.
Rabits and dados allow for alignment of parts, although butt joints in panels can work too, but plan for shear(breakout in MDF). I'll draw a few things to illustrate for you. Buiscut assembly is good too, although takes a special tool and or a router with a spline cutter. Even metal angle brackets will work too.
There are a million ways to join things together, but KISS strategies work best. KISS= Keep it simple stupid!!(not callin you stupid-its a standard design philosophy, although I tend to ignor it for my stuff. 
Do NOT nail anything. Use screws and hardware to fasten things together. I generally stock "grabbers" which are like drywall screws. You can buy them in bulk at most hardware stores. Generally, you will need 4 lengths. 1", 1 1/4",
1 5/8" and 2" , but for fastening bulkyer things its handy to have 2 1/2" and 3" on hand. They usually sell for about $3 lb. Also, a good quality glue such as Tightbond should be used.
As far as materials, there are a few that are normally used. MDF, or Medium Density Fiberboard is the most used material as it is strong but heavy,
but because it is absolutely flat, it is the material of choice now days for general cabinetry and fixture work. Then there is Melamine, which is MDF with a fused layer of a thin laminate which is durable, water resistant, scratch resistant, and is easy to cut and machine joints. Melamine comes in various finishes such as woodgrains, white, black and sometimes grey. But usually is stocked at HomeDepot type places in white and woodgrain. Also comes in 1/4", 1/2" and 3/4". Sometimes you can find it with a real hardwood veneer if you are lucky. Such as Oak, cherry, Ash, or others, but is generally more expensive. One of the plus's of MDF is its paintablity. Thats what it was designed for. But a good grade of primer is required before a finish coat is applied. Even exposed edges paint well if primed, Some places will even POWDER COAT it for you but it's damed expensive. Paint is just as good. Even latex, although I always spray lacquer on MDF. Veneers will require a finish coat as well, and exposed edges usually will have to be edgebanded with a layer of solid wood or taped with rolled solid wood edgebanding. This comes in small rolls with a pre applied hot glue which you, cut to length and then IRON on the edges with a regular household iron. But since it is 1/16" wider than the thickness of a panel, you then have to either file the edges, or cut them with a utility knife, or use a special beveled trimmer that cuts both edges off at once. It's about $10, but worth every penny.
Generaly, I use black melamine for my projects with a black melamine edgebanding or Black laminate edgebanding. One aspect of using MDF, is screwing into the edge can split the panel. Therefore, not only must you drill an oversize hole through the panel you are fastening, you also must drill an UNDERSIZE hole in the edge for the screwthreads to grab with out spliting the panel. I usually use a special TAPERED drillbit with countersink built in. Works great. Plus it does everything at once. You must clamp the panels together to keep everything aligned. And thats another animal. CLAMPS. Never enough in a shop.
Then you have plywoods. Although ply is good, unless you purchase a cabinet grade ply, it will have VOIDS on the inner layers. And it will REFUSE to lay flat, untill adjacent perpendicular panels are fastened to keep it straight.
There is the standard old AB grade Fir ply, but I personally would NOT use it.
If anything, use cabinet grade BIRCH PLY. Paints well, machines good, cuts clean, and drills smoothly and is relatively cheap The best cabinet ply is called Armorcore, which has two layers of 1/8" thick MDF, and is right below the veneer surface. This keeps it absolutely flat, and keeps the veneer flat as well. Other grades veneer is applied to a layer of fir which allows the grain of the fir to telescope through the veneer. All the other aspects of MDF are applied to ply also. Comes in veneers, or even a layer of MDF on the surface.
Doesn't paint smoothly though. Veneers require a clear finish.
And speaking of finishes. Laminates are great, but require tools and experience to apply. Expensive too. Paint, varnish, Ureathanes, and other types of finishes usually come out better on MDF. And then there is speaker box carpet or indor outdoor carpet too. AND, there is a CHEAP automotive carpet that is sold at most carpet places. Looks good and applys easy with spray on or roll on adhesive and staples. Comes in black and grey. Even Home
Depot type places carry some kind of cheap carpet.
Well, I'm out of time and breath Hope this helps. If you need some drawings to explain assembly, cutting, and joinery tips, just holla and I'd be glad to help.
fitZ")
To give you a few clues to designing the unit, think in terms of MODULES or sub assemblies. Such as:
Rack mount boxes
Main support frame(metal, solid wood or boxed beam
Equipment Decks(panels or cheap solid door will work too)
End Caps.
Bridge support(personally I would use angle iron for the span)Bridge Deck
Backs
Legs, feet, or bases for the rackmount boxes.
And generally speaking, if you use sheet goods you will be using cabinet type joinery. Here are a few tips.
Cabinet work is only as good as your squareness of cuts. If you have no table saw, I would suggest laying all the parts out as a cutting bill and have a cabinet shop cut the parts. This will assure proper fit and ease of assembly. Remember, one panel out of square will make not only assembly difficult, but will affect openings, levelness, connections etc.
Panel or sheet goods require not only squareness of the panel, but perfect 90 degree cuts perpendicular to the face. Rabit joints facilitate assembly. Pre-drilling pilot holes and countersinking for screw heads also make for ease of assembly. If you have access to a router and a few carbide cutters, this will help emencily, but its not impossible to build things without them. If you don't have a router, maybe the cabinet shop can do the few rabits that will facilitate the assembly process.
Rabits and dados allow for alignment of parts, although butt joints in panels can work too, but plan for shear(breakout in MDF). I'll draw a few things to illustrate for you. Buiscut assembly is good too, although takes a special tool and or a router with a spline cutter. Even metal angle brackets will work too.
There are a million ways to join things together, but KISS strategies work best. KISS= Keep it simple stupid!!
(not callin you stupid-its a standard design philosophy, although I tend to ignor it for my stuff. Do NOT nail anything. Use screws and hardware to fasten things together. I generally stock "grabbers" which are like drywall screws. You can buy them in bulk at most hardware stores. Generally, you will need 4 lengths. 1", 1 1/4",
1 5/8" and 2" , but for fastening bulkyer things its handy to have 2 1/2" and 3" on hand. They usually sell for about $3 lb. Also, a good quality glue such as Tightbond should be used.
As far as materials, there are a few that are normally used. MDF, or Medium Density Fiberboard is the most used material as it is strong but heavy,
but because it is absolutely flat, it is the material of choice now days for general cabinetry and fixture work. Then there is Melamine, which is MDF with a fused layer of a thin laminate which is durable, water resistant, scratch resistant, and is easy to cut and machine joints. Melamine comes in various finishes such as woodgrains, white, black and sometimes grey. But usually is stocked at HomeDepot type places in white and woodgrain. Also comes in 1/4", 1/2" and 3/4". Sometimes you can find it with a real hardwood veneer if you are lucky. Such as Oak, cherry, Ash, or others, but is generally more expensive. One of the plus's of MDF is its paintablity. Thats what it was designed for. But a good grade of primer is required before a finish coat is applied. Even exposed edges paint well if primed, Some places will even POWDER COAT it for you but it's damed expensive. Paint is just as good. Even latex, although I always spray lacquer on MDF. Veneers will require a finish coat as well, and exposed edges usually will have to be edgebanded with a layer of solid wood or taped with rolled solid wood edgebanding. This comes in small rolls with a pre applied hot glue which you, cut to length and then IRON on the edges with a regular household iron. But since it is 1/16" wider than the thickness of a panel, you then have to either file the edges, or cut them with a utility knife, or use a special beveled trimmer that cuts both edges off at once. It's about $10, but worth every penny.
Generaly, I use black melamine for my projects with a black melamine edgebanding or Black laminate edgebanding. One aspect of using MDF, is screwing into the edge can split the panel. Therefore, not only must you drill an oversize hole through the panel you are fastening, you also must drill an UNDERSIZE hole in the edge for the screwthreads to grab with out spliting the panel. I usually use a special TAPERED drillbit with countersink built in. Works great. Plus it does everything at once. You must clamp the panels together to keep everything aligned. And thats another animal. CLAMPS. Never enough in a shop.
Then you have plywoods. Although ply is good, unless you purchase a cabinet grade ply, it will have VOIDS on the inner layers. And it will REFUSE to lay flat, untill adjacent perpendicular panels are fastened to keep it straight.
There is the standard old AB grade Fir ply, but I personally would NOT use it.
If anything, use cabinet grade BIRCH PLY. Paints well, machines good, cuts clean, and drills smoothly and is relatively cheap The best cabinet ply is called Armorcore, which has two layers of 1/8" thick MDF, and is right below the veneer surface. This keeps it absolutely flat, and keeps the veneer flat as well. Other grades veneer is applied to a layer of fir which allows the grain of the fir to telescope through the veneer. All the other aspects of MDF are applied to ply also. Comes in veneers, or even a layer of MDF on the surface.
Doesn't paint smoothly though. Veneers require a clear finish.
And speaking of finishes. Laminates are great, but require tools and experience to apply. Expensive too. Paint, varnish, Ureathanes, and other types of finishes usually come out better on MDF. And then there is speaker box carpet or indor outdoor carpet too. AND, there is a CHEAP automotive carpet that is sold at most carpet places. Looks good and applys easy with spray on or roll on adhesive and staples. Comes in black and grey. Even Home
Depot type places carry some kind of cheap carpet.
Well, I'm out of time and breath
Hope this helps. If you need some drawings to explain assembly, cutting, and joinery tips, just holla and I'd be glad to help. fitZ
technominds
New member
wow, thanks for that!! ok im now more the wiser to materials i can use... i think i will knock up some renderings and planned prints of the desk. Although i dont think it will be too much of a difficult job, after all it is just a standard desk shape with a bit of curve at the bottom... ive decided im going to add a bit of skirt to the bridge, so it covers the wires at the top of the desk and rests on a metal gap between the inputs of the mixer and the gain, there is a fairly large 4cm gap. this will provide support i need for the bridge and will mean i wont have to make sacrifices by adding other supports.
What do you think?
What do you think?
technominds
New member
bileshake said:That is a sweet rough design, i'd use it myself as an inspiration but I can't afford enough board to justify it.

Hah, thanks man... atleast someone appriciates my graphical view...