deverbing vocals

SAMTheGreat

New member
what are some ways to ? seems like the frequency i find the verb in , is also the frequency that brightens up the vocal , any tips ?
 
Yes maybe and yes. Room treatment is your first priority. Don't take that lightly. It involves more that throwing up some foam. You mix on headphones for now, but you still have the problems of the room itself messing with your recordings.

Take a look at the studio build forum. There is much to learn man.
 
Until you get your studio fully acoustically treated (or if you're in a situation where you can't make permanent alterations) the sE Reflexion filter does and amazingly good job. A very OCD acoustic consultant friend of mind says that the pro version is probably about 80% as good as a fully treated room if you follow the set up instructions carefully.
 
Until you get your studio fully acoustically treated (or if you're in a situation where you can't make permanent alterations) the sE Reflexion filter does and amazingly good job. A very OCD acoustic consultant friend of mind says that the pro version is probably about 80% as good as a fully treated room if you follow the set up instructions carefully.

80%? Wow, I doubt that had anything to do with a condenser mic. Doesn't OCD have more to do with visual cues?

Not trying to take away from your post, but I would surely place $300 into room treatment before purchasing a workaround for the same cost.

That being said, I have never used a SE Reflection Filter, but I do use two hanging panels that do similar, in a treated room. I highly doubt that something directly behind a mic is going to solve the issues of the room it is placed in. Maybe 40%.

And to add, I am quite OCD myself visually. Didn't know there was an audio type....
 
I'm going to disagree with you on this one, Jimmy.

My first choice would be a professionally treated room (and same with the guy I mentioned above). However, if I only had $300 and a book on acoustics (and if I was only doing vocals...a whole band is something different) I'd go with the Reflexion filter. They're that good. Note that I'm talking about the high quality, original brand name model--not one of the numerous cheap imitations.

As for the guy I mentioned, I'll PM you!
 
I made about 20 panels with $300. Not saying the filter isn't good, but $300 is quite a bit of DYI treatment. I'd have trouble foregoing that just for a reflection filter. That's just me, I have no science to back up my theory.
 
Remember that one reflexion filter can only treat one mic. If you spend that money on room treatment and do it right, it should be good for multiple mics throughout the room.
 
Ok so for future reference, never record with reverb. Those reflection filters are a good idea, but quick diy hanging panels should do the job until you have the money to invest in treatment. Try SPL transient designer on the vocals to remove the reverb. There's a knob for attack and one for sustain, bring the sustain down to get ride of that reverb tail. I've been pretty successful with it.
 
Ok so for future reference, never record with reverb. Those reflection filters are a good idea, but quick diy hanging panels should do the job until you have the money to invest in treatment. Try SPL transient designer on the vocals to remove the reverb. There's a knob for attack and one for sustain, bring the sustain down to get ride of that reverb tail. I've been pretty successful with it.
whoa sounds dope , thanks
 
The way they use the sE filter, you really have to tuck that mic deep inside of it, and it does wrap around the mic quite a bit, so it probably takes out most of those early reflections and dries up the vocal....but that doesn't really make it a broad-band trap, and as already mentioned, you need one reflection filter per mic...and those filters are not very usable for anything else but vocals because of the way they wrap around the mic, and make positioning for other stuff difficult.

I got one of the "cheap imitations"... :D ...well, not that cheap, and it's a multi-layer filter (not just foam and metal mesh), but mine is not a wrap-around, and that's why I chose it. It's a smaller type with just a slight curve, that I use mostly to "reflect" stuff coming at the back of the mic (like AC wind noise) and not really as a "treatment"....and I can position it for a lot for other things besides just vocals. You can get a mic in close to guitar cabs and whatnot, and still have the filter behind the mic.

To OP....
If you do other things in the room besides vocals, you are better off treating the room somewhat...and then you can still get a reflection filter for vocals if you want that really dry/dead signal going to the mic. I kinda prefer having some room ambiance, but then, you need to treat the room first.

You can try some of the software tools to remove reverb...but you always end up affecting the stuff you want to keep...so at that point, you are better of just redoing the vocals in the right environment.
 
The way they use the sE filter, you really have to tuck that mic deep inside of it, and it does wrap around the mic quite a bit, so it probably takes out most of those early reflections and dries up the vocal....but that doesn't really make it a broad-band trap, and as already mentioned, you need one reflection filter per mic...and those filters are not very usable for anything else but vocals because of the way they wrap around the mic, and make positioning for other stuff difficult.

<snip>

Sorry, but this is completely against the instructions that come with the filter (at least the original sE version). They instruct you to put the mic so the capsule is exactly in line with the two front edges of the filter. Going too far in give you the ugly, boxy quality that all the DIY cardboard box ideas seem to suffer from.

In my first post I should have been clear that I was talking specifically about vocals (in my case, often the spoken word though I've done a lot of lead vocals with it too).

Given a choice, professional room treatment definitely--but not just random soft stuff scattered around. I admit it...I was spoiled when working by having good acoustic consultants do a specific room treatment complete with a variety of panels tuned to their own frequency ranges. Being honest, I prefer the Reflexion filter to the sounds I've heard in a lot of DIY studios (and, another admission) since retiring to Aus I've been in rented property so my treatment options are further limited.

(And if RAMI could build that many panels for $300, it would almost pay me to fly to the US to buy the materials!)
 
Sorry, but this is completely against the instructions that come with the filter (at least the original sE version). They instruct you to put the mic so the capsule is exactly in line with the two front edges of the filter.

Well....that may be the case with the instruction in the original version. I never looked at them when sE first came out with a reflection filter, but in the current "Pro" model they make no reference to a specific mic position, and instead tell you that the mic bar allows both vertical and horizontal placement of the mic, so you have to tailor the placement based on your room.
http://www.seelectronics.com/static/downloads/cms/manuals/rf-manual-updated.pdf

My point about putting the mic deeper into the wrap-around filters like the sE, is that you would need to do that to remove all room ambience/reverb....and yes, it would give you that dead/boxy sound, not much different than the typical small vocal booths.
Even if you place the mic in-line with the front edges of the wrap-around style, it still takes out a lot more room than the more open style I chose and prefer, since in my own case, I was not looking for "portable vocal booth" but something to just remove some of the reflections from the back of the mic, but sill allow a good deal of the room sound.
To tell the truth....I've only used the reflection filter a couple of times when I had the AC on during the summer, since the AC vent is behind my usual mic position when I do vocals....and for that it did a good job of blocking that mild AC "hiss".
 
Well....that may be the case with the instruction in the original version. I never looked at them when sE first came out with a reflection filter, but in the current "Pro" model they make no reference to a specific mic position, and instead tell you that the mic bar allows both vertical and horizontal placement of the mic, so you have to tailor the placement based on your room.
http://www.seelectronics.com/static/downloads/cms/manuals/rf-manual-updated.pdf

.

Interesting. Next time you use your Reflexion filter, give the original instructions a try and see how it sounds.

Given the physics of a cardioid mic, it makes sense to me that the "capsule in line with the front edges of the filter" position should give maximum isolation with minimum "boxyness". Worth a try.

Certainly on my original it works that way...out by even an inch or so and the isolation goes byebye; in too deep and it sound like the proverbial closet.
 
If I had the wrap-around type of filter, I would try those different positions....but as I said, I opted for the more "open" type, since I wasn't trying to creat a "booth" and/or looking to remove room ambience (my space has a very nice room sound).
I was simply looking to block some minor AC air noise coming at the back of the mic, and for the one I got works well.
I don't use it when the AC is off. :)

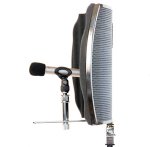
I went with this filter:

Post Audio Production ARF-12


arf12-side-mic300.jpg
 
Sounds like we have totally different requirements then. I use mine exclusively to remove room ambience (I first bought it when I had a "spoken word" project that involved recording an author reading her books in her own home) and don't use it for any form of sound proofing.

Horses for courses and all that.
 
Back
Top