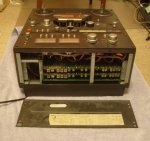
tascam 38 wierd playback stuff

burymyteeth

New member
i've been recording on my 38 the last couple of nights and there's some weird stuff going on. i would love some advice if anyone can offer it!

first off, (this might be a big question) but tracks 3 4 and 5 are getting no levels at all on the VU meters and don't record. where do i begin to trouble shoot this problem?

but more immediately:

i recorded a few tracks over the last couple of days and for some reason the tracks are split up when i play them back. some will play when i am in REPRO mode and some will play when im in SYNC mode but they wont play together. however, when I first recorded them they all played together in SYNC mode, and when I went back to the studio today I tried listening to two different tapes and I had the same problem. Track 1 would only play in REPRO and the rest was all playing in SYNC mode and nothing would play together! What's up with that? at least i know the tracks are still there, but it would sure be nice to hear them all at the same time! any help is greatly appreciated.
 
I had a similar problem with my 34B, I cleaned the contacts and reseated the rec/play cards and it fixed the problem, perhaps that may be the case here?
 
I'm not too familiar with the inside of this machine, I just got it like a week ago, I'm going to go to the studio now and check it out, I may snap some pictures and need some help locating where the relays are. Thanks for the suggestion.
 
I'm not too familiar with the inside of this machine, I just got it like a week ago, I'm going to go to the studio now and check it out, I may snap some pictures and need some help locating where the relays are. Thanks for the suggestion.

Okay. I don't have a '38 myself, but I do have a '32, schematics and a couple of spare audio cards from a dropped '38.

At the bottom panel of the machine it should be possible to unscrew the base. If it's like the '32 it should swing down once a couple of screws are removed, which exposes the audio cards for alignment etc. There should be 8 of them.
I do not know how to remove them, I guess someone else will have to step in there.

I'm attaching (I hope) a picture of the audio card. Each one has three relays, and the part IDs are silkscreened onto the PCB:

K101 - Switches between the Sync head and the Repro head
K102 - Mute relay
K103 - Activates the record head

K101 is the one I'd suspect - if it was on the blink it might explain your symptoms.

EDIT:
The relay part numbers are listed in the manual as:
K101: G2E-182P-H (24v)
K102: RRD51A24
K103: G2V-2 (24v)

extremely helpful! thanks jp, i got as far as you explained today and also couldn't figure out how to take the cards out and took apart a ton of things unnecessarily and then put it back together haha. this is such a weird machine to work on, i can't figure out if i should go from the back the bottom or the front??? i thoroughly cleaned it today, i'm going to let it sit for the day and go back tomorrow and check it out, if anyone can explain to me how to get the channel cards out that would be awesome.
 
At first I thought you were saying you couldn't locate them, so I took this photo of my '32. Having done that I don't want to waste it so I'll post it anyway ;-)

By the looks of it you have to remove a supporting bar (which looks like it'll need the back off the machine too). It's probably a matter of hooking something into the holes at the corners of the audio cards and pulling, but since that may damage it if it's done wrong, probably best to wait for someone who's done this before.
 

Attachments

  • t32-audiocards.jpg
    t32-audiocards.jpg
    63.6 KB · Views: 75
Its similar to a 48 with which I'm familiar...jpmorris is on the right track.

Here's how I would do it:

  1. Remove the rear dress panel...that's 7 screws I believe, 3 down each side and one top center as you look at the back.
  2. Now with the rear panel removed you should see a screw at the very bottom near the center of the back. That's the rear of the card retainer bar...remove that screw.
  3. Now put the rear panel back on so you can safely lay the deck on its back. Probably don't need to put all the screws in. Use your best judgement.
  4. Lay the deck on its back:
  5. Now remove the bottom feet and the card cover panel (the bottom panel of the deck...should just be 2 screws left to remove to do this after the feet are removed)
  6. Now that the bottom panel is off and you can see the cards, you can see that there is one more screw that holds the card retainer in. Remove that screw and the bar.
  7. Now you should be able to remove the cards. They may be stubborn depending on the age of the deck and the environment in which it has lived but if they are stubborn gently rock them as you pull...not up and down, but pulling slightly harder on the right and then on the left...rocking that way. Jpmorris is right about the holes in the extreme right and left of the cards...they are for a card pulling tool which we all have laying around right??? :rolleyes: Right. I use those holes as extra grip for the thumb and forefinger of each hand. Worst-case scenario you can fashion a piece of stout coat hanger wire into a puller but you shouldn't need to do that...just keep gently working them and they'll come out.

thanks sweetbeats, didn't want to yank on something without knowing first. now i can get to work, so when you "reset" your audio cards, you're simply taking them out and putting them back in? should i be cleaning any contacts or anything?
 
By "reset" I think you mean "reseat"...in the most basic sense yeah...you're just taking them out and putting them back in but it really helps if you have a good contact cleaner too. I pretty sure the others would join me here in saying that DeoxIT by Caig Laboratories is the stuff of choice. It cleans, protects and improves conductivity all in one. You would apply it to the sockets on the cards, wipe the excess up and then seat the card, pull it and reseat a couple times and while you have them out you can look for anything that looks obviously bad on the cards and in particular look for loose solder joints on the joints for the socket contacts on the card. If applying contact cleaner to the contacts and reseating the cards doesn't do the trick it may very well be the relays. I dealt with this on my 58. Look at the picture that jpmorris put up. the relays that are indicated look like little chrome blocks right? Well, those are shield covers. They are typically soldered on over the relays themselves. If you are pretty good with a soldering iron and have a good solder vacuum (it helps) those covers are pretty easy to remove, and then you can get to the relays. Typically there are little clear plastic covers and you can see the actual relay contacts through them...you pop the little covers off, sparingly apply DeoxIT to the contacts, gently massage with a clean soft toothbrush or some such thing, another little shot of cleaner and then turn the card on its face on a clean cloth so the cleaner can drain out of the relay. once its relatively dry its not a bad idea to gently shoot some canned air in there to make sure there's no dust or fuzz, put the plastic cover back on and resolder the shield cover back on.

Sounds a little labor intensive but I did all the cards of my 58 in an evening and it turned it into a whole different machine. Have a look at my Tascam 58 thread...I was in the thick of the same kind of issues you are dealing with when I started that thread, but it picks up around post #19. You'll see links to stuff over on the Tascam Forum...it was sadly slow over there and I was hailed over to here thanks to cjacek. :D;)

Anyway, wierd inconsistent to non-existent record and repro response and I believe it was dirty relay contacts. Yes the sure fire bet is to replace them though I've had great fortune just cleaning them as described above. It'll hold for a little while at least. :)

So reseating, cleaning relays, and you may also want to re-weld the card socket solder joints. Do that last if reseating doesn't cure it and then cleaning the relays.

Hope that helps.

Kudos to jpmorris for the pics and detail from his 32. That should really help.

Its funny that with the number of 38's in operation out there we often seem to run up against a search for service manual docs on the thing...I have a full 32 manual and a 34 operations manual but nothing on the 38. :(
 
I have my original Tascam 38 manual with the pullout wiring schematic sheet. I might be willing to scan it and post somewhere if anyone might be interested.
 
By "reset" I think you mean "reseat"...in the most basic sense yeah...you're just taking them out and putting them back in but it really helps if you have a good contact cleaner too. I pretty sure the others would join me here in saying that DeoxIT by Caig Laboratories is the stuff of choice. It cleans, protects and improves conductivity all in one. You would apply it to the sockets on the cards, wipe the excess up and then seat the card, pull it and reseat a couple times and while you have them out you can look for anything that looks obviously bad on the cards and in particular look for loose solder joints on the joints for the socket contacts on the card. If applying contact cleaner to the contacts and reseating the cards doesn't do the trick it may very well be the relays. I dealt with this on my 58. Look at the picture that jpmorris put up. the relays that are indicated look like little chrome blocks right? Well, those are shield covers. They are typically soldered on over the relays themselves. If you are pretty good with a soldering iron and have a good solder vacuum (it helps) those covers are pretty easy to remove, and then you can get to the relays. Typically there are little clear plastic covers and you can see the actual relay contacts through them...you pop the little covers off, sparingly apply DeoxIT to the contacts, gently massage with a clean soft toothbrush or some such thing, another little shot of cleaner and then turn the card on its face on a clean cloth so the cleaner can drain out of the relay. once its relatively dry its not a bad idea to gently shoot some canned air in there to make sure there's no dust or fuzz, put the plastic cover back on and resolder the shield cover back on.

Sounds a little labor intensive but I did all the cards of my 58 in an evening and it turned it into a whole different machine. Have a look at my Tascam 58 thread...I was in the thick of the same kind of issues you are dealing with when I started that thread, but it picks up around post #19. You'll see links to stuff over on the Tascam Forum...it was sadly slow over there and I was hailed over to here thanks to cjacek. :D;)

Anyway, wierd inconsistent to non-existent record and repro response and I believe it was dirty relay contacts. Yes the sure fire bet is to replace them though I've had great fortune just cleaning them as described above. It'll hold for a little while at least. :)

So reseating, cleaning relays, and you may also want to re-weld the card socket solder joints. Do that last if reseating doesn't cure it and then cleaning the relays.

Hope that helps.

Kudos to jpmorris for the pics and detail from his 32. That should really help.

Its funny that with the number of 38's in operation out there we often seem to run up against a search for service manual docs on the thing...I have a full 32 manual and a 34 operations manual but nothing on the 38. :(

Awesome, I reseated the cards last night and same problems persisted, but I am going to do it again with the directions you gave me and let you know what happens. Thanks for such detailed instructions, very helpful!
 
Yes. I concur.

I also concur with jpmorris that K101 should be #1 on the suspect list, and if your cards are like the one in the picture there is no cover to desolder...just pop that plastic lid off and gently clean away. If that doesn't do it then go for K103. K102 is solid state so nothing you can do with that except replace if that proves to be faulty, but it doesn't appear that its function would cause your troubles to occur.

alright i went in last night and checked out the relays (K101). I think that maybe my machine might be a slightly newer model or something, because there's no way to get inside and clean this part, its a solid black plastic box (labeled K101 so i know its the right part) and it looks different than in JP's photo, and the model number is off by a couple digits. I took one of them off of the circuit board and if there's any way to get inside I just don't know how. So, I'm guessing I just have to replace these parts? i keep forgetting my camera at the studio, i'll post a picture of the component.
 
Back
Top