arjoll said:
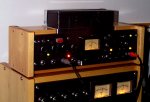
Nice job Dr Zee - once again an impressive looking unit. The detail of the finishing, cabinets etc are particularly cool - very much in keeping with the 'vintage' feel without some of the overly industrial look of the original mixer, if you understand what I mean.
Just a couple of quickies on the electronics - I'm not an expert but have learned a lot researching repairs etc on a couple of vintage units I have here:
Caps - I see you replaced one, I assume you checked the rest to make sure they weren't leaky, electrolytics and certain moulded ones (Hunts from memory, plus paper types) are prime candidates for replacement. Low value ceramics etc are probably fine.
Resistors - a lot of them look original, apparently it pays to check the values etc to make sure they're still within tolerances.
Selenium rectifier - apparently they can fail (and make a rather nasty smell when they do!) - can be replaced by a 1N4007 diode with a series resistor to bring the voltage back down to spec (check the power rating) and a small value cap across them.
Anyway a really nice job - I wish I had your wood/metal work skills!
First of all thanks a ton for taking time looking into details and all your thoughtful suggestions. I'm no expert at all myself, btw... as a matter of fact I really know nothing, with exceptions of few things I've got my hands on... sort of
 :rolleyes:")
And, from what I know all you suggestions are right on target.
Now, here's the strange thing. I am not really sure how to explain this and the same time to make sense... well, I'll try.

To begin with, I've got that thing without having any idea what's in it... it's was a parts-item with no description what so ever, just a photo. So I've got it, took a look, figured it can be powered up - took a chance, did it and figured that the unit actually functional (the original preamp/mixer unit, that is)... so then I've checked it through with no knowledge and no schematics on hands.... and I've got that idea to make something out of it... first I just wanted to make some funky enclosure for it, but then, I've got that idea, that those two tubes (mic inputs preamp stages) could be used for something else if(when) the mixer is used for line-inputs.... it just looked to me like a waste of
hot tubes ... LOL...., you know, similar to channel's mute/ALT-3/4 idea... when it's in "mute" mode, why waste it?

So then I've done bunch of reserch about details etc... and yes, all the suggestions you've mentioned and some more came to my attention, and I actually started moving toward "implementing" all those good things, but at some point I've said to my self: "Wait a minute! What's the point, then? What am I doing?"... it's like building everything almost from scratch (from new parts... that is)", and that was not what I wanted to do in this project (instead, I may some day build something else, maybe similar from scratch) ... So I've decided NOT to replace anything, unless it really really has to be done, so to keep its originality and characted as much as it is possible. On the other hand it is really hard to make up mind on what is REALLY has to be done, not to mention the fact, that tube circuits (which look so simple, huh

) are very strange creatures... they are like living beings in a sense - touch any thing there a little - and it will react.
Now, the power supply filter multi-cap may need to be replaced. I am considering that.
And the selenium rectifire issue... hah hah - good one. I've read about some projects, where guys would replace it in the circuit, while keepping it physically on the chassis to keep the original look, hah hah, like a monument for a dead hero
Also I've read those stories and warnings ala "It's not a question of wheather or not it will fail, but rather - when it will fail". OK, now... I've got it
")
, however I never read a single story about "It actually failing". I guess everybody avoided it by following the word of wisdom
, while I'm taking bad chances here. And the smell is nothing (

) comparing to something like this:
What is going to happen to your vintage H.H. Scott amplifier's output tubes if all of a sudden it looses all of its negative grid bias or DC filament voltage in the preamp section? You can probably guess.
Output tubes will draw too much current and overheat causing the output tubes' plates to turn red or orange. At the very least, you may be looking at replacing hard to get NOS (expensive) tubes. Allowing any amp to operate in this condition for very long will destroy the output transformers. That should get your accountant's attention!
that was from H.H. Scott website.
Well, I am thinking about replacing that thing seriously, though. As a matter of fact the whole main power supply section is kinda "questionable" and sure is upgradable.
You see, again... it's an issue of keepping ballance between improvement and authenticity. Not easy one imho.
thanks a bunch again, I appreciate you paying attention to the details and your comments. -
/respects
**********
and now it's time for
commercial break:
we'll be back, don't go anywhere
")