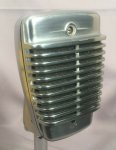
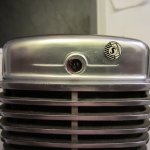
How can I get this 1950's Shure 51S mic apart?

Chris Long

New member
Hi Folks-

I picked up this beauty at a yard sale, and would like to refurb the inside--the foam is rotten. The problem is getting it apart.
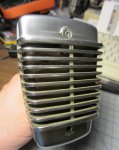
IMG_9969.jpg

There are three machine screws holing it together--two were easy, they are accessed from the rear. The third is hidden beneath the little Shure emblem at the top. It doesn't pry off easily--it seems to be glued in place.

Does anyone have experience with this? Does it take heat, or a solvent to break the seal and loosen that badge?

Thanks in advance for any help--

Chris
 
Hi,
I don't have experience with this mic but I found a picture of the exposed screw. Maybe you've already seen one?

Screenshot 2019-05-23 at 00.01.48.jpg

As you can see it's only glued on quite a fine ring around the edge.
I've no idea if it would take heat or solvent without damage but it looks like it could be carefully worked and/or prised with a fine blade?
 
You, Sir, are a Prince among Men! I appreciate you taking the time to find that--I had NOT seen it, and it's going to be very helpful. I think you're right, that the glue must be not too deep. Going to start with a little moisture and move up from there.

I've tried to prise it loose with an exacto blade, but the badge is soft aluminum, and I can see I'd damage it before getting it off that way. The microscopic chip of glue I was able to get out of the gap looks a lot like hide glue that I see in guitars. So moisture and heat should do the trick, if I'm right.

Thanks so much for the image. It'll help a lot!

Chris
 
Shure might have that piece as a spare - can't hurt to ask. I'd bet their standard repair procedure at the time was to just pop the old one out and stick a new one on.

I'd work that Exacto around the edges and just drip some water or maybe dilute rubbing (wood might remove the paint) alcohol on it and let it sit for a good while. A little heat from a heat-shrink gun is all I'd apply, and carefully. Still could remove the logo before you're done. Good luck.
 
Success! I soaked the spot overnight with water (a piece of paper towel on it, angles just right so it wouldn't run away) and gently attacked it again this morning. In the end I think I was just lucky--there was more glue on one side than the other, and I just happened to be working on that side when it moved. It's not hide glue after all--it looked more like contact cement, something like that. It has a slightly flexible quality to it, something hide glue wouldn't. They used it all around the rim where the parts meet, too.So I'm not even sure the moisture did a thing! Just luck (or perseverance, which sometimes coincides with luck).

Thanks for the help and encouragement! Hopefully these pictures will help someone down the road, too.

IMG_9977.JPG
 
Nice work!

Thanks for coming back to let us know.
As you say, maybe it'll help someone else out some day. :)

Would love to see what you get up to, now that you've cracked it open!
 
Back
Top