Disassembling FATAR keyboard to clean - Help!

Hi,

You can be sure that I will document everything I do ! I'll likely benefit from your excellent documentation you made also. This forum is about helping each other, right ? So I will certainly return the favour and post my findings and techniques.

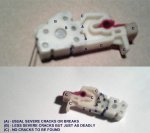
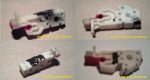
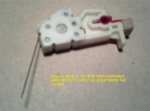
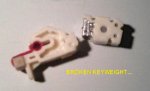
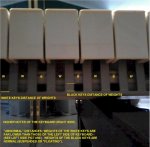
I have read and read and read... a lot of forums and yep, the crackign weights problem comes up fairly often. Apparently one of the big problems with broken ones is that they are made of nylon and that material is a particular polymer base that cannot readily be glued and expected to last like new. Depending on where the crack or break is, it may not be salvageable at all. I have pondered a lot on what I'm going to do if I need to repair a busted weight. Since I've never actually seen one (except in photographs) and the space it occupies, its hard to think of what to do ahead of time. I'm looking into very thin & strong heat-shrinkable plastics technology, amongst other solutions. I also read that there are in fact some special glues that will bond nylon polymers together so maybe that and the shrink wrap may do the trick. The expensive route would be to take the part to someone who does nylon NC milling and have them just make new ones. Then again, there may be a market for this ...

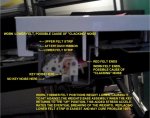
The other problem I have to adress is that of the felt. I saw an excellent post somewhere (ratz, I didn't save the link) about replacing felt and apparently I need a particular grade of felt but have no clue as to what to get !

J
 
weights crack in two ways... most of the time the lead hunk comes loose from the plastic cracking... and then secondarily there's a little tab that sits on the underside... it part of the repetititions works... it can crack as well... i've never found an effective glue for it...
 
Perhaps this is the one place on the web that can help!

I know I'm a few years late to the party on the original thread, but am happy to see it's still alive!

I have a Fatar SL-990 pro with a single stuck key (G below middle C).

I figured I'd open it up, and order myself a replacement key, and it would be a relatively easy fix. Not so fast bucko!

I *cannot* get further than unscrewing the screws from the bottom panels! Yes, I feel like a total muppet, but simply cannot find a way to lift the hinged top cover off. Is there a 'secret trick' I'm missing? I had assumed that with all screws removed it would smoothly slide apart, but that couldn't possibly be further from what is happening!

I could certainly post a pic or two to try to show what I mean, if that would be helpful. Right now I feel like going at the darn thing with a mallet!

Thanks in advance for any pointers.
 
Cfowler,

The photo may help, as I do not have any particular knowledge of the Fatar keyboard you have. Common sense would seem to indicate that there are still some screws holding the keybed in place. If you look at posts #6, #7, and #8, it shows how to get the keys off and out. Also, if you look at the 2nd photo in post #7, the one labeled "C", you can see the keybed still screwed into the bottom of the keyboard plating.

I don't know if your Fatar is similar, but it probably is, in someway. With an 88 keyboard, being as heavy and cumbersome as they are, more than likely they have to be dismantled while lying upside down. There will be some specific screws dedicated to the holding of the keybed in place.

Also, as noted in the posts when this thread got started, in order to take keys out of the keybed, the whole keybed has to be taken out of the rig, because there is a guard, in the very front of the keyboard (the lip that your thigh can almost touch when you are sitting in front of your keyboard to play) that prevents keys from being removed while the whole thing is "buttoned up" as you might say.

Lastly, if your stuck key is refering to a MIDI contact, then you do not need to remove the whole assembly, as all you need access to is the MIDI contact board, which should be viewable when you take apart the two halves of your Fatar keyboard.

Dementedchord correctly made that observation to me back in the beginning of this thread, while I had come to learn it simultaneously by experience. All my problem was in the contacts, and not in the plastic keys at all.

If you can elaborate on your "stuck note" a little more, it may just be the MIDI contact, and you do not need to go through the headache of further dismantling. The photo could help, too, if what I just wrote does not address the issue.
 
Last edited:
Hi Todd - I will snap a couple of pics later today.

You were right about the 'common sense'. There were, in fact, 6 'hidden' screws recessed inside what I'd assumed were just ventilation holes. The screw head wasn't visible without a flashlight as it was about 1 1/2" from the bottom panel!

I did get the case open - although not before damaging the case, unfortunately. In fact it was only once I could see inside the case that it was apparent that these screws existed! Still, what's done is done and seeing as this keyboard sits in one spot and never moves, no real harm done.

The 'stuck' key is one that physically sticks. That is, it's not a constant trigger or anything. I believe (given that the key fell off once I removed the keybed) that there is a tiny part of it that had snapped, and so it is able to slip out of position. My next step is either to find a replacement key or to just use a dab of epoxy to keep it securely in place. A little experimenting with bouncing the key while resting a finger at the very rear of the key suggests it just needs 'securing' to function just fine.

What's funny is that after buying this as a 'scratch and dent' I now believe somebody had previously dissassembled the instrument and then reassembled it incorrectly - there are a bunch of loose bits and pieces rattling around inside. Ah well, live and learn.

I appreciate you chiming in and may pick your brain about dealing with this one annoying key!
 
I finally had a chance to do some picture taking. After finally getting this thing apart, I discovered that buying something "scratch and dent" online may also mean buying something "taken apart and reassembled incorrectly"!

This is such a great thread that I hope no-one will mind me adding some pics to it - if anyone else is out there feeling stupid about not being able to take apart their studiologic keyboard maybe this will help them. It might even stop them breaking theirs the way I broke mine:mad:

I apologize if the pictures are too big - I've already resized them quite a bit but could re-upload them as even smaller versions if this is irritating for people.

In this first picture you can see the screwdriver pointing at one of the screwholes on the bottom right side of the casing. I'd always wondered what the rattling noise was inside the keyboard. Now I know! Several of the black plastic "witches hats" just to the right of the screwdriver weren't actually attached.

Fatar SL990 pro - missing widgets.jpg

This next picture shows what had made life difficult for me. Despite being told on a separate forum to search for screws I'd missed under labels etc, it hadn't occurred to me that there might be screws I'd missed that were invisible to the naked eye!

Behold the grey 'stalactites' and the black 'stalagmites'. I had no idea that these were there, or that if I blindly poked around through what I'd thought were ventilation holes I would find screws holding these pieces together.

Obviously, the fact that I only discovered these were there *after* I got the case open means that by a feat of superhuman strength, I managed to rip 3/4 of the stalactites from the clamshell!

Fatar SL990pro - lower right case end flanges.jpg

This third picture shows one of the few surviving matings of the 'mites and tites'. In hindsight it seems obvious. At the time I was cursing the stupid Fatar minions who were driving me crazy!

Fatar SL990pro - case build.jpg

And now, we get to what I hope someone can help me with. The keyboard doesn't seem to be of the same type Todd had posted pictures of. The key I need to replace had a little piece that had snapped off, so it lifted off/fell off once I got the keybed out of the case.

My next problem is what to do about it. Finding a replacement key seems difficult, so I had toyed with possibly switching in a 'little used' key from a low/high octave.

The problem with this is that I can't figure out how to take one of these keys off without forcing it - and I've already learned not to do that!

Here's a view of the missing key slot from the top
Fatar SL990pro - keybed top view.jpg


And from the front
Fatar SL990pro - keybed front view.jpg

And from the rear
Fatar SL990pro - keybed rear view.jpg


I've worked out that the key 'sticking' problem is fixed simply by keeping my finger pressed at the rear of the key. A snapped little bit of plastic means it works loose when struck with even moderate force.

I suspect I could probably solve my problem by just putting a dab of epoxy onto the 'pink bit' so that key is held in place - but I'm reluctant to do this if there's a way of switching the key with a different one. Does anybody have any suggestions?

Thanks for bearing with my long post - I hope it helps me and might be useful to anyone else who is struggling like I did!
 
So everybody, let this be a lesson to you. NEVER force anything. If something won't move, keep looking for the reason. There will always be a logical and simple manner to take things apart. Don't use force.

Fowler, good pics.

So, let me just say a couple of things, and maybe I'll cover your dilemma in some way.

First, those pink tabs are the same as the tabs I mention back in the beginning of this thread. I wrote something like 'use a flathead screwdriver to push the tab in, and the key will come loose, or free, to be removed. Not much force are you will break the tab, and then you are screwed.' Same thing here. You push the pink tab in, thereby freeing the key. If your G key won't click into place, then maybe something on the pink tab has broken off (a tiny lip, maybe, on that pink part), or maybe something on the inside of the G-key (the hollow part) where it connects to the pink tab is broken.

So because you have mentioned that the key is loose, and you also write something about using epoxy glue to try and keep it in place, that's why my thoughts.

Next, trying to find replacement keys, from what I have read on other sites by keyboardists, has lead me to believe that it is very difficult. Again, I have no experience here, but taking what other keyboardists have written, my understanding is that trying to find a replacement key is difficult. That is why people look for broken keyboards for sale on Ebay, to buy for spare parts. First call some big music stores and ask them about replacing keys.

I gather the loose part is from where it is supposed to lock into place by that pink tab, but your tab has a broken part missing, or something inside the G key has broken.

So to summarize:

1. Trying to find a replacement "G" may prove difficult.
2. If the pink tab is broken, you'll be on your own trying a home brewed remedy.
3. If the G key is the problem, due to being damaged, then your solution is simple. Like you said, swap G-keys with the one at the very top of your keyboard, not your low G, which for me would make my keyboard useless to play on. Or
4. Try to locate a G-key from some store, somehow. Last resort, look for completely damaged SL-990 where you can buy it for parts, cheap.
5. If the G-key has a broken part inside of it, then maybe you can try a home brewed remedy to fix that key (similar to trying a home brewed remedy of fixing a broken pink tab), although this I believe would prove to be a formidable problem to try and resolve.
6. Lastly, if it's the pink tab that has a broken part on it (yikes!), maybe it's possible to swap pink part with the very top notes pink tab? Do they slide off their metal sheaths easily enough?

Compare the pink tab on this problem note, with a neighboring tab. IF they look absolutely identical, then the problem lies inside the G-key itself.

Good luck, and keep us posted.
 
Hi Todd

Thanks for such a thoughtful and detailed response.

I went back through the beginning of the thread and found the earlier post that you'd mentioned - I'd remembered the spring removal, but forgotten that you'd mentioned the tabs there, so that was very helpful.

After a bit of prodding of the tabs, I was still getting nowhere, and continuing to feel stupid! On a whim, I started poking around Youtube and stumbled on the following video of a fella modding his Fatar keyboard.

[edit: because I'm a noob, I'm not able to post a link directly to the video. However, the title of the video on Youtube is "Key-Dip Mod for a Fatar TP/80 waterfall keybed" and it was posted by jasoneip]

As silly as it sounds, I discovered that I simply wasn't pushing at the right angle (I was coming more or less 'flat/straight on' from the rear of the keyboard rather than directly downwards). Watching him remove the keys helped things fall into place.

Long story short, I followed your suggestion to steal the G from the highest octave and switch it out - bizarrely, the old, duff key works just fine in its new home, and I have a properly functioning G below middle C as well!

I was a bit alarmed when I reassembled the unit and got no midi signals from the notes. I *was* getting midi transmitted from the mod wheel and sustain pedal. As luck would have it, I'd already watched a chap fixing a Yamaha keyboard on Youtube, and he had commented on the need to make sure you didn't reverse the two 'printer style' connectors from the keybed back to what I assume is the main board (or whichever board has the power input/sustain/midi-connectors wired to it). I didn't have them reversed, but I *did* have them upside down. Fixing this restored midi transmission - hurrah!

So far, everything seems to be working well!

Thanks for bearing with me, and for starting this thread, Todd. I suspect there are many folks like me who would have had no idea where to start without coming across it.

Knock on wood, I won't need to be posting more questions to this thread :-)
 
Hi Gang,

I've started to look at my K2500XS's key problems today. I documented some steps and discoveries along the way, and am presenting some pictuers of what's going on. I will not go into the steps required to open the K2500's case nor fix contacts; Toddskins has already done a great job on that. I will show and discuss the key noise problems (the "klunk" or "clacking" sound on key returns) and the keyweights.

First off, I removed the entire keybed to be able to work more easily. Then I removed the keys since I intended to repair a broken weight and inspect the rest of them to see in what condition they were in and to try to identify the klunking of many keys...

Sorry about the low quality of the pics, I only have a cellphone camera to document this !!!

EDIT DEC 23: Once you remove the keybed, lay it on a perfectly flat surface and check from both ends that the frame is not bent. Despite perfect exterior consmetics, my frame was bent by only 1/4 inch but that makes a whole lot of difference; and worse, I only found that out when re-assembling the keybed in the K2500XS enclosure & testing afterwards (there were still problems) ! Save yourself a lot of trouble and check that first ! Although I am a seasoned electronics technician, I had no experience with musical instruments and keyboards, so I learned a lot in the course of this project and also made some dumb mistakes at times. If you want to know how to fix noisy keys and broken keyweights, how to dismantle the keybed and put it back together again, then read the entire thread following this one. Don't jump ahead and implement a solution before having read all the posts, I made some msitakes and I commented them afterwards; I think its worth leaving them in so others can learn too.
 

Attachments

  • Keybed_no_keys.jpg
    Keybed_no_keys.jpg
    59.2 KB · Views: 779
  • Re-ass-3.jpg
    Re-ass-3.jpg
    55.6 KB · Views: 747
Last edited:
The weight itself. This is a nylon part and apparently it cannot be glued back together.

Off on the net to do some research.... As per this thread Need to Fix Some Cracked Nylon. Any Suggestions? - AudioKarma.org Home Audio Stereo Discussion Forums some people have had very good results using a product called "Plastic Surgery" Plastic Surgery 302
and one person tried a hot glue system Ultra-Tac Polyamide Glue Sticks (Glu-Stix) .

The key ingredient here is "Polyamide", present in all those products. Since I have nothing to lose at this point, I got myself a set of "J-B Weld" glue tubes since the active ingredient in that is also "Polyamide". I'll let you know in about a day if the gluing was a success or failure. I also tried something else since it is acetone related and it sticks like hell: its called "New-Skin" ! Its a liquid bandage that works really well and takes a long time to wear off. After 2 hours, I tried to pull the bonded nylon apart. It was really hard to break but it did come apart, unfortunately. Maybe I didn't let it cure long enough though... Looking at the 2 pieces, what I observed is that the nylon had somewhat melted or remoulded so maybe this stuff is a viable alternative; I'll investigate that further later on. On the downside, if it turns out that its better than J-B Weld, my keyboard will smell of clover leaf for a few months !

So, What are your thoughts and experiments with glues that stick to nylon ?
 

Attachments

  • Broken_Keyweight.jpg
    Broken_Keyweight.jpg
    28.2 KB · Views: 473
While that one weight was curing, I removed the rod that holds the keyweights in place so I could have a look at the condition of the rest of the weights. What a dismal discovery... pretty much all the keyweights are cracked and like the Titanic, its only a question of time before they fail one after the other and have to be replaced. I recall seeing someone (the Midi store maybe ?) selling them for 17.00$ each. Hum, 17$ x 88 = 1,496.00... not an option. I won't buy used ones either because there's a good chance they are in the same condition mine are, unless they really are new. At this point, I'm a bit discouraged and very tempted to just put it back together and sell it "as is" for the remaining duration of its useful lifetime before it gets turned into spare parts.

Then again, I love a good challenge and this is one of them: how to restore those keyweights so they last at least another 5 years or more!

On the subject of cracking, I think Fatar made an engineering booboo along the way. Here's what I think: when they designed the part, they didn't think of the expansion coefficient of the lead they were encasing in nylon. From my observations, the cracks come from anywhere and everywhere along the areas where there is lead, not one specific predictable place (weak or breakage point) all the time.

The lead expands with temperature and that cracks the nylon coating; the crack just keeps going and eventually gets to a critical spot where it will cause the separation of the nylon and cause the weight to fall off. When you look closely at the part, there are no cracks anywhere along the friction points or mounting points like where the rod is passing or where the keys are hitting the extremity of the part. All those points are cushioned (the felt and the rubber) and that allows for expansion of the nylon itself and absorbs shocks so it does not crack. Then again, I've seen VCR's with nylon "trims" holding some parts together and there were no stresses on those parts, yet the nylon still cracks after about 10 years.
 
On to the subject of key noise or "Clacking"...

I've obeserved that the noisy key problem comes from the weights hitting the bottom of the keyweight assembly. The weights do not necessarily hit the frame, and maybe they do somewhat but the bulk of the noise comes from hitting the assembly. There are 3 pictures along with this text; a typical view of a bunch of keys on the left (Lower notes below middle C) and a bunch of keys on the right (Higher notes above middle C) plus a side view of the key mechanism. Notice the distance between the keyweight's bottom extremity relative to the slots in the frame, for the white keys only (labeled "W"). This is the subject of the following paragraphs. The black keyweights are all okay everywhere.

The thrd picture displays what I think is the problem with the weights hitting bottom: the felt is worn (matted down so it is thinner than the rest of the felt piece) in the area where the plastic tip of the key always rests. There is a groove there and its just deep enough that the keyweight sits lower down when it is at rest; so low in fact that it always hits the bottom of the keyweight assembly when the key returns to the up position... and causes the infamous "clack" noise.

Now, the keys on my keyboard (like many others) are not equally worn; the wear is mostly on the keys between C3 and around E6 or so. Its normal as far as I'm concerned. What has me puzzled though is this: When I look at the keybed front, (use the first 2 pictures to visualise where I'm going with this) going from left to right, the distance between the weight and the frame starts out large and ends with 0 distance at the other end. In other words, there's a nice continual slope from left to right, instead of a dip in the area where the wear is (C3 to E6) !! Yet, the frame is not bent, the assembly is screwed flush to the frame, etc... Weird, huh ?

EDIT DEC 23: Weird allright ! I discovered the very likely cause of this problem at re-assembly of the keybed in the K2500XS enclosure with the right end bell removed to see better. At initial dis-assembly, I missed this big problem because I had not first laid the keybed on a flat surface. But, you see, I was not expecting the keybed frame to be bent or twisted as it had no reason to be that way.

I also conclude that since the weights are always hitting the base, and fairly hard at times; this causes additional stress on the already fragile nylon that is always cracking, thus accelerating the breakage of a keyweight. If the weight were not hitting anything, there would be no shock to the part itself and it would hold up together much longer.

Any thoughts on this ? Is the felt the only problem or might there be something else ?

EDIT DEC 20: Pic 3 changed to display U/L felt strips.
 

Attachments

  • Normal weight distance.jpg
    Normal weight distance.jpg
    57 KB · Views: 467
  • Abormal weight distance.jpg
    Abormal weight distance.jpg
    56.5 KB · Views: 463
  • Worn Felt Accelerates-1.jpg
    Worn Felt Accelerates-1.jpg
    61.2 KB · Views: 476
Last edited:
NEW OBSERVATIONS...

I didn't think about this earlier but I just made a test and it confirms another possibility for the noisy keys: Although the red felt tip is worn, the wear is prety evenly shared amongst all the keys although slightly more wear in the range I specified in the earlier post. I thought about looking at the felt strip that is under the keys at the front of the keybed. There are 2 long strips of felt glued on the top and bottom lip of the front of the keybed assembly. These cushion the key when it goes down and when it is released back up. Sure enough, the bottom front felt strip has a very uneven thikcness - the felt is matted down a lot more in the problem keys area ! To see if I could ensure that the keyweight would not hit anything upon its return, I inserted a thin piece of cloth ribbon to thicken the felt strip. Lo and behold, the weight stopped without hitting anything - silence :)

Could it be that I just need to replace that strip of felt and the noise is gone ? It would appear so.

EDIT DEC 23: Not so fast... the felt is a problem but its not the MAIN problem ! J
 

Attachments

  • Temp_Thick-1.jpg
    Temp_Thick-1.jpg
    61.7 KB · Views: 481
  • Felt_Locations.jpg
    Felt_Locations.jpg
    58.2 KB · Views: 481
Last edited:
Really good post and pics. Very informative - at least for me.

Question: Can the weights be moved to other positions, similar to what CRFolwer was exploring for keys themselves? Thus, if mending a broken weight is not likely to work, can it be relocated to the extreme top or bottom of the keyboard?
 
Question: Can the weights be moved to other positions, similar to what CRFolwer was exploring for keys themselves? Thus, if mending a broken weight is not likely to work, can it be relocated to the extreme top or bottom of the keyboard?


Yes it can ! I had to pull the rod retaining the weights to remove that one broken one, and to check the other ones. That's when I discovered the condition of the other weights - an accident waiting to happen. I will most likely relocate to the lower notes area, that one glued weight and any other ones that I estimate will fail earlier despite all my efforts to try to restore them.

The weights are not "graded" (heavier to lighter) so they can be moved around. The only thing to watch out for is that the weights are different for the white and black keys, but that fact is immediately apparent once you look at the entire board's length.

The other thing to beware of is the rod itself. Both ends are finished squarely and that means when you re-insert the rod it might sometimes catch the inner felt lining of the keyweight and screw it up and jam. To prevent that, all one has to do is to file the inserting end just a bit so that it is slightly conical. Also apply a very very small amount of lubricant and rotate the rod as you push it back in.

J
 
Last edited:
I've added more pics to yesterday's post "NEW OBSERVATIONS", and edited text on a previous pic (picture 3 relating to possible causes of key noise).

I'm shopping around for adequate felt but it seems very hard to find in hardware or sewing supply / dry goods stores! Gotta find me a piano shop in Montreal...

J
 
UPDATE !

Well, the felt problem is solved - I simply removed the composite rubber-felt strip and turned it around, re-positioned it with an offset so that the worn/matted area is now in the center of the key. Then re-glued it in place! Its like having a new piece of felt since the keys are now resting on the never-used part of the felt strip; the keys are now okay and none of the weights will touch the keyweight assembly. And that means the clacking key problem is solved !

EDIT DEC 23: On re-assembly of the keybed, I observed that the black keys traveled farther than the white ones now. That's normal because I didn't replace the felt strip for the black keys. I had 3 options at this point: 1-undo what I had done and find another way to eliminate the weights hitting the assembly/frame; 2-modify the black keys felt to get it up to the same thickness as the white ones or; 3-shave the white keys felt to try and strike a balance between the black and white keys. Had I first laid out the keybed on a flat surface and looked at both ends to see if the frame was bent, I would have saved myself a lot of time with the felt thing!


NOT SO LUCKY WITH THE KEYWEIGHTS...
17 keys imminent failure (so cracked that I can break the thing in half),
3 keys with shells about to crack (shell = that part that encases the lead weight),
31 keys cracked at the exact spot where they banged on the keyweight asembly,
20 keys with fairly cracked shells - the pieces will eventually fall off an maybe jam the weight somewhere,
17 keys with lightly cracked shells (shell = that part that encases the lead weight).

EDIT / ADDED:
On the above key count: how many black, and how many white, keys were failing ? After the count, I made an interesting observation: the 17 imminent failures are all BLACK key weights !!! Now why is that I wondered... It also possibly invalidates my theory about the acceleration of failure for those keys hitting the base assembly ! One thing for sure though, all white keys that were hitting the base are showing signs of fatigue and the beginning of the cracking process at a specific area of the weight; not so with the ones that were free-floating - the cracks are random.


The glue test with J-B Weld seems to be holding up - I applied good force and cannot break the joint. I might break it if I apply a LOT... However, I purposey dabbed soem extra glue on an area of the nylon and that can be scratched off fairly easily, meaning it did not adhere well to the nylon. So possibly the glue does not really work well in the long term.

EDIT / ADDED:
On subsequent gluing of other parts, I roughened the nylon to make sure the glue had a firmer grip so it may help. At any rate, the best thing to do is to replace all the key weights. Hell, the unit works perfectly, the only problem is the keyweights, it would be a shame to have to scrap the unit just for that.

I am VERY discouraged... if I don't find a suitable solution, I'll have a very expensive door-stop!

J

PS: thank you for your appreciation Toddskins !
 
Last edited:
Keyweights fixing.

Trying to find new keyweights is an almost impossible task so for now the only viable option is to try to salvage and repair the existing ones. This is a very time consuming task, it takes more than one long day to get things back into shape. And the only relatively easy way to fix them is with glue. I got a confirmation from someone that indeed, "J-B Weld" will do a good job on nylon. Long term ? nobody knows... Besides, you fix one crack and another shows up later so although I'm confident this repair will last maybe a year or more, the weights have terminal cancer and will need replacing in another couple of years.

When you inspect the weights, use good lighting and a magnifying glass to spot the cracks because some of them are hard to see. Repair any obvious ones and plan ahead, you will know by careful observation which weights will fail faster than the others and make it a point of fixing those also.

Score or roughen the nylon areas before applying the glue, it will grab the nylon a lot better.

There are two kinds of J-B Weld glue products: the fast setting one (4 mins) and the slow setting one (4 hrs). Beleive me, the 4 minute glue really does set in 4 mins - if you don't work quickly or mix too big a batch, you'll lose it all within 4 minutes.

Do not apply a thick layer of glue to the sides of the weights. In fact, try not to put any glue there at all, the weights are so closely spaced that any thickening is likely to make the weights rub against one another when you play!

To get glue between the lead and the nylon, it is sometimes necessary to lightly pry the two apart to get some space for the glue. Use a needle to gently separate the parts.
 

Attachments

  • Wt_eval-Annot.jpg
    Wt_eval-Annot.jpg
    59.8 KB · Views: 452
  • Crack_locations_Annot.jpg
    Crack_locations_Annot.jpg
    53.3 KB · Views: 452
  • Wt_fix-1-2-Annot.jpg
    Wt_fix-1-2-Annot.jpg
    61.4 KB · Views: 444
  • Wt_fix-needle_Annot.jpg
    Wt_fix-needle_Annot.jpg
    42.5 KB · Views: 439
Last edited:
Back
Top