Adding veneer to my old bass

Chili

Site Moderator
I just ordered some burled walnut veneer. I intend to strip the metallic red flake paint from my Yamaha bass and add the veneer.

I have no idea what I'm getting into.

Suggestions?? :D

Well, actually, I do have somewhat of an idea. I saw a video where someone removed the lacquer finish with a heat gun and scraper. Took a while, but no major chemicals or drugs were used. I think that will be the hardest part of the process.

Has anyone removed the tough auto-like paint from their guitar before??
 
You have set yourself quite a task there.

I would use a cabinet scraper to remove the finish rather than heat. That is if you dont have power snaders and extraction.

The veneering will be tricky. When I apprenticed years before I started making guitars I trained at Rolls Royce and then BA Wood shop doing all the burr work on their dash and cabin components. Chuck up some pics and lets see what we have going on here. Planning is going to be your best tool on this one.
 
Coool, Mutt!! I'll post a pic of the bass soon. If I get in a bind and end up destroying the bass, I'm not too concerned. It wasn't expensive and I can buy a body to replace it. I should probably just do that anyways!! :rolleyes:

But this will be fun!!
 
this could end up muting your tone.


most veneers are added in combination with well-thought out tone woods underneath, and the overall tone is the function of both together.

granted, it's probably worth the experiment if you are planning on doing a more serious project in the future, but i'd bet money you'll hate the tone.

IDK, the veneer is something like 1/42". That's pretty thin. The mass of the veneer is negligible compared to the mass of the body. It's not like a maple cap, just a veneer. I just don't see it having much of an affect on the tone. The body is Alder.

But we'll see, it is worth experimenting. The grain is beautiful.


Here's a link to what I ordered....

Walnut Burl Veneer Lot 21" x 13.25" 6 Sheets Per Lot - VeneerSupplies.com
 
this could end up muting your tone.

Not true

most veneers are added in combination with well-thought out tone woods underneath, and the overall tone is the function of both together.

Not true

granted, it's probably worth the experiment if you are planning on doing a more serious project in the future,
The man who never made a mistake never made anything...

but i'd bet money you'll hate the tone.

Unlikely as the tone will be what it is and likely not far from original.
 
OK, as soon as you get that veneer you will need to get it under some serious weight. If it is already distorted which is likely then you will want to mist spray it with water on each face and clamp it between two solid bits of ply and leave it for at least a week in a dry warm place to flatten it.. Burr and crotch veneer can pull and push in all sorts of ways and buckle and cup randomly if left to it's own devices. Some sort of heated press will do the job quickly but you dont have one so thats no good to you. Ignore the stuff they sell that claims to "platicise" the wood to flatten it. You will also need some veneer tape to join the pieces once you have cut them to the correct size.

You will have to bookmatch the pieces and join them dry with the tape to make the "lay up" veneer. You will need to be able to cut a perfect 90 degree edge on two sides and I mean "perfect" Once you have done that you will need to cut the veneer to slightly over size of the outline of the bass.You do that by making a dummy plate of the bass outline about 2 or 3 mm over size out of 1/2 inch ply. You will also use that when you glue that baby down. More on that later.

I have some old burr veneer knocking about I'll see if I can dig some out and do a quick picture essay for you on the prep....

As far as prepping the bass. Are you planning on stripping the whole thing or just the top? It may be easier if you sand flat on the back and sides and shhot a solid dark colour to suit. That way you will only have to bring the top down to bare wood.. Just an idea.
 
This process, like any other adventurous alteration applied to bass guitars, is going to be a steep learning curve.

It's probably best to do it on a Yamaha first to get some runs on the board.

Very envious, because I wish I could sand back guitars and basses, and paint them and then apply nitrocellulose etc to get them looking new again.

For a vintage Fender bass, you probably would not do it, but for a bass that really needs it, and one you do not plan on selling in the short to medium term, it's a great opportunity.

I have a 1980 P bass sitting around that has a few scratches and dings, and the sanding process would really bring it back to life. But for an instrument like that, you are better off just leaving it if you plan to sell it. The drop off in value for vintage instruments that have been re-finished is phenomenal.

1962 Fender Precision Bass Sunburst (Professional Refin) | Reverb

Try buying an original spec 1962 P bass for less than $10,000

They usually fetch a lot more than that as well:

1959 Fender Precision Bass Sunburst | Reverb

The crazy thing is, both basses listed there probably produce great tones regardless. I have to object to those machine heads on the refinished 1962 version. They could have easily sourced something to fit the holes.

But the refinished basses just dont sell on the vintage market. That '62 has been listed for quite a while.

Good luck, I will be very keen to see some update photos as you go.
 
Hey Muttley. the veneers I bought are large enough that I can cover each side with one sheet, so no bookmatching and I am able to avoid the perfect 90 degree edge. There are 6 sheets in the lot I bought; roughly 53cm x 33cm each. I'll have a few mm's around the edge of the guitar as you described. As for heat pressing, you're right, I don't have one, but I can press them with MDF and my garage is about 37c (Texas). Does that count?? LOL.

Not sure what I want to do about the sides yet. Any ideas? Can I cut strips of the veneer and fair the edges with sanding??

Hey Mecl, I wouldn't touch a $10,000 guitar with surgical gloves and an insurance policy. he he he...

I can see this project taking a while.

If you lay them straight on without bookmatching it's not gonna look that good. At least do a 2 piece match up. If you want do the edges you are going to need an awful lot more kit and some more backing for the veneer so you can postform the edge. Believe me it aint easy and even with a vacuum/bag press which I have and lots of experience that would be a challenge for me. Think carefully what you want to achieve. I would go for the capped option with a matching solid colour sides and back. Especially as it is your first toe in the veneering water. ;)
 
If you lay them straight on without bookmatching it's not gonna look that good. At least do a 2 piece match up.

I think we're talking two different things. The veneers are large enough to cover the front with one sheet. And I'll have 6 sheets, if needed. I might also do the back... But definitely will take your advice and not do the sides.

You don't think this will look good???

BasswithVeneer.jpg
 
Mate if thats the look you are after it's all good. I was thinking a mirror image of the lower bout on the top by bookmatch it but its all good. My background is bookmatch, both as an apprentice and as a guitar builder of thirty years but thats not a reason to follow what I suggest. What you suggest will work fine and there is no technical reason not to so go for it. At the end of the day it will work and save you a bit of craft. You should still pickup some veneer tape and think about the glue line you intend to use. Also you can go right ahead and make the clamping cauls that I mentioned. Those will be same whichever way you go.

Always happy to provide some tips on the process will be provided if and when you need them. There are a few things that will seriously help you when it comes to actually glueing up and clamping.
 
I think we're talking two different things. The veneers are large enough to cover the front with one sheet. And I'll have 6 sheets, if needed. I might also do the back... But definitely will take your advice and not do the sides.

You don't think this will look good???

View attachment 81019
That's some nice photoshopping! :D

So how are you going to wrap it around the edges?
 
Thanks Mutt. That's definitely the look I would like to have. Love it. Glad to hear it will save me a few steps (of which I know I will eff up!!) From the website where I purchased the veneer, they highly recommend not using yellow glue, which I guess is a carpenter's glue. Any suggestions on what veneer glue to use?

Hey Greg,

I'm not sure about the edges just yet. I'm hoping some judicial sanding will fair the edges of the veneer to the body nicely. I don't plan to wrap it around the edges to the sides. I will probably paint and/or stain the sides a dark color like Mutt suggested and hope I can get it to blend. This is another stage of the experimentation part.

Here's a better photoshopped picture...

BasswithVeneer2.jpg
 
Thanks Mutt. That's definitely the look I would like to have. Love it. Glad to hear it will save me a few steps (of which I know I will eff up!!) From the website where I purchased the veneer, they highly recommend not using yellow glue, which I guess is a carpenter's glue. Any suggestions on what veneer glue to use?

Hey Greg,

I'm not sure about the edges just yet. I'm hoping some judicial sanding will fair the edges of the veneer to the body nicely. I don't plan to wrap it around the edges to the sides. I will probably paint and/or stain the sides a dark color like Mutt suggested and hope I can get it to blend. This is another stage of the experimentation part.

Here's a better photoshopped picture...

View attachment 81021

In the ambient temp area you have yellow glue which is probably titebond will have an open time of about 10 minutes. If you go with that then you have absolutely no room for error. When I was at BA Woodshop doing all the veneer work on corporate jets we would use epoxy with an open time of about an hour. It also has better gap filling properties so any pin holes and cracks get filled and you can color it down with dye to match the timber. That would be my choice. Alkl the stuff at Rolls Royce had to be done with Cascamite or hide glue but that was over 30 years ago. much has changed.

The most important thing is to have a system prepared that allows you to spread and clamp quickly and efficiently with no slip. Thats where the tips I have may be useful but you aint there yet. ;)
 
Hey Greg,

I'm not sure about the edges just yet. I'm hoping some judicial sanding will fair the edges of the veneer to the body nicely. I don't plan to wrap it around the edges to the sides. I will probably paint and/or stain the sides a dark color like Mutt suggested and hope I can get it to blend. This is another stage of the experimentation part.

I was going to suggest just that, but I don't know anything about this stuff. I was going to say strip it down to bare wood and use your veneers to make something like a gigantic pickguard to cover the top and back. Then lightly sand the edges to blend the veneer and body into one seamless transition and stain the edges to taste. Maybe that could work?.
 
In the ambient temp area you have yellow glue which is probably titebond will have an open time of about 10 minutes. If you go with that then you have absolutely no room for error. When I was at BA Woodshop doing all the veneer work on corporate jets we would use epoxy with an open time of about an hour. It also has better gap filling properties so any pin holes and cracks get filled and you can color it down with dye to match the timber. That would be my choice. Alkl the stuff at Rolls Royce had to be done with Cascamite or hide glue but that was over 30 years ago. much has changed.

The most important thing is to have a system prepared that allows you to spread and clamp quickly and efficiently with no slip. Thats where the tips I have may be useful but you aint there yet. ;)

Ahh, cool. good to know. I read about the gap fill stuff and pinholes. I guess that's a priority, then???

You're right, I'm not at that point. First is to strip the paint from the body.
 
I was going to suggest just that, but I don't know anything about this stuff. I was going to say strip it down to bare wood and use your veneers to make something like a gigantic pickguard to cover the top and back. Then lightly sand the edges to blend the veneer and body into one seamless transition and stain the edges to taste. Maybe that could work?.

Yeah, a giant pickguard is kind of what I had in mind. I think you understand how I see this working.
 
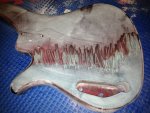
Heatgun and chisel seems to work good.

At first I tried an 80 grit paper on my orbital sander. Meh, it was taking a while. Got out the heat gun and chisel and this is about 5 minutes of work. Of course, I'm a little dizzy now and I've got this weird almond/peach taste in my mouth.... :drunk:

IMG_0301.JPG
 
Back
Top