Nice one Ash'. I know you needed to K.I.S.Sir but can I point out that it is almost always necessary to include output Z and load Z in any divider calculation?
A good example of this is an attenuator for guitar into (the unnecessarily high gain these days!)some AI inputs.
Dave.
Just noticed this. I did say: "The only question is what makes up Z1 and Z2. In almost all cases they are both actually made up of some combination of multiple components..."
")
K. So I can't really link to the schematic for your specific kit, but it really is a basic clone of the DOD 250 with provisions to convert it to a MXR Dist+. They're about exactly the same circuit, only a couple of component values are different. That doesn't change what they do or why they're there, though they might have some effect on the ultimate outcome. It's actually quite a bit like a Rat also, but...
Here's a scheme for the 250 with numbered components to make it a bit easier to reference. I'll try to identify any places where this differs from the BYOC kit, but again I think we're talking more about how and why more than exactly how much.

Neither this nor the BYOC schemes include the actual bypass wiring. That's not unusual. I'm pretty sure that it's a simple true-bypass arrangement on a 3PDT, and we're going to ignore it for this discussion. The above scheme doesn't include the power supply switching that you can at the input of the BYOC schematic. This is the ubiquitous way of disconnecting power when the input cable is unplugged. The "bottom" of the battery doesn't actually connect directly to "ground" to complete its circuit and do its thing. It goes to the ring of the TRS input jack. When you stick a regular TS guitar cable in there, the ring terminal touches the shield, which connects it the whole thing to ground and completes the power supply circuit. Note that this circuit is always on as long as it's powered and a TS cable is in the input, regardless of bypass status. The bypass switch just disconnects the input and output of the circuit, doesn't turn the thing on and off. It does turn the LED on and off, but...
The tip of the input jack goes to where it says In on the schematic.
")
R1 is not on the BYOC schematic, but is actually a good idea. It is called a "pull down" resistor and can help keep it from popping when the switch is flipped. See
here for more detail than you probably need on that.
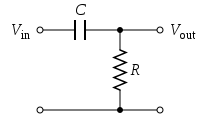
The BYOC does have an optional capacitor in that location. That's the "bottom half" of an RC LPF like in my post above. The "top half" is pretty much the guitar or whatever else happens to be plugged in. I think this is a very small capacitor so should work out to a very high cutoff, and shouldn't much affect the range of frequencies that normally come out of a guitar. A cap in this spot is usually there to filter out ultrasonic and radio frequency noise which you might not even actually hear, but could eat up headroom and generally make the circuit act funny. Then again, it might be enough to hear. Who knows? To calculate the cutoff we need the specifics of the input, which could be anything at this point, so... Try it and see if it makes a difference to you. If not, I'd highly suggest putting a 2.2M resistor in that spot as a pull-down.
C1 creates a high pass filter, but it's a little complicated to see what the "bottom" of that filter is because it includes R2, R3, R8 parallel to R9... Anyway, it is a relatively large capacitor over relatively large resistances, so its cutoff is going to be relatively low. It may not even touch the fundamental of the low E, but it might roll off some from the bottom end of a bass guitar or drop tuned/baritone guitar. I don't think this cap is really supposed to affect the tone, though. It's real purpose is what we call "AC coupling", but is easier understood as "DC blocking". We want to let the AC audio signal through this node, but we don't want any DC voltage from the input to mess up the way our circuit works, nor to let any DC voltage we apply to get out to the outside world or to be affected by the input end of the circuit at all. The input side of this cap should be wiggling up and down around 0VDC, but this cap means it really kind of doesn't matter because any DC offset gets stripped out anyway.
R2 does create a voltage divider with R3, but if you do the math, you'll find that it's really an insignificant amount of attenuation. What it more does is limit the current into this node and it's kind of more "best practice" than important part of the operation.
R3 is important and interesting. Remember, we stripped off any DC that might be on the input, so it should now be wiggling around 0V. Remember also that this opamp gain stage is going to do its thing by dividing the power supply proportional to the input. Well, it may or may not be obvious, but the output of the opamp can't swing beyond the extremes of that power supply. That is, the highest it can go is 9V and the lowest is 0V. It can't swing more negative than the power supply's most negative voltage. (Most opamps, including the one you're using, won't actually go all the way to either power rail, but that's not super important right now) So, you want to amplify a signal that sometimes swings below 0V, and actually want the output to go even further below 0V, but it can't go below 0V at all. We need to get the input signal to swing somewhere in the middle of the power supply so that there is plenty of room for the opamp to amplify both upward and downward swings. We add a voltage equal to almost exactly half the power supply, what we call a "bias voltage", which is what that "VB" at the other end of the resistor means. That node will be connected to the other spot that says VB up by C7, and even though we're getting out of order, I suppose it's time to look at that power supply chunk.
Let's start where it says +9V(T). Don't know what (T) means, but this is the "top" of the battery and/or the positive terminal of the DC power connector or just generally the most positive point on whatever we're using to power the thing. R7 is kind of a current limiting thing which keeps helps keep the capacitor from sucking too terrible much current when it's first powered up. It is also the "top" of a low-pass filter which has C6 as its "bottom". That cap is really big, and even though this resistor is pretty small, it still works out to an extremely low cutoff frequency. The amplification happens by dividing the power supply in response to the wiggles of the input, so what do you think happens if the power supply is already wiggling on its own? Yep, you'll hear it! If this is powered by a battery, it's not going to be wiggling, but if you're plugged into a wallwart it could be for any number of reasons, so here we're filtering out as much AC signal as we possibly can to get a nice flat, quiet DC supply to work from. Any parts that need to connect to 9V wants to connect after this filter, and that's the VA point. In this case, it goes to the positive power supply input on the opamp.
Now R8 and R9 are a picture perfect example of the basic resistive voltage divider. Depending on which version you're building, they will be either 22K or 1M, but in either case they match, and you'll recall that this means that the voltage at their junction (VB) will be exactly half of the supply voltage, which is what we want for our bias voltage. In actual fact, the choice of values here is almost arbitrary as long as they match (remember proportion is all that matters in a divider) and are much larger than R7. The smaller resistors will make the whole box pull a bit more current from the supply, but I'd be really surprised if you actually hear a difference.
Especially since they are pretty much bypassed for all audio frequencies by C7, which is another really big cap meant to filter off any AC signal that might have got through the last filter, or generated in the resistors, or brought here through R3. Any noise at this point would be coupled into the input and be amplified along with our signal, so we want to make damn sure we kill it dead before it can get there.
And then we're back to the non-inverting (+) input of the opamp. This part of the circuit is really not that far off from the non-inverting opamp example I posted above. Ignoring the caps for just a minute, the feedback is divided down with R5 as the "top" and R4 + whatever the Gain pot is set to as the "bottom". When the gain pot is all the way down, the full resistance of 500K is there. The divider is 504.7K/1504.7K, or about 1/3 of the voltage from the output is reaching the inverting input, so the opamp will apply about 3 times (like 9-10db) gain to the output. When gain is turned all the way up, it goes toward 0 Ohms, so the divider is 4.7K/1004.7K, about 1/200, so gain is a pretty hefty 200 times (something like 45-50db). Or at least it will try. Even moderate pickups can put out 1V peak to peak on harder strums, some hot humbuckers can hit 4V or more, and active pickup systems can get close to 9V or even more. Multiply even a 1V input (biased at this point to swing up to 5V and down to 4V) by 200, and you're asking the opamp to swing up to 104.5V and down to -95.5V. We already said it can't get bigger than 9V or smaller than 0V, so we end up "hitting the rails", clipping, distorting, right here at the opamp. The Dist+ has a 47K at R4, which makes for about 1/10th the gain at the max, but doesn't change the minimum quite so much.
But of course we can't really ignore those caps. C3 would be left out if you're doing the Dist+ version. It's a little weird to see the filter that it makes because it's got that resistor parallel to it, but lets pretend we just take that out. The divider is now C3 as the top and R4 + Gain as the bottom. At high frequencies, this cap is a straight wire, the divider doesn't (ratio very close to 1), and so those frequencies get through at unity gain. At low frequencies, C3 looks like a big resistor, so those frequencies are divided down more and more, and so the opamp will add more and more gain at lower frequencies. But then that R5 in parallel kind of won't let that equivalent resistance get too big, so the gain shelves off rather than heading toward infinity at low frequencies. The cutoff of this filter depends on the Gain control. I'm not going to calculated it, but usually will above the range of the guitar if not the audio range altogether when the gain is way down, and will maybe start to shave off a little bit of the top end when it's cranked. This can help tame some of the harsh fizziness at the very top end when it distorts hard, but almost as important is that it keeps it from amplifying any of that supersonic/RF noise that we tried to filter out but might have snuck back in since.
That low boost filter wouldn't be able to go to infinite gain at low frequencies even without R5 to shelf it off anyway though, because C2 is sitting there making the "bottom" of the resistor look really big at low frequencies. This cap does a couple other things, too. First, remember that this whole thing is biased up to wiggle around 4.5V, and if we connected that directly to 0V ground (at the other end of the Gain pot), it would just plain mess everything up. C2 blocks DC current via that route, so that this thing can work at all. It also creates a low-pass filter on the feedback with R5 as the top. R4 and the pot make it into a shelving low-pass by making sure there is some resistance in the bottom of the divider even at frequencies where the cap is a straight wire. Of course, we're here in Bizzaro World, so the frequencies that get attenuated here actually get more gain at the output. So, it acts like a high boost. The lower frequencies get through at unity, and higher frequencies get more gain. Again, I'm not going to calculate the cutoff here. It is somewhat dependent on the Gain knob again, getting higher as the gain increases, and at high settings it probably creates a pretty significant drop across much of the lower end of the guitar range - even into the what we might call "low mids". This is important in making it sound like an overdrive or distortion rather than a fuzz.
Then we're done with the opamp, and come out the output at the tip of the triangle. C4 is there for about the same reason as C1 - to strip out the bias voltage we've applied and get things wiggling around 0V before we pass it down the road, and to keep DC conditions on the output from messing up the opamp action.
R6 is partly there to limit the amount of current that can be pulled out of the opamp, partly to help alleviate some of the weird things that capacitance (like the output cable) can cause when connected to an opamp output, and mostly to work as the top of the low-pass filter with C5 (reduces some more of the harshest distortion byproducts) and the clipping divider made with the diodes. The DOD 250 has one diode (D1) pointing one way and two in series (D2 and D3) pointing the other way. When the signal swings up from 0V, the resistance of D1 starts out near infinity and gets almost not at all smaller until it hits about 0.6V where it rapidly goes around the curve of the exponential function and then pretty much stays exactly enough to keep that voltage at 0.6V no matter how much more positive the opamp tries to make it. When the signal swings below 0V, the same thing happens through D2 and D3, but it doesn't turn over until it has gone twice as far. It clips at -1.2V or so in this direction. That causes a bit of asymmetry in the distortion which will give us some even order harmonics and sound a little more "musical" to some people. In the Dist+, there's just a single diode on that negative side, so the distortion is symmetrical, so maybe a bit nastier. It will also be a bit quieter at the output, because the signal can only be 1.2V peak-to-peak rather than 1.8V. I would suggest that you could put a red LED in place of both D2 and D3 and it would do about the same thing. Some folks claim to be able to hear the difference in "clipping characteristics" between an LED and a pair of silicon in series, but it just can't possibly be more than extremely subtle.
Then you've got the Volume pot. If you imagine that squiggly line that represents the resistive element as being split into two resistors with their junction connected to the wiper, I think you see how this is pretty much a textbook example of a simple resistive divider. Turn it up so that the top resistor is 0 and the bottom is 100K, and you get a ratio of 1, no attenuation. Turn it down and the bottom resistor goes to 0 with the top at 100K, and you get a ratio of 0/100K = 0, and the output is silent.
This really is a super simple, but very versatile circuit. You should build a Rat next.