You are using an out of date browser. It may not display this or other websites correctly.
You should upgrade or use an alternative browser.
You should upgrade or use an alternative browser.
Packing 101 (read this if you want your recorder / mixer to arrive in one piece)


cjacek
Analogue Enthusiast

cjacek
Analogue Enthusiast
Source for the above:
http://cgi.ebay.com/Tascam-MSR-16-1...ryZ15000QQssPageNameZWDVWQQrdZ1QQcmdZViewItem
http://cgi.ebay.com/Tascam-MSR-16-1...ryZ15000QQssPageNameZWDVWQQrdZ1QQcmdZViewItem
A Reel Person
It's Too Funky in Here!!!
Classic!
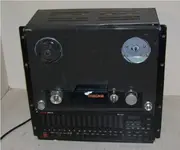
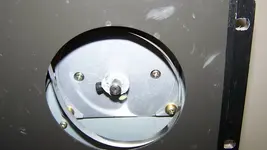
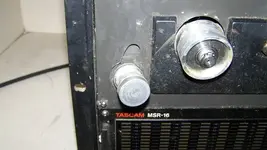
This item was damaged during shipment as shown. iT pwoers on, the controls respond as they should and the play,ff,rew,stop functions work well but it has not been tested with a tape.
")
This item was damaged during shipment as shown. iT pwoers on, the controls respond as they should and the play,ff,rew,stop functions work well but it has not been tested with a tape.
cjacek
Analogue Enthusiast
Yup, it's hard to tell who the biggest moron is, the seller trying to auction off this thing [with a retarded description] or the one who originally packed this unit! :rolleyes:")
----
----
sweetbeats
Reel deep thoughts...
I finally got around to going through this entire thread. It is indeed excellent. Worthy of the sticky.
But I couldn't find info on what I needed to get...crating and freight...
Can anybody help?
Here's the situation:
There is a mixer that is out-of-state from me that needs to be shipped. It is 38 x 34 x 12 and I'm sure weighs in at about 150lbs. +/-.
I have a friend who lives in the area where the mixer is who is going to pick it up.
I want him to be able to deliver it to a professional that will properly pack/crate/strap and ship the thing to me.
what do I do? Is there such a service? Its in Southern California.
cjacek
Analogue Enthusiast
Cory, my friend, were you able to get the shipping done? Sorry was not able to help earlier but typically all of the 'pack & ship' local stores are able to arrange packing and crating / palletizing.
When I had my recorder shipped from California, I was lucky to be dealing with the seller, of the said machine, who also had a business and personally boxed and strapped it onto a pallet.
I think contacting any freight company might give leads as to with whom to deal with.
----
When I had my recorder shipped from California, I was lucky to be dealing with the seller, of the said machine, who also had a business and personally boxed and strapped it onto a pallet.
I think contacting any freight company might give leads as to with whom to deal with.
----
sweetbeats
Reel deep thoughts...
good advice and valuable regardless of timing...thanks for putting it up. I did some checking around and it is going to be cheaper by far to make the trip and pick up the item...I'll be making a Canonball Run style excursion in the next couple-three weeks. 
cjacek
Analogue Enthusiast
I did some research and while I don't have first hand experience with the following companies, they surely look to be a much better option to ship larger / fragile electronics:
Allied Van lines, Bekins, Mayflower etc...
They will actually pack / crate & ship the product for you and some of the better ones specialize in high value, heavy and fragile electronics. It's worth checking these 'moving' companies out, instead of UPS, Fedex, DHL, USPS and all those parcels smashers.. Blah!
---
cjacek
Analogue Enthusiast
Have a lookie at a nice TASCAM 58 which was damaged in transit :
:
https://homerecording.com/bbs/showpost.php?p=3036366&postcount=356
--
:https://homerecording.com/bbs/showpost.php?p=3036366&postcount=356
--
analogkid
I Bleed Analog!
I use a very simple rule in regards to shipping: The package must be able to survive a toss from the back of a C-130 moving 100 knots at 75 ft in the air. This is a close approximation of UPS or FEDEX shipping
AK
AK
cjacek
Analogue Enthusiast
I often say that if it's not palletized or crated then don't bother. Here's a superb showcase for the latter:
https://homerecording.com/bbs/showthread.php?t=276396
---
https://homerecording.com/bbs/showthread.php?t=276396
---
sweetbeats
Reel deep thoughts...
This is a reminder and a reinforcement to every time it has been said to demand strict packing standards when having gear sent to you, and if the Seller won't abide then it is time to back out.
Another sad reminder too that shipping damage doesn't just happen to the heavy open-reel machines or large mixers...it strikes cassette decks too...check out post #7 here...
Another sad reminder too that shipping damage doesn't just happen to the heavy open-reel machines or large mixers...it strikes cassette decks too...check out post #7 here...
A Reel Person
It's Too Funky in Here!!!
Some people...
Some people don't have a clue what really good packing is, no matter how much you council them, or they don't care.
Some people don't have a clue what really good packing is, no matter how much you council them, or they don't care.
cjacek
Analogue Enthusiast
Yeah, many people just don't give a crap, even if you do indeed council them. I'm truly sad about your loss Cory...
gerard
Member
Packer & shipper info used on my console
Hey guys, I'm the one with the Tascam M3500 board. Here's what the seller used to pack and ship:
Packer: Wetzel & Sons (moving and storage)
12400 Osborne St.
Pacoima, CA. 91331
818-890-0992 (Danny)
Shipper: R & L Carriers
PO Box 271
Wilmington, OH. 45177
1-800-535-1983 (customer ser)
Sorry I didn't post this sooner! Hope this will help.
Jerry
cjacek
Analogue Enthusiast
Yes, it does help a lot! Thanks Jerry!!
Is this the company that actually packed it too or just shipped? Did the seller bring the mixer to them or did they pick it up? Just want to clarify.
Is this the company that actually packed it too or just shipped? Did the seller bring the mixer to them or did they pick it up? Just want to clarify.
gerard
Member
Hmmm......
I'll try to remember how it went down. The seller droped the console off to Wetzel and Sons, they did the packing and the crate sat there till R & L picked it up and shipped it here. Here's were it gets a little fuzzy. The "bill to" on the packing list is QWE Logistcs in IL., also a shipping agent (ATMC/Transgroup) was involved. Really not sure why/how/when/what the seller was doing, 4 different companys? I don't get it. Maybe someone who is in the know can chime in. Hope this helps!
Jerry
sweetbeats
Reel deep thoughts...
How I Packed My Tascam 48 To Send To lo.fi.love...
As requested by cjacek, the AO Prime Minister of a more humane world for dinosauric audio gear in-transit, here is a pictorial display of how I packed my Tascam 48 that is soon to be lo-fi-love's, and hopefully it arrives in as nice a condition as it is at present...this is a great concern to me, and below is how I hopefully will abate that concern.
First off, we are talking about a very, very clean example of a 48-OB that is fully operational, serviced, aligned and calibrated.
Here are some pics:


Its a clean one...So...how to get it to lo.fi...
Fortunately I had some good packing materials on-hand from my parts 48 being sent to me as well as my parts 58. I hung on to all the parts 48 packing materials as the seller had basically created a caccoon out of styrofoam block...used a hot knife or soldering iron to make custom cutouts from the tape path and such...but I'm getting ahead of myself...
First I took the back and bottom feet off as well as the reel adapters...bagged them up. I'll wrap them in bubble pack in a separate box along with some other parts that lo.fi bought. Notice also that I taped the power cord along the side. I don't want the deck sitting on the cord...could damage the deck or the cord. Also I'm using blue "painter's" masking tape. Holds good enough but comes off easy and leaves no residue.

Then I wrapped the deck in a plastic bag. Helps to keep it from getting scuffed and also keeps it clean and dry. Poked a hole for the power cord so that could be tucked safely aside in the box.

Here is some of the packing materials from the parts 48...notice some dented in areas...those are spots where I could tell the parts deck was rubbing because the styrofoam wasn't the right shape...plus the parts deck wasn't in a bag. Anyway, I smacked those spots with a hammer to compress the styrofoam to reduce the pressure on those areas.

You can see further what I mean looking inside the box...you're looking at the impressions the back of the deck made in the styrofoam. see where the power cord was? No-no. Anyway, smacked out a spot for where the power cord comes out (and in the case of this pack job wraps around the side of the deck), as well as the I/O jacks and ACCESSORY port.

Ahhh...got it in there with all my spinal discs intact...(hint, I actually tipped the box on its side, set the deck on its bottom, slid it into the box and then tipped the box back onto its bottom, placing the deck on its back)

Filling it in...I stretched the plastic out around the rollers, especially the tension arms to avoid the dreaded tweaked 48 t-arm syndrome... You can see the rack ears in there too...wrapped in saran-wrap to avoid scuffing.

All the styrofoam is in. The whole idea is to keep this 100lb. chunk from shifting around, so I carefully selected an amount of bubble pack to fill in the top, and then I really try to get the top of the box pushed together snug as I tape it.

Here's the inner carton now all sealed up. I always tape across the seam of the box top and along the edge of the flaps...gives the box torsional rigidity which is very important for a package of this size and weight.

Here's the inner carton in the background with the outer carton in the foreground. Found an outer carton that is a great size. It isn't super-duty, but it is a double-wall box which is good.

I've got a bunch of closed-cell poly-foam blocking from other shipments. This is great stuff. Easy to cut with a steak knife. I didn't have enough to make a full pair of end-caps, but I could emulate that with what I had...


It ended up being a pretty good fit!

Now for the other side...

After getting the other side fitted, I pulled the blocks back out, stuffed corner pieces along the sides as well as blocking on the larger side surfaces. Then a poured in a bunch of packing peanuts. I'm not expecting the peanuts to do anything but help to stabilize the blocking and minimize shifting. Peanus do nothing else on a package of this size and weight. Also note the scoring along the top flaps. I scored each flap to accomodate the height of the blocking. Rather than compromise the blocking, I made the box taller. Cutting lightly with a utility knife so that you cut through the first layer but not all the way through...then you can bend the scored cardboard one way and then the other way. Makes a nice new bend but it still has some strength. I make sure to tape these corners well though to help reinforce.

And there you go! I put a piece of cardboard from another box on the top there to fill in the space left after raising the height of the box and hence shortening the flaps. Again, corners/edges taped well.

So now we have a firmly held deck nestled in a custom formed caccoon of styrofoam, and that caccoon is suspended in a custom fit closed-cell poly-foam cradle. The exterior skin is double-wall and everything is liberally taped. Went through an entire roll of packing tape for this job and its worth it. I'll ship it FedEx and have arrow labels put on the box to help keep the deck from being oriented face-down...it'll be fully insured and marked fragile...not that that will actually do anything.
Thanks to cjacek for this thread and the AO forum in general. Learned a lot about proper packing right here!
Okay lo.fi...here it comes!!")
As requested by cjacek, the AO Prime Minister of a more humane world for dinosauric audio gear in-transit, here is a pictorial display of how I packed my Tascam 48 that is soon to be lo-fi-love's, and hopefully it arrives in as nice a condition as it is at present...this is a great concern to me, and below is how I hopefully will abate that concern.
First off, we are talking about a very, very clean example of a 48-OB that is fully operational, serviced, aligned and calibrated.
Here are some pics:
Its a clean one...So...how to get it to lo.fi...
Fortunately I had some good packing materials on-hand from my parts 48 being sent to me as well as my parts 58. I hung on to all the parts 48 packing materials as the seller had basically created a caccoon out of styrofoam block...used a hot knife or soldering iron to make custom cutouts from the tape path and such...but I'm getting ahead of myself...
First I took the back and bottom feet off as well as the reel adapters...bagged them up. I'll wrap them in bubble pack in a separate box along with some other parts that lo.fi bought. Notice also that I taped the power cord along the side. I don't want the deck sitting on the cord...could damage the deck or the cord. Also I'm using blue "painter's" masking tape. Holds good enough but comes off easy and leaves no residue.
Then I wrapped the deck in a plastic bag. Helps to keep it from getting scuffed and also keeps it clean and dry. Poked a hole for the power cord so that could be tucked safely aside in the box.
Here is some of the packing materials from the parts 48...notice some dented in areas...those are spots where I could tell the parts deck was rubbing because the styrofoam wasn't the right shape...plus the parts deck wasn't in a bag. Anyway, I smacked those spots with a hammer to compress the styrofoam to reduce the pressure on those areas.
You can see further what I mean looking inside the box...you're looking at the impressions the back of the deck made in the styrofoam. see where the power cord was? No-no. Anyway, smacked out a spot for where the power cord comes out (and in the case of this pack job wraps around the side of the deck), as well as the I/O jacks and ACCESSORY port.
Ahhh...got it in there with all my spinal discs intact...(hint, I actually tipped the box on its side, set the deck on its bottom, slid it into the box and then tipped the box back onto its bottom, placing the deck on its back)
Filling it in...I stretched the plastic out around the rollers, especially the tension arms to avoid the dreaded tweaked 48 t-arm syndrome...
You can see the rack ears in there too...wrapped in saran-wrap to avoid scuffing.
All the styrofoam is in. The whole idea is to keep this 100lb. chunk from shifting around, so I carefully selected an amount of bubble pack to fill in the top, and then I really try to get the top of the box pushed together snug as I tape it.
Here's the inner carton now all sealed up. I always tape across the seam of the box top and along the edge of the flaps...gives the box torsional rigidity which is very important for a package of this size and weight.
Here's the inner carton in the background with the outer carton in the foreground. Found an outer carton that is a great size. It isn't super-duty, but it is a double-wall box which is good.
I've got a bunch of closed-cell poly-foam blocking from other shipments. This is great stuff. Easy to cut with a steak knife. I didn't have enough to make a full pair of end-caps, but I could emulate that with what I had...
It ended up being a pretty good fit!
Now for the other side...
After getting the other side fitted, I pulled the blocks back out, stuffed corner pieces along the sides as well as blocking on the larger side surfaces. Then a poured in a bunch of packing peanuts. I'm not expecting the peanuts to do anything but help to stabilize the blocking and minimize shifting. Peanus do nothing else on a package of this size and weight. Also note the scoring along the top flaps. I scored each flap to accomodate the height of the blocking. Rather than compromise the blocking, I made the box taller. Cutting lightly with a utility knife so that you cut through the first layer but not all the way through...then you can bend the scored cardboard one way and then the other way. Makes a nice new bend but it still has some strength. I make sure to tape these corners well though to help reinforce.
And there you go! I put a piece of cardboard from another box on the top there to fill in the space left after raising the height of the box and hence shortening the flaps. Again, corners/edges taped well.
So now we have a firmly held deck nestled in a custom formed caccoon of styrofoam, and that caccoon is suspended in a custom fit closed-cell poly-foam cradle. The exterior skin is double-wall and everything is liberally taped. Went through an entire roll of packing tape for this job and its worth it. I'll ship it FedEx and have arrow labels put on the box to help keep the deck from being oriented face-down...it'll be fully insured and marked fragile...not that that will actually do anything.
Thanks to cjacek for this thread and the AO forum in general. Learned a lot about proper packing right here!
Okay lo.fi...here it comes!!
Last edited:
A Reel Person
It's Too Funky in Here!!!
Wow!
That's a clean machine! Really nicely kept & well taken care of. Awesome packing job! A stellar example of how to do it right! Your best bet is covered.
That's a clean machine! Really nicely kept & well taken care of. Awesome packing job! A stellar example of how to do it right! Your best bet is covered.