Help needed building my studio

omero

New member
Helo all.
I am about to start building my home studio and would like some tips/advice before i take to my materials with hammer and saw...

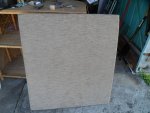
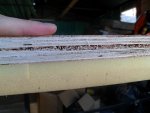
iv found 10 1900x900mm pannels and 4 1000x900mm pannels out the front of an old warehouse, i know their not ideal seeing as their made from foam not fiberglass but am doing this on a budget so they will have to do. was thinking of putting some cardboard between the foam and the cloth covering the pannels to compensate for the foams softness. is this a good idea or would it be better to just leave it as it is??

I would also like some advice on placement of the pannels. iv done some reaserch and have come up with what i think is a good layout but would like some feedback before i get started.

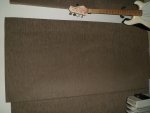
here are some images of what im working with and the planned layout of the pannels, with an identical layout on the rear wall. any feedback would be great

cheers

studio .jpg
SAM_0469.JPG
SAM_0468.JPG
SAM_0467.JPG
 
I just made a few extra panels (in addition to what I already am using) for spot treatment of flutter echoes out of 2" thick foam (flat like yours, but white). To make them lightweight and super quick/easy to install, here's what I did and I recommend:

1- Lay the foam on a large enough piece of flat card board (no fold lines) - try and find some harder than most cardboard. Boxes for heavy duty hold electronics are best. Check with a local furniture or electronics store. Make sure your cardboard is on top of a surface that won't scratch. I did mine on tile.
2- Cut the cardboard, following along the edge of the foam to make sure you cut the cardboard exactly to the size of the foam.
3- Go pick up some spray adhesive (make sure on the bottle that some of it's recommended uses are for foam and fabric)
4- Cut your fabric large enough to have an inch or two folding around the back of the panel
5- Spray one side of the foam and spray one side of the cardboard. Allow the glue to set in for a couple seconds, then carefully/accurately lay the foam glue side down on the cardboard glue side up. Press firmly but not too firm. The cardboard will be your back (ditch the heavy unneeded plywood)
6- Spray the underside of the fabric and spray the exposed side of the foam. Allow to dry a couple seconds. Place foam side down onto the fabric. Press firmly, not too firm. Don't worry about the edges (hopefully you didn't spray the fabric all the way to the edge yet)
7- Flip it over onto its cardboard back. Smooth out the fabric and glue on the top side so there are no crinkles. Be gentle though.
8- Flip it back onto it's face. Spray the back of the cardboard near the edges, the edges of the foam and the edges of the fabric.
9- Start by lifting one edge up, and pressing along the side of the foam, ensure the fabric adheres nicely with no crinkles, then adhere the fabric to the cardboard on that side
10- Go to the opposing side and do the same. Don't put too much tension on this side (just flattening it so its smooth is all that matters). That way your "squared" foam edges will maintain their shape.
11- now do each other side. You don't need to cut off any excess when you do the corners if you didn't leave too much excess around the edges when you cut your fabric. Fold it up on the sides like you would wrap a present.
12- Your panel is done, time to hang it, presuming it's on dry wall or similar.
13- Hold the panel against the wall where you want to hang it. Place a level to ensure it's level on the wall. Draw a faint line along the top edge with a pencil.
14- Put x2 finishing nails a few inched below your line, and a few inches away from each other horizontally.
15- Place the top edge of your panel lined up with the pencil line, grip the panel firmly and then, with authority, pop it onto the finishing nails. Your'e done.
16- If the foam underneath the cardboard resists the nail and causes the panel to be too far from the wall, remove the panel, grab a finishing nail and poke it almost all the way through the foam on the cardboard side. Then flip the nail around and poke through again using the nail head side. Then place it back on the wall (using the existing holes). It should be almost or completely flush with the wall now.

I should have taken progress pics with mine but I was in too much of a hurry to get 'er done. Will post the finished pics when I have a moment.

Sorry about the lengthy instructions, but more details can only help more, right? I just dislike when people give too vague of instructions (not necessarily referring to on here).

Good luck! :)
 
iv found 10 1900x900mm pannels and 4 1000x900mm pannels out the front of an old warehouse, i know their not ideal seeing as their made from foam not fiberglass but am doing this on a budget so they will have to do.

I can't be certain, but that doesn't look like acoustic foam. Can you blow through it easily? If not, it's just packing foam. It also looks too thin to do anything at bass frequencies. It might help a little, but probably not enough to be worth much effort. Regardless, placing plywood in front of foam as you show is not useful.

--Ethan
 
The extra foam I used just for a few remaining little flutter spots in my control room wasn't designated acoustic foam. It was indeed packing foam...But I could breath through it. So it was fair game. Flutters are gone and room isn't overly dead since I used it sparingly, only where it NEEDED to be, as an addition to my other treatment.

^
For whatever that's worth!
 
cheers for the advice guys. iv started to put it all together and it is making a bit of a difference but not a heap, i guess ill have to wait until i have the dosh for some owens and then just swap it with the foam...
 
I can't be certain, but that doesn't look like acoustic foam. Can you blow through it easily? If not, it's just packing foam. It also looks too thin to do anything at bass frequencies. It might help a little, but probably not enough to be worth much effort. Regardless, placing plywood in front of foam as you show is not useful.

--Ethan
ill be placing the foam on the outside with the plywood against the wall/across corners, im hoping this shoald have a prety decent affect on the higher frequencies?
 
Sorry mate. You're not after advice; you're after confirmation that waht you are doing is OK.
It's not & you'll be putting in a lot of effort for little return.
That's cool if you're strapped for cash, have lots of time/energy and don't expect too much from your efforts.
That plywood's pretty heavy looking & quite thick compared to the foam - take care hanging it all so that nothing lands on your scone.
I hope you have success with it. I'd be happy to say I was wrong!
 
cheers for the advice guys. iv started to put it all together and it is making a bit of a difference but not a heap, i guess ill have to wait until i have the dosh for some owens and then just swap it with the foam...

Plus, if you practice with the instructions I gave you with the foam and DON'T use that hideous looking heavy plywood, the you'll get a feel for wrapping frameless panels (if you're going to go frameless with the OC that is).
 
and would like some tips/advice before i take to my materials with hammer and saw...

Before? Apparently you re-defined the word to mean...AFTER. Your pictures prove it.

Sorry mate. You're not after advice; you're after confirmation that waht you are doing is OK.
Ditto.
 
apparently this is an english class. your so smart arnt you

I think he was referring to you asking for advice on if what you were doing would work after you already did it.
More of a confirmation that what you did would work instead of getting advice on what WOULD work. And it won't work great but it will help some. I'm guessing it'll help more along the lines af your mids and highs more than bass buildup.
Just a thought...:drunk:

(p.s.... in this tense, it's you're...not your...aren't...not arnt.... and I believe a comma is used after "smart")

:D


(p.p.s..... just messin with ya dude ;) )
 
Apparently this is an English class; you're so smart, aren't you? (Possibly intended to be rhetorical which may or may not make the quotation mark redundant depending on which side of the Atlantic and irony you live).
No, he was referring to your original statement and the lack of tense agreement when it met the photographs as demonstrated by the following quoted statement and your 2nd, 3rd & 4th attachments.
"I am about to start building my home studio and would like some tips/advice before i take to my materials with hammer and saw..."
Whereas the snaps show work that has undergone hammer & saw processes.
I reiterate my initial statement though amended to correct the spelling mistake and therefore bring it into line with the grammar & usage parameters of this thread:
Sorry mate. You're not after advice; you're after confirmation that what you are doing is OK.
P.S. Bass traps are't bear traps & Ethan is, as usual, on the money!
 
Last edited:
Back
Top