Getting the basics - some help for someone new to mixing!

Okay, so say I have a bass track, and when I've recorded it, I've played some of it louder than other parts. I should then just automate it so that it's all equal and relative to the overall mix? And this will preserve the dynamics a lot better than drastic compression. Is this what you mean?

Thanks.
 
You could automate to get your levels even then use compression for pushing up the rest of the volume, make it fatter, etc. Gives you a lot more room to work with.
 
Okay I think I get it. I'm still getting to grips with compression though, so first I'm going to focus on automating the tracks and getting a good relative mix. As this seems like the first step after the recording is done.

Right? :)
 
IMO, that is the first step to take. Mix it first, get your levels set, then treat your problem areas with EQ and compression. After that, it becomes a matter of taste.

Most of what I have said here I have learned from the guys on this board. There may be some difference of opinion at the advance stages, but I think most people would agree, source, levels, then EQ and compression for the final adjustments.

Also don't forget, as you add instruments/tracks, your master bus will peak out, that is why you want to leave yourself room on your tracks so you don't sum up and red line your master level. That is where the issues start coming in and then you can start to treat tracks with compression for taming purposes.

Others will get on and help even further, as a noob myself, I can give you only the basics from my understanding, but I don't think I have said anything that would be considered bad advice.
 
Yea. I've tracked low, at -18db, and I actually pushed the levels up with a limiter (trial and error) so that people could hear the mix but really, I should be aware that people on here have monitors and will just turn them up. So for now, I'm going to just do as you said and post some results in a day or so. :)

Thanks for your help.
 
Okay, so say I have a bass track, and when I've recorded it, I've played some of it louder than other parts. I should then just automate it so that it's all equal and relative to the overall mix? And this will preserve the dynamics a lot better than drastic compression. Is this what you mean?
Thanks.
There are others who know much more than me, but a compressor is a generic setting for the track. Automation or even clip editing (I use Ableton's clip editing to pull down the highs so I can set my compressor less aggressive) you can remove the high peaks and not have to deal with them in the compressor. Example, take my peaks and reduce them manually (automation) when I set my compressor, I don't have to deal with those peaks and can adjust to the average more than to the extremes.

Not sure that makes sense, but in summary, by getting rid of the extremes, your compressor settings can be less aggressive leaving you more dynamics.
I agree with this totally. If DM' hadn't- I would have. :D
Think of your first few passes in a mix. Your sorting out the big stuff. Rough in the faders, track gain (pre fader) as needed, the obvious bigger eq / clean ups.
This is a good place to begin looking at a first layer of automation, and that should (if you like) be at the pre fader/pre compressor level. Your sort of getting a dual purpose here; a) You are helping dial the mix in (often clip automation moves replace somewhat moves that you might have otherwise needed on the faders) and b) As you begin to use this approach you begin to see some obvious choices that are availed of whether some of your automation may be served better playing into the compression, or after compression.
 
Okay. I understand.

Although can you explain this please. 'Rough in the faders, track gain (pre fader) as needed'

Does this mean, set a basic level with the faders and make sure you're aware of the headroom you have? I'm just getting used to the terminology. :)
 
Okay. I understand.

Although can you explain this please. 'Rough in the faders, track gain (pre fader) as needed'

Does this mean, set a basic level with the faders and make sure you're aware of the headroom you have? I'm just getting used to the terminology. :)
Yeah Shure :) Faders up, looking to see your master level in the ball park (not out'o whack). I prefer a little low early on and maybe use the master trim temporarily at least to bring it up rather than starting with (or ending up with) a mix too hot.
This where you'd spot the tracks that need a lot more level (or a lot less) than the fader's normal range, and begin to look at your track's global trims.
 
I look on it as you use automation for coarse adjustment of levels and compression for fine adjustment.

BUT, there are many other uses of compression apart from achieving level consistency.
 
...and sometimes hand editing is the best way to "pre-treat" a track before using the compressor.

Let's say you have a bass track that has two or three notes that really pop out. Hand editing those particular notes for volume with either a gain cut or a "U" or "V" shaped volume envelope edit can often be FAR easier than trying to manage those issues using the compressor. After such edits the compressor is used as a final smoothing tool...this is the way I usually approach bass and vocal tracks....hand edit the nasty stuff first.

Of course, tracking the thing well in the first place is the best solution but sometimes a performance is special and hand editing be the difference between using it or having to trash it.
 
That makes sense.

I'm just waiting for my singer friend to come round tomorrow and then I'll get cracking on it. I've been watching a lot of Recording Revolution videos. Very helpful.

What do you mean by envelope?

Thanks.
 
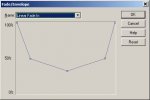
An envelope is simply a segment dynamically edited for volume.

By "dynamically"...I mean that it isn't simply a gain or boost applied to a selection....but rather...a fade or rise over time...or combination thereof.

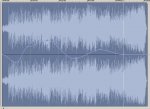
In this case a segment of audio (a blob) is louder than the rest of the waveform and sticks out audibly. Drawing the pictured fade envelope and applying it to the selected blob will lower the amplitude by about 50% but it will leave the ends unaltered...so there's no "click" associated with a sudden change in amplitude from the edited to non-edited areas.

You can often get away with a simple gain cut or boost with a little section like this but if you apply too much gain to a small section within a waveform...and if your selection's beginning and ending doesn't occur at a zero-crossover point....then chances are you'll introduce a nice "tick" or "click" into that edit. The volume envelope, as depicted, will allow for deep cuts or boosts within small selections without fear of that.

Once you set up your hot buttons for editing...edits like this can happen within seconds. What seems like a lot of work becomes rather quick to accomplish with a little practice.

envelope.jpgselect.jpg
 
Last edited:
A control shape within an automation line would be another good example of an "envelope".

Anything that dynamically alters volume within a span of time could be called an envelope.
 
What I've been doing is automating, so it looks like this.

Is this what you mean by the envelopes?

Screen Shot 2015-04-05 at 08.42.21.png

Also, I've been getting pops and clicks when recording vocals on Logic. My buffer size is set to 32. Could this be the reason? What should it be if so?

Thanks again, you guys are great. :)
 
Last edited:
What I've been doing is automating, so it looks like this.

Is this what you mean by the envelopes?

View attachment 92515

Also, I've been getting pops and clicks when recording vocals on Logic. My buffer size is set to 32. Could this be the reason? What should it be if so?

Thanks again, you guys are great. :)

32 is way too low, you've got to own a really powerful CPU to handle it. What processor do you have (sorry if I missed this and this has already been answered)
 
I usually can't go below 64 and stay most often around 512. I can handle the latency around that number, if not I drop it and live with the pops since it doesn't seem to record them.
 
I've got a 2.5GHz i7 which overclocks to 3.7GHz with turbo boost.

I've not had any issues recording with my Kemper via SPDIF at that 32 samples. The Kemper runs at 44.1kHz and prefers to be Master. I do change the buffer size when I use my MIDI Keyboard as it causes latency issues.

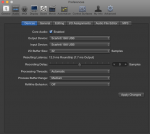
Here's a picture of my audio preferences in Logic.

Screen Shot 2015-04-05 at 17.14.37.png

If I hear no problems at all when using SPDIF should I continue to use 32 samples for the Kemper and change it for when recording vocals which is via XLR cable, or should I just choose a different one all together in order to use less CPU power? It's strange because I've recorded guitar live before with this same set up and not had any pops or clicks and I didn't change the buffer size.

Can an incorrect buffer size affect the sound quality of the recording? Ie: can it distort the quality of the recording? Not all the takes had clicks so I managed to comp a non clicked take. It's okay to use this right?

Does the picture I posted previously of my automation correspond with enveloping?
 
Last edited:
General rule, if it is working for you, it ain't broke. But be aware there is a correlation between buffer size and interface sound stability. The only quality I would worry about would be dropouts, but I think that is not so common these days. At least I've never experienced it and I do some tracking on pretty a low end computer.
 
Back
Top