After reading Cloneboy's recent post I figured it would be a neat thing if we had one thread for Tutorials/Guides made by members of this forum. If anyone else comes across another great Tutorial/Guide post it in hear. If not, at the very least this thread is a collection of a few recent posts that Cloneboy has made.
You are using an out of date browser. It may not display this or other websites correctly.
You should upgrade or use an alternative browser.
You should upgrade or use an alternative browser.
BBS Member Tutorials/Guides
- Thread starter chadsxe
- Start date
This was posted by Cloneboy, and is his work.
MIXING
This is my little mix method:
1.) First thing listen to your recorded material and make some decisions. What needs to be up front? What needs to be in the background? What are the important parts of the mix? Have you recorded everything you need in a clear, high quality manner?
IF YOUR RECORDED TRACKS AREN'T UP TO SNUFF GO BACK AND REDO THEM!
Nothing slows a mix down faster than tracks that have a lot of issues. If it's noisy, pops, bad performance or whatever you owe it to yourself to fix it before you mix it.
Unless you are getting paid by the hour you don't want to play the "fix it in the mix" game. Trust me, I've polished as many turds as a toilet at an overeaters anonymous seminar, and it is never fun. You will kick yourself and end up re-tracking it anyways, so why wait?
2.) Set levels manually for a rough mix in **MONO** (don't stereo pan yet). Don't touch any eq or compression at this point. KEEP IN MIND THAT YOU SHOULD MIX AROUND YOUR *VOCAL* LINE OR MELODY (if an instrumental song). At all times remember that songs are to sell a vocal performance and everything should be subordinate to it.
KEEP IN MIND MIXING IS EASIER IF YOU START WITH THE "CORE" ELEMENTS OF A SONG AND NAIL THOSE FIRST.
Thus, start with the main percussion (which may be all of it), the bassline, the main melodic instruments, vocals, background vocals, primary guitars--anything that is the strong parst of the song. Things like background noises, samples, special effects, random noises and the like should be *MUTED* and put on the backburner until after you complete this entire process.
The reasoning is that if your core material sounds great, you can fit the 'support' stuff *around* it and the song will still sound good. After all, it is bassackwards to have the greatest sounding pad that just rules if the vocals and drums are totally buried by it.
Thus--MIX FROM MOST IMPORTANT ELEMENTS TO LEAST. LESS IMPORTANT STUFF MUST WORK AROUND MORE IMPORTANT STUFF. THE VOCALS ARE ALWAYS THE MOST IMPORTANT ELEMENT.
3.) Once you've gotten a rough mix going on, listen to it again and note any deficiencies--is the low end tight? Is it muddy? Is something that is important not popping thru? Is something popping thru too much? Does a part go from too loud to too soft? How's the high end balance and clarity? Does the midrange sound cluttered?
4.) Now that you've mentally assembled your laundry list of mix complaints, it's time to do something about it.
5.) First clean up your low end. Run an EQ on all the tracks with nothing but a HIGH PASS FILTER on it. Stuff that should be part of your low end like kick drums, bass and so on get a HP filter around 35 or 40hz; stuff that shouldn't be cluttering your low end much like strings, sweepy pads should get a HP cutoff around 70 to 200hz. Vocals can be cut off around 150hz pretty safely. Guitar gets cut off around 70hz in general. Remember: you don't want excess garbage cluttering your low end--this is one of the main sources of audio mud.
IN GENERAL THE MORE BACKGROUND A TRACK IS THE MORE YOU SHOULD REMOVE ITS LOW END!
I've had pads start rolling off at 400hz before because all I really wanted was a little midrange color and some upper harmonics (so I boosted them around 11khz or so later on). Heck, on high hats I typically roll off starting at 500hz for that crisp, clean and transparent high hat sound.
6.) Now that things are looking clean on your low end re-examine your VOLUME issues, which means listening and start grabbing for the compressor.
7.) Stuff that still seems to pop in and out of the mix need compression--target these and compress them so that their volume stays put. (Read my compression tutorial for additional details.)
IN GENERAL I COMPRESS **EVERYTHING** IN MY MIXES AT LEAST A LITTLE BIT.
I am a big believer in fairly low compression ratios though. 2:1 on a lot of things. I always lightly compress analog synths because they are very erratic; if it's an analog synth doing a bassline I will squish it pretty good. In general VA, softsynths and digital synths need **LESS** compression than analogs, but let your ears and mix decide.
8.) Stuff that should be prominent rhythmically like kick and snare definately get some compression as well. Make them slam hard as hell.
9.) Get your low end instruments thumping be it bass guitar, synth or whatever. Make that low end steady, yet punchy. Try not to have more than 3 "low end" elements if you can.
10.) Now that you've gotten levels to be pretty consistent re-listen to the material critically and ask yourself--what needs more seperation, and what needs more integration?
11.) Now it's time to EQ. A lot of mixes sound tinny and thin because of overuse of EQ. If you've gotten your volume levels sounding great manually, and then used compression to make it even more tight, there shouldn't be a whole lot of EQ that you need to do.
12.) First thing--listen to the mix and try to identify weak sounding areas that sound BAD. Is there a little fizz to the guitars? Kick drum a little muffly sounding? High hats sound clangy? Prepare another mental list....
13.) Now use *subtractive EQ'ing* to locate and eliminate these discrepancies. Use the narrowest and smallest cuts you can get away with to bury the offending freq's in the *mix* (not solo'd by itself--always, always look at things in the context of the mix). When you have eliminated these frequencies (and there will probably be a few, perhaps none if you're lucky, sometimes on poorly recorded stuff there will be some in almost everything) we can move on.
14.) Now that the shit frequencies have been zapped listen to the song again and listen to see if the seperation/integration issues have been taken care of. Sometimes you can get lucky and a few problems will work themselves out; if not, the overall quality should have gone up a few notches.
15.) Now it's time to EQ for *SEPERATION*. Listen to the mix and figure out what elements are fighting for space in the low freqs, low-mids, midrange and high frequencies. Choose the one that you want to be more dominant in that frequency band--now go back and slightly cut that track in that band, while (sometimes) applying a slight boost (we're talking 1-2db's) to the dominant track. Keep doing this until you've gotten them all. Re-listen to the track.
16.) Now you want to integrate some of the elements so they work together more. An example is bass and kick drum. But how do you integrate AND seperate these sounds? Easy--give them boosts that are close on the lower end of the spectrum on or near the same frequency (for example: kick drum at 80hz with a boost, bass synth at 100hz with a boost); next move up into the midrange and boost one element someplace and the other one someplace else (such as boosting kick at 4khz and bass synth at 2khz). Play around with these techniques until you have things really cooking.
17.) Now listen to the WHOLE mix. Focus on the different frequency bands, paying special attention to the high end. Does the bass sound tight and clear--with the bass and kick working together yet with distinction? Does the voice mix well in the midrange with the other instruments? Is the high end crisp and clear, but not domineering and tinny? Can you hear the "air" and upper harmonics of the instruments in the over 10khz range?
18.) Now use EQ positively to *add* any of these missing characteristics... such as boosting some cymbals at 12khz, or a string synth at 9khz or wherever there is a bit of a pocket that needs filling, or place for something to shine a bit more without queering the mix.
BE CAREFUL WITH SUB 1khz BOOSTING. Too much boosting in this area can mess you up... too much cutting will give you a thin sound. This is a difficult area to master. When in doubt, leave it alone for the most part.
19.) Now, at long last, STEREO PAN your tracks. Try not to weight any one side more than the other. Keep low frequency or primary instruments centered, or close to center. Bass and kick should always be centered... and snare as well. Give a nice panorama of sound but don't get carried away. Panning over 50% is often too much. Panning less than 30% is what I do most of the time except in specific circumstances like mic'd drum overheads (due to stereo bleeding) which I'll put at 60-75% or so.
20.) Correct any deficiencies that may have arisen from the stereo panning. 80% of the time if you've done the steps pretty good you won't have any correcting to do. The song will suddenly have "mixed" itself when you stereo pan everything.
21.) Now go back and fit the less important elements into the mix. DON'T TOUCH THE CORE ELEMENTS--make the less important ones fit around them with compression and eq.
22.) When you're done, put the mix down for a day or two and go back and listen. Correct anything you don't dig. Compare it to CD's you like and see if it measures up. Make sure it's not too bright of a mix, make sure there is good low end, make sure it doesn't sound muddy, make sure the midrange is well defined, punchy and clear.
Most of all--have fun. There is no right or wrong way to mix YOUR songs.
This was psoted by and the work of Cloneboy:
COMPRESSION
I'm "reprinting" this so it is easier to find. By popular request I typed up a quick and dirty tutorial on better use of compression.
Here's the big secret of compression:
You should *barely* hear it working except as increasing your overall volume within the parameters you need. The average person may not even hear it working much. THAT is how the pro's set 75% of their compression, the other 25% is super squish city reserved for things like submixing drums in stereo and mixing it back in at low levels to beef stuff up.
Jim's rules for compression:
First let's define what a compressor does--which is to affect the amplitude of a signal by selectively reducing it. Compressors tend to have the following controls:
Compression ratio: this determines how 'hard' the compressor is supressing the signal. Usually described as a ratio such as 2:1, 4:1 and so forth. What this means is, after you cross the threshold setting, how many db's you have to go over to effect 1db of volume change. Thus a 4:1 ratio means that once you go over the threshold for every 4db over you will only get 1 db of amplitude change.
Threshold: this sets the decibel level that the compressor starts to work. Signal underneath the threshold will be unaffected--signal above it will be hit by the compression amount determined by the ratio. Needless to say, setting the threshold above the peaks of the signal will NOT do jack shit to the signal. You gotta set it in the path of the signal, so to speak. This is always expressed in negative db, thus a -24 threshold will compress any audio above -24db, and leave everything below it alone. (*Note, soft knee compressors start to work a bit before the threshold!)
Attack time: how long, in milliseconds, it takes for the compressor to kick in. This keeps your transient peaks unaffected and is the trick for getting a "punchy" kick or snare (the front end crack will be uncompressed and thus louder than the following signal).
Release time: once the signal falls below the threshold how long, in milliseconds, it takes for the compressor to 'let go' of the signal. For vocals and other similar instruments you want this to be fairly long like 200-250ms. For drums 75-125ms is great.
Special note on soft-knee compressors: some compressors have a soft knee function. What this does is start compressing the signal lightly as it approaches the threshold, and as you get closer to the threshold it will compress harder and harder until you reach the threshold and the full compression ratio will be utilized. This provides for fairly transparent compression and is great on vocals. Personally it sucks for drums unless you are squishing a stereo submix of drums.
Another note on stereo compressors: you should *always* link stereo sides of compressors when processing stereo signals. Once a side reaches the threshold BOTH sides get the compression. Failure to do this can lead to, for example, drums that leap in volume on one side but not the other... very assy unless that's what you really wanted. (Why god, why???)
Moving right along.....
Here are some guidelines off the top of my head:
2:1 ratio--overheads, distorted guitar, soft vocals, most synths
3:1 ratio--clamping down on overheads, acoustic guitar, most singers
4:1 ratio--bass, snare, kick drums, toms, crap singers
8:1 ratio--bad bassists, screaming vocalists, squishing the life out of stuff
12:1 ratio--out of control peaks or when you want to sound like limiting but still keep some life to it
Compression ratio and threshold are intertwined, so set both accordingly!
If you need dynamic range--LOWERthe ratio
If you need more regularity in levels--RAISE the ratio
If you just need to shave off some peaks--RAISE the threshold
If you want to affect a lot of the signal--LOWER the threshold
Here's the tricky parts that require hard decisions:
If you want more smooth sounds--LOWER attack time (under 6ms)
If you want more punch--RAISE attack time (between 7-50ms)
If you need "more" compression--LOWER attack time more
If you need "less" compression--RAISE attack time
If you need 'invisible/natural' compression--RAISE release time
If you need 'audible/percussive' compression--LOWER release time
Now pull out yer ears:
If it pumps and breaths--RAISE release time (unless you want that)
If the compression seems to disappear--LOWER release time
Finally the number one rule for compression:
ALWAYS match relative volume levels (by ear) before and after compression using makeup gain--meaning that they should be peaking about the same. If you record using my "-15 to -12dbfs with peaks no greater than -6dbfs" rule this is easy; if you tend to record sloppy and "hot" you may need compression to keep you out of the red. Don't do this to yourself.
The idea for this is that LOUDER often equates to sounding better to us, fooling us into setting duff and mookish compression settings. When dialing in compression make sure that the before and after levels are identical so you can hear the compression and not the jump in volume.
Here are some guidelines on setting makeup gain:
The lower the threshold the more makeup gain you need.
The higher the threshold the less makeup gain you need.
The higher the ratio the more makeup gain you need.
The lower the ratio the less makeup gain you need.
Further modified by:
The faster the attack the more makeup gain you can get away with.
The slower the attack time the less makeup gain you can use.
The faster the release time the less makeup gain you can use.
The slower the release time the more makeup gain you can use.
You can also calculate the amount of makeup gain you need by looking at the signals peak levels or RMS--figure this out, and then:
COMPRESSION THRESHOLD = T
SIGNAL DB PEAK = P
COMPRESSION RATIO = R
(T-P)/R = A
P-A = MAKEUP GAIN
Thus if your threshold was -24db and your signal is peaking at -12db the amount of gain being compressed is 12db total; i.e. (T-P). Divide this amount, 12db, by the ratio of 4:1--making A = 3db reduction of peaks.
Then take the signal db peak and subtract the peak reduction--in this case -12db and subtract 3db... meaning you require 9db of makeup gain to approximate the original signal level.
Last edited:
This was posted by Cloneboy, and is his work.
EQ
One thing that is *ESSENTIAL* to a professional sound is mastering the parametric equalizer. Graphic equalizers just don't cut it for recording; in fact, I *NEVER* use one personally.
Parametric EQ is easier to use than you think, but it can appear tricky to master at first. It's not--just use your ears and don't over EQ.
KEEP IN MIND THIS GUIDE MAKES MORE SENSE IF YOU OPEN UP A PARAMETRIC EQ AND MESS WITH IT A LITTLE BIT WHILE YOU READ THIS!
This is a quick and dirty guide to parametric EQ.
First off, parametric EQ's have multiple bands--typically 4 or 6 bands. Each band is independent and can have its own individual settings. Most parametric EQ's have a number of MODES or FILTER TYPES available to them for each band:
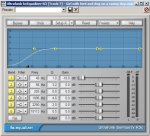
HIGH PASS FILTER: will not affect freqs *higher* than the center frequency--in other words this cuts out lower frequencies (the highs PASS thru--get it?).
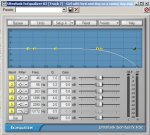
LOW PASS FILTER: reverse of the high pass--the freqs *lower* than the center frequency are unaffected--this cuts off high frequencies.
Both high pass and low pass filters have something called a *roll off* which may or may not be user definable; a roll off will determine the slope of how the frequencies are reduced--such as 6db per octave, 12db per octave and so forth. The greater the db reduction the more frequencies are reduced.
High and low pass filters are usually only available on the ends of the parametric EQ bands. Thus, a 4 band parametric could have a high pass filter, 2 band filters, and a low pass filter as its options.
NOTE: both low and high pass filters *ALWAYS* are used to cut frequencies--these cannot be used to boost.
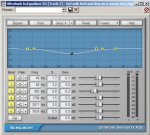
SHELF FILTER (LOW OR HIGH): affects ALL frequencies from the center frequency and upwards (for high shelf filter) or below (for low shelf filter). Use carefully and sparingly. This is basically a relative of the high/low pass filters but contains no roll off.
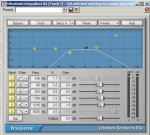
BAND FILTER: this is the "typical" mode you will use--this will accent or cut a certain range defined by the user (see below).
After the mode, which 90% of the time you will be using a band filter type of mode, the next important thing to look at are the actual controls of the parametric eq--the center frequency, Q, and gain.
CENTER FREQUENCY: this is the epicenter of the where you are applying EQ at. Usually ranging from 20 hertz to 20,000 hertz (20 khz). This is just the center of your eq adjustment, other frequencies will be affected.
Q: this determines the width of the eq around the center frequency. The higher this number is the narrower the range. Very narrow boosts can sound "ringy" and actually go into a (bad sounding) self-oscillation due to the feedback used to create the boost.
GAIN: the "height" or "depth" of the equalization. The gain, which can be positive or negative, determines how much cut or boost you are using in that frequency range.
In general, keep all gain cuts/boosts within 6db. Most of my cuts are under 2 or 3 db's these days. If you record sounds to be *exactly* what you want you don't have to mess with them very much--resulting in a much cleaner, pro sound.
EQ
One thing that is *ESSENTIAL* to a professional sound is mastering the parametric equalizer. Graphic equalizers just don't cut it for recording; in fact, I *NEVER* use one personally.
Parametric EQ is easier to use than you think, but it can appear tricky to master at first. It's not--just use your ears and don't over EQ.
KEEP IN MIND THIS GUIDE MAKES MORE SENSE IF YOU OPEN UP A PARAMETRIC EQ AND MESS WITH IT A LITTLE BIT WHILE YOU READ THIS!
This is a quick and dirty guide to parametric EQ.
First off, parametric EQ's have multiple bands--typically 4 or 6 bands. Each band is independent and can have its own individual settings. Most parametric EQ's have a number of MODES or FILTER TYPES available to them for each band:
HIGH PASS FILTER: will not affect freqs *higher* than the center frequency--in other words this cuts out lower frequencies (the highs PASS thru--get it?).
LOW PASS FILTER: reverse of the high pass--the freqs *lower* than the center frequency are unaffected--this cuts off high frequencies.
Both high pass and low pass filters have something called a *roll off* which may or may not be user definable; a roll off will determine the slope of how the frequencies are reduced--such as 6db per octave, 12db per octave and so forth. The greater the db reduction the more frequencies are reduced.
High and low pass filters are usually only available on the ends of the parametric EQ bands. Thus, a 4 band parametric could have a high pass filter, 2 band filters, and a low pass filter as its options.
NOTE: both low and high pass filters *ALWAYS* are used to cut frequencies--these cannot be used to boost.
SHELF FILTER (LOW OR HIGH): affects ALL frequencies from the center frequency and upwards (for high shelf filter) or below (for low shelf filter). Use carefully and sparingly. This is basically a relative of the high/low pass filters but contains no roll off.
BAND FILTER: this is the "typical" mode you will use--this will accent or cut a certain range defined by the user (see below).
After the mode, which 90% of the time you will be using a band filter type of mode, the next important thing to look at are the actual controls of the parametric eq--the center frequency, Q, and gain.
CENTER FREQUENCY: this is the epicenter of the where you are applying EQ at. Usually ranging from 20 hertz to 20,000 hertz (20 khz). This is just the center of your eq adjustment, other frequencies will be affected.
Q: this determines the width of the eq around the center frequency. The higher this number is the narrower the range. Very narrow boosts can sound "ringy" and actually go into a (bad sounding) self-oscillation due to the feedback used to create the boost.
GAIN: the "height" or "depth" of the equalization. The gain, which can be positive or negative, determines how much cut or boost you are using in that frequency range.
In general, keep all gain cuts/boosts within 6db. Most of my cuts are under 2 or 3 db's these days. If you record sounds to be *exactly* what you want you don't have to mess with them very much--resulting in a much cleaner, pro sound.


There might be a slight problem or mixup here... ")
To me a notch filter implies a cut, per the Rane definition:
http://www.rane.com/par-n.html
The post with the 'notch.jpg' looks like a bandpass filter to me.
Bandpass filter per Rane:
http://www.rane.com/par-b.html
The post with the 'Bump narrow q.jpg' looks like a bump using a peaking filter with a narrow Q to me but is labeled NOTCH.
Peaking response type filter per Rane:
http://www.rane.com/par-p.html
What do you guys think ?
You can look at this too...note near the bottom where George Massenburg shows a pic of his 'inverted notch' peaking type curve.chadsxe said:Hmm I really can't say. Maybe one of the vets can chime in.
http://www.massenburg.com/cgi-bin/ml/parametric.html
Lot's of manuals (for equipment I don't have) offer little mini tutorials and detailed descriptions also - that's a place to snatch up some cool info too.
Disposable
New member
Here's another one of Cloneboy's that I found very useful...
Making Realistic Sounding Sequenced Drums
My method is a big laborious but it can work pretty convincingly:
First off--use a computer based sequencer like Digital Performer (top choice IMHO for any MIDI sequencing *IF* you have a Mac) or Cubase (next best bet or best choice on PC).
Only program patterns that a drummer can physically play. Make sure each roll is different--even if the pattern is the same change the velocity on the hits somewhat.
Hit the entire MIDI track with subtle amounts of random velocity and timing randomization. Like maybe 1-2% on the timing, and maybe 8% on the velocity. Do this for EACH drum seperately. You probably want the kick and snare a little more steady than cymbals, high hats and toms.
Only choose *realistic* drum sounds. Ultra gated kicks that sound like your head being stomped on with a 20 ton elephant are no-no's.
Modify the sounds as well if you can. Don't use ultra common sounds like anything on an Alesis SR16.
Consider choosing two kicks and two snare sounds that are very similar or modifications of your main sound--as if you had "double miked" them. Remember these for later so you can apply some filters or other effects to "duplicate" the sound of a under snare mic, or mic that is on the beater side of the kick drum. Later on submix these into your primary kick and snare sounds as if you merged them in the mixer buss.
Imagine the drum kit playing the song and what components are in it. Where are they at? Draw a diagram if you have to. What types of cymbals do you need? Customize the samples to represent 3 or 4 cymbals and where they are located in the kit. Some of these may be just modified versions of the same cymbal elsewhere in the kit pitched up or down a bit, or eq'd a bit before mixing... DO THIS! It makes things more realistic. Try to give each cymbal it's own character.
Also, the biggest weakness of drum machines are the high hat and cymbals. Do your best to get them sounding realistic... also, human drummers put a LOT of emphasis on how they play their high hat. Make a number of different volume levels AND sustain/attack levels for different high hat "feels". Examples: totally closed high hat, partially open but still tight, partially open and trash, totally open 'mashing the oars', and something for high hat chokes. Also make sure that the high hat chokes correctly and doesn't trigger polyphonic samples--but only one sample at a time. Now use these feels where appropriate in the song. Change it around like a real drummer does. When combined with the random time/velocity you can make it pretty convincing.
Run each sound *INDIVIDUALLY* into a mixer as if they had been mic'd. Process them like normal drums... add a small touch of EQ to further modify the sounds from the stock samples. If you have to buss them in groups do them as: kick / snare / stereo toms / stereo overheads.
Once in your mixer create a fake "overhead" mix down. Put low levels of kick, some snare, high hat (in proper stereo pan), cymbals (stereo panned to taste--not too wide, about 30%), toms (stereo panned appropriately, like 15%ish) and so on. Make it sound a lot like overhead mics--plenty of bleed but in general a good 'snapshot' of the overall kit sound. Be careful with too much kick, toms or snare... you want the cymbals to be predominant. Definately apply reverb to this to give that sense of space. Use the BEST reverb you have available. Reverb will help hide the cymbals and high hat as best they can....
Now throw away the cymbal tracks. If you want to do something to the cymbals modify the "overheads" like you would for real.
You would probably want a lot of seperation on the kick, snare and toms so don't use this trick with them. It will save you gating and so on. However, if you want to experiment with making these 'bleed' mixes and then going back and gating them a bit for added realism it can't hurt--it will add a lot of time though....
Anyways, mix down your toms into a stereo file so you can put stereo reverb, eq, compression on them like normal.
Now mix like you would a regular kit. For added realism do a submix of the entire drum kit and compress the snot out of it, mix this back in around -20db or so (i.e. "parallel compression"). Can add some beef.
Basically:
-program it realistically in the sequencer with human feel and personality
-set up the sounds to be realistic
-set yourself up to RECORD and MIX it like real drums
-then treat it like real drum as you mix it
If the high hat/cymals are a real pain you can always leave those out and do THOSE by hand. Set up some overhead mics and a high hat mic and play along with the song.
If you want a "room" sound, run a mix of the entire kit playing sans effects into a PA loudspeaker and turn it up to drummer volume levels in a decent sized, decent sounding room. Mic the room with some condensor mics however you want and record that. Treat those as your room mics and put them in your mix subtly. It will add that 'micro delay' that makes real drums sound realistic when recorded with microphones. Mix that in there at fairly low levels.
If you want a bit more realistic snare, run just the snare thru a monitor and MIC that.
Or do the old 'big speaker with a snare on it' using the snare track to trigger the speaker to vibrate the snare with each hit. Mic that and mix it in there.
Get creative. It can be a lot of fun. You can fool people with drum machines!
This is the work of Skippy and posted by Skippy:
PHASE
Right. There are two different things going on here: phase and polarity are only the same thing at one specific special-case point, really. Phase is a much more complex topic.
When two signals have exactly opposite voltages at each and every point in time, they are said to be "opposite polarity". They also happen to be 180deg out of phase with each other: that is the most gross phase error possible, and it happens to apply equally at all frequencies for this one special case. Add 'em together, you get zero: everybody knows that.
However, when you introduce *time* delays by spacing mics apart, the simple "opposite polarity" special case doesn't occur: because the sound takes time to go from here to there, and the wavelengths differ according to frequency, you have differing amounts of phase shift at different frequencies. This "different-phase-shift-per-frequency" thing is what gives you the "phasey" sound with a pair of mics at different distances from a source: you are creating a comb filter, where some frequencies are 180deg out of phase and cancel, and other frequencies aren't quite out and don't quite cancel, and others still are exactly in phase and *add* instead of cancel. What you really work with in mic placement is this parasitic comb filtering: it comes for free, because of the time delay.
Let's work an example, just for shits and grins. Sound moves about 1100 feet per second (close enough for this example). So let's stick a pair of mics on a guitar amp: one right up against the cone, and one back a few feet. The picker graunches a chord, and the resulting signal has all sorts of components at different frequencies, from the lowest string's fundamental at 100Hz, say, all the way up to high harmonics up at 10kHz or so.
The wavelength of a 100Hz sine wave is 1100/100: 11 feet (nice, round number, eh?). So theoretically, to perfectly cancel that 100Hz out between the two mics, you'd put the second mic back 5.5 feet: one half wavelength. Ignoring reflections and all that unpleasant real-world dreck, when the pressure was just hitting its max positive value at the close-in mic, it'd just be hitting its max _negative_ value at the mic 5.5 feet away: one half wavelength, 180deg phase shift. With me so far?
Now let's look at some 1kHz stuff in the same signal. That 1kHz stuff has a much shorter wavelength: 1100/1000, or 1.1 feet (start to see the relationship?). So to completely cancel that 1kHz, you'd only have to move back .55 foot: 6.6 inches. The perfect cancellation distance for any given frequency is _not_ the perfect concellation distance for any other frequency, because the wavelengths differ. Make sense?
If we move the second mic back that 6.6 inches behind the first, we have 180deg phase shift (cancellation) at 1kHz, and only 18deg phase shift at 100Hz: not much at all, and very little cancellation. The 1kHz stuff covers 10 wavelengths in 1 single wavelength of 100Hz. That's the key!
So phase shift is a function of frequency, when you're talking about spacing between mics. In the first example there, that perfect cancellation of 100hz at 5.5 feet would give you a perfect _doubling_ at 200hz (360deg phase shift, or perfectly in phase), and a perfect cancellation at 300hz (540deg phase shift, or effectively 180deg out of phase) and so on: so you end up with a frequency response that has a series of peaks and notches in it. Thus the term "comb filter".
Changing the spacing moves the notches around, and that's what you are doing when you play with mic placement. It also changes the contributions of reflections and all sort of that real-world stuff sweetnubs mentioned that is really a damned sight more important than this nerdy theoretical shit. So you never get the precise cancellation or reinforcement that this contrived and oversimplified example might seem to predict: the comb filtering can be pretty subtle. But that's how it works.
Hope that helps, anyway.
This is the work of Light, and was posted by him:
PHASE
First of all, you are confused on the difference between phase and polarity. They are two VERY different things, though they are frequently taught in a way as to make the difference less than obvious. 180 degrees out of phase is really, mostly, a theoretical concept. It is only possible at one frequency at a time, and as all the sounds we record (sine waves are boring) contain more than one frequency, the theory is pretty much useless.
At any rate, phase is an issue of time, polarity is an issue of electrical direction. The following post contains a graphic of this.
https://homerecording.com/bbs/showth...?threadid=62002
First, a couple of terms you should know.
The cycle of a wave is the time it takes for a signal to start to repeat. During this time, a typical signal will start at zero, reach its peak positive amplitude, pass through zero, reach its peak negative amplitude, and reach zero again. The number of cycles in a second equals the frequency (pitch) of the signal.
The period of a signal is one half of the cycle. It is defined more precisely as the time it takes a signal to go from zero to peak amplitude (positive or negative) and back to zero. You will note it only goes to one peak, not both.
Phase is the time difference in two waves which are the same. For our purposes, it is the time difference between two electrical representations of the same sound.
The degrees of phase shift is how much of a cycle difference there is between two signals. There are 360 degrees in a cycle, or 180 degrees in a period.
A phase switch is a myth. It is also the name marketing people with no knowledge of audio give to the polarity switch on many pieces of gear.
This is the image within the above post.
https://homerecording.com/bbs/attach...p?postid=495077
In the top pair of (poorly drawn) sine waves, you have exactly one complete cycle of two signals, which have reversed polarity. They are NOT out of phase, as they begin and end at the same point in time. The first and second half of the period is the same in both signals.
In the second pair of sine waves, you have one complete cycle of two signals, 180 degrees out of phase. You will note, that, during the second period of the first wave (which is the first period of the second wave) it looks exactly like the second period of the two signals which have their polarity reversed. However, in the first period of the first signal, the second signal has not yet started.
When using sine waves, the importance of this difference is not obvious, because with two sine waves, reversed polarity and a 180 degree phase shift sound the same. This is not true, however, with more complex wave shapes.
The third pair of signals, which are triangle waves, have their polarity inverted. As you can see, these two signals have a zero sum. You will also note that they are more complex signals. The amplitude is different in each cycle. This is a more natural acting signal (though it is still a manufactured signal).
If you look at the last set of signals, of which there are three, you will see the real problem with using sine waves as a teaching aid for phase/polarity. The first of the three is the same as the pair of signals above. The second is the same signal with its polarity shifted 180 degrees. Because of the complex nature of the amplitude, these signals do not create a zero sum signal.
None the less, if you had a perfect 180- degree phase shift, the polarity switch will "fix" the issue. Any two signals, when summed, will sound (marginally) different if the polarity is reversed on one of them, and it is good to try both ways on every signal whenever you are mixing. The difference will, of course, be most pronounced with two signals which are similar.
The polarity switch will NEVER actually fix a phase issue, because while it will make the peaks of one frequency line up, it will have the opposite effect on another frequency in the same pitch. It may sound better with the switch in a reversed position, but you have only created another issue. (This may not make sense if you do not understand the Harmonic/Overtone Series. Even as long winded as I am, I don't have the energy to explain this right now. You can probably find everything you need to know by doing a web search for "Overtone Series.")
I hope this helps.
(You will note I am not calling them phase problems. Some phase issues will sound good, some bad. You will never know for sure until you have tried it both ways.)
Here are a couple of other posts on related topics.
https://homerecording.com/bbs/showth...?threadid=59380
https://homerecording.com/bbs/showth...?threadid=57636
Glad my tutorials can be of some assistance!
heroics321
New member
my brain never hurt so good... thanks a bunch, guys. this should be considered for a sticky, i know i'll be printing them out.