Tascam-244 (DIY): Access, Pinch Roller, Idler Tires

Dr ZEE

Anti-Pro Circles Insider
I've put together few more "how to" photos / charts when servicing TASCAM-244 portastudio (DIY).
These are:
- How to remove face-cover with vu-meters and separate it from unit's main chassis,
- Replacing Belts
- Replacing Pinch Roller Arm Assembly, and how to substitute pinch roller with a spare part from other unit if you don't have the original tascam part.
- Replacing Rubber Idler Tires and how to substitute them if you can't find tascam parts.
Here's the link to the page where you can view the photos: http://www.mzentertainment.com/studio_workshop_tascam_244.html
 
Great stuff, Doc!

I replaced the rubber on my 246 idlers a few months ago and used faucet washers just like you show.

You can get new idlers from Tascam for around $25.00, but they don’t sell the idler tires separately. I decided to wander around Home Depot and Lowes until I found suitable washers for less than a buck a piece.

My idler tires had become hardened, and at the point where the idler motor touches the rubber it left an indentation. It made a clattering noise in fast forward and rewind. The machine also started eating tape because the take-up was slipping due to the slick idler.

:)
 

Attachments

  • rep.jpg
    rep.jpg
    8.6 KB · Views: 882
I decided to wander around Home Depot and Lowes until I found suitable washers for less than a buck a piece
Tim , huh, - COOL!
same here. I went to "True Value" hardware here locally. They don't sell those washes separately, so I had to purchase a few sets of faucet adaptors kits, they were like three bucks each.

25 bucks a set?! - wow! nice. heh heh .... laugh or cry - your choice :mad:

My idler tires had become hardened...
wait a minut! are you talking about the old original tires?
Or are you talking about the "new" plumber-speacials that you've replaced the old ones with? No you don't mean that!? :D
The thing is that those washes fit well and work well in action so far, but I have no idea how they will perform over the time. The rubber "type" looks and feels "right" though.
The machine I've got here was in "dead" condition, it was actually 'electronically' just fine, and heads are 'visually-new', but all the rubber parts were in "melted" state. Actually I have never seen before such melted condition, I've seen stretched, stone-hard, broken, but in this case all the rubber parts (belts, tires, pinch roller - all) were like thik-grease-jello-something thing, you can spread it like butter :eek:, I had to pick pieces of belts from all over inside the unit. I wonder if sitting in the heat for long time may be the reason ????

So do they still have cassette pinch roller assembly part for those machines at tascam? If they do it gotta be a fifty bucks deal or something. :p
 
...wait a minut! are you talking about the old original tires? Or are you talking about the "new" plumber-speacials that you've replaced the old ones with? No you don't mean that!? :D

No, Not That! :eek: ;)

It was the old original TEAC idler tires that went bad. The new plumber specials are working just great... like a new machine now. :)
 
Tim, - COOL! That's a good news :)
**************

OK, one note here.
I've just received an e-mail from a nice guy, who shared a tip with me about replacing the pinch-roller. Something I have not realized.
So what he is saying, if I understood correctly, is that there's better way to take the roller off the arm bracket. Instead of bending the bracket, which is pretty hard and especially it is hard to bend it back to its "original form" - there's better/easier way to do it , here's quote from e-mail:
All you need is a small block of wood with a 3/16" hole drilled into it.(go down about 1/2" or so this) Then, lay the pinch wheel assy over that hole to where the pinch wheel dowel(that shaft) is over it. Now take a small object, say a finish nail for example and tap on the top of the dowel/shaft and it FALLS right out. The shaft will fall right into that block of wood. If you ever have to do it again, try it! No mess, no fuss and no "re-shaping."
that sounds cool :cool:


Well, I'll have to try it, but now only when and if I ever have to do this again. :)
 
Spectacular work Mike! This is what great posts are made of. Thank you for doing this. I'm saving this to a special 'Dr. Zee' folder, for future reference [in case my 244 / 246 needs this work done]. Picts, diagrams, instructions, video, sound file.. WOW!! I can't thank you enough for this! Your 244 looks as new now, very clean. :)

----
 
The machine I've got here was in "dead" condition, it was actually 'electronically' just fine, and heads are 'visually-new', but all the rubber parts were in "melted" state. Actually I have never seen before such melted condition, I've seen stretched, stone-hard, broken, but in this case all the rubber parts (belts, tires, pinch roller - all) were like thik-grease-jello-something thing, you can spread it like butter :eek:, I had to pick pieces of belts from all over inside the unit. I wonder if sitting in the heat for long time may be the reason ????

Yeah, I got a machine (a few months ago) exactly as you've described. It was such a mess. Before I knew it..that crap was on my pants, shoes. shirts, elbows, armpits (just kidding about the last one :D) If you get that junk on your hands, it's extremely hard to get off. I used Bestine Solvent/Thinner to remove the "rubber butter" from the metal parts (it worked very well) . I wouldn't suggest using Bestine to clean the plastic parts though. Thanks for the tips, Zee. Your website is sooo cool and informative!!! I've got (3) 244's at home. 2 of them are in working condition. The 3rd one is a parts machine (Actually this parts machine may be repairable too. If I could find another cue pot assembly I could repair it too. I had to take it out to repair one of the other ones. The previous owner had broken off one of the cue pots. When I get around to cleaning my 244's, I'm gonna use your pics and info as a guide.You are the man Zee!
 
Last edited:
Daniel, THANKS :)
***********
Aaron, huh, it's nice to have a few :D
I saw someone selling pieces of 244 on ebay, here's the linK: http://search.ebay.com/_W0QQsassZbluedogwater, maybe the seller still have cue pots, he may ask 20 bucks + Shipping for it though :p,
I've paid $8.50 plus shipping for the 'dead' machine :p ((shipping was 25 bucks, - I didn't mind :) )
Buy them Dead in one piece, and then imagine that you've got Christ's Powers :D
**********

ok, on the subject of Pinch Roller:

Last night I opened up the machine again, I had to anyway for other reasons and I've placed the pressure spring incorrectly, so had to fix it.
So I did go through the Pinch Roller Shaft(pin) Removing method, and it IS SURE the way to do it. So DO NOT BEND NO NOTIN"!!!!!!!! :D:o:D

I've made photos and edited the Pinch Roller Photos chart, the only little thing there, that now on the photos I am removing the "new" roller and then placing it back (this may confuse a "sharp eye viewer" ) , but simply ignore that "visual fact" if you can ...heh heh.
Here's direct link, replacing pinch roller: http://www.mzentertainment.com/pics/teac_244/dr_zee_workshop_tascam_244_project_part3.jpg
Also not all pinch roller assemblies are designed and made in such way, so you can puch-out-remove the shaft pin, some are "non-removable".

alright, later, guys
:)
 
Cleaning mixer and cue pots....

What's the best way to clean mixer channel and cue pots? I bought electrical contact spray cleaner from radio shack. It seems to work, but it's kinda greasy and leaves a residue. Although the cleaner comes with a spray straw, it still seems to get all over the place. Then you have to wipe this up with q-tips and some of the places on the board are hard to get into ..:confused: Many Thanks,
A
 
Aaron,
the RShack cleaner works really well, but, yes, it has a "problem", well sort of. Somehow the pressure is somewhat really really high. I have no clue what's the deal there, but it sort of does not feel "right", and it is really hard if possible at all to "regulate" the spray amount by pressing hadrer or easier, it's like "Non" or "All the way" with nothing in between :mad:, and it shoots like crazy.
Well, what you gonna do?
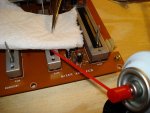
The way I did it: use the straw, aim it (see attached shot) and use a piece of cloth or napkin or something like that to cover above and maybe around to reduce the mess.
here's a photo I have, that I've made when was cleaning teac-144 pots and sliders:
 

Attachments

  • cleaning_pots.jpg
    cleaning_pots.jpg
    60.8 KB · Views: 847
Excellent! Thanks for the pinch roller update Doc! It's definitely the easier [and less destructive] way. :D

----
 
Thanks for the pictures Dr Zee, they've been very helpful. I'm trying to fix a malfunctioning tascam 244 myself, but have very little experience (nobody here in Belgium wants to repair this for me though). I noticed while looking at your "control mechanism close-up photos" that there's this white chunk of glue or fat on top of the black wheel, between the arch of the white wheel (in close up on the 8th picture down). This seems to be missing in my portastudio and I was wondering what the use of this was, and if this could be the reason my control belt won't spin.
 
I found your site with your excellent pictures for the TASCAM-244. Do you have any tutorials for how to calibrate it?
 
Bro Man

I'm not sure if ZEE hangs on this site anymore. I've not seen nor heard from him in quite a while. I'll agree his pictorial of rubber refurbishment of a 244 is quite good. I'm not sure if he's ever touched on calibration issues, but I have. There is no easy "cheat" for calibration.

You need a standard calibration tape from TEAC or other reputable source, not the so-called calibration tapes people make at home and sell on eBay. However, genuine TEAC cal tapes may be found used on eBay. Genuine calibration tapes are hard to find and expensive. I'm not sure they're being made anymore, but a while back TEAC sold the cal tape business to a Japanese technical firm. I'm sorry for being so vague, that's all I remember. Somewhere on my older computer I might have a link or reference.

You will also need a DVM, audio oscillator test signal generator, and to do it right also an oscilloscope for head azimuth align.

In general: (following the Service Manual you bought from TEAC)...

~ Align the head azimuth using the calibration tape and an oscilloscope.
(NOTE: I've usually opted to gloss over and skip this step. It's very touchy to align, is factory set and loctite'd in place, and I've found having done it once or twice that it usually doesn't need messing with).

~ Calibrate the VU meters using a known -10dbV test signal (0VU= 0.316V)

~ Calibrate the playback amps using the standard calibration tape

~ Calibrate the record amps using a known 0VU test signal. This is done by recording, rewinding, playing back and making adjustments until what you put into it is what it gives back to you.

** While you're in there, and if you have a frequency counter, you should calibrate the Speed, too! **

There are some caveats. Rec/PB amps are recommended to be calibrated by unhooking the dbx card and jumpering the empty connector for continuity. Then you'd have to calibrate the dbx encode/decode afterward. I will have to try that next time out, but I opted to skip that and calibrate with dbx in. I think as long as you're calibrating to standard levels and there were no problems with the dbx encode/decode previously, you should be ok. I had no noticeable problems, but for the record I'll do it by the book next time. Circuits do drift, and the dbx section may well have drifted and may need calibration too. As yet TBD/TBA.

Another caveat is Bias, which if you venture in this realm could prove very difficult and/or problematic. Being a 2-head design, there's a process of recording a test tone on tape, rewinding, playing back and adjusting for incongruencies between a 1K and 10K test tone. Due to the tedious and particular nature of this operation, plus the relatively small window of adjustment you're shooting for, I've deemed this to be too delicate and potientially problematic to mess with. The manual states that Bias should not be touched unless the record amp is replaced. I'm happy enough with that & have had no noticeable problems.

The only other anecdotal thing I have about bias is when I calibrated my Tascam 34. The 34 is a 3-head deck and is much easier to align than a 2-head deck. I decided to go all in on this at that time, but I found when I went thru the adjustment that it was already spot on before I started. It had not drifted the way so many other circuits drift and need calibration. I calibrated bias anyway by virtue of having messed with it already, but decided it didn't need it. I'd suspect the 244 bias would be stable much like the 34 was, being from the same time period and engineering batch.

There may be more highly trained and attuned techs on this board who might want to crucify me for this post, or for an alignment/calibration that skips or glosses over steps, but I've generally gotten excellent results doing things my own way and I do have a formal background as a tech. However, this is only my experience and anecdotal, and YMMV.


:spank::eek:;)
 
Last edited:
Dr Zee I need to replace the idler tires on my Tascam 246 portastudio. Can I do that by taking off the face cover? Can I access them on this unit from there.

Everton
 
Sorry, but...

no.

Having done it several times, I assure you that it's a moderate teardown in which you must remove and partially disassemble the tape mechanism.

Dr ZEE may not be participating on this board anymore. I'm sorry if this is not the reply you were hoping for. If you are ultimately able to replace the idler tires by removing the top cover, please come back to this board and tell us all how you did it.

:spank::eek:;)
 
I'm really sorry...

for speaking in absolutes. I'm certainly no god of DIY repairs.

I looked at the Dr ZEE website, and he definitely exposes the top half of the 244 and does the tire replacement from the top side down. He's very detailed and methodical in his posts. His repair results seem very nice. I'd never attempt a tire replacement from the top, and I'd definitely never split the idler assembly in two. Fact is I've never agreed with any of Dr ZEE's posts, ever, but it doesn't preclude you from following his advice.

After inspecting his refurb directions, I think that removing the bottom cover, dismounting the cassette mechanism, disassembling the mech and removing the motor is definitely the easiest and safest way to go. I see many pitfalls in that refurb tutorial, not to mention that removing the top cover is quite a bit more involved than removing the bottom cover and approaching this repair from the bottom. Having removed both the top and bottom covers a few times over, I'm confident in saying that.

I only post occasionally & only to help and offer advice, not to pose as a know-it-all or impose my will on others. I'd never recommend anyone to do anything that I'd not do myself. The Dr ZEE tutorial on tires is in context of a total refurbishment. I'll offer the tip that you can't remove the top cover without removing the bottom cover first, and it's not exactly a shortcut or piece of cake. Also, to replace the other belts you'll have approach it from the bottom.

Somewhere between my advice and ZEE's, hopefully you'll get it done in a satisfactory way. Post your own tutorial if you like, and we'd all appreciate it. Either way you look at it, it's a moderate teardown. I don't see things, nor would I do things like Dr ZEE, but his advice and tutorials in context are excellent. I don't think he's on this board anymore. Good luck.

:spank::eek:;)
 
I know this is an old thread, but I am going to tackle both belts and idler tires in a few days. What A Reel Person says seems true. I found a copy of the service manual and it says that it's just 5 screws to remove the mechanism. Obviously you'd have to remove the wiring harnesses that are attached first, but that seems easier than trying to do the job from the top.

EDIT: My apologies, I am working on a 246. But I think the mechanism is the same.
 
I'd be very interested to know how you get on - any chance you could post some pics? I can't see where those 5 screws are. I've replaced the idler tyres on 3 244s now by taking the top off as Dr Zee shows - but I am still worry about losing that tiny circlip holding the tyre wheels. I've replaced the tyres with O rings and they seem to be working well. Using your way it should be possible to replace the O rings without taking the clip off again.
 
Back
Top