You are using an out of date browser. It may not display this or other websites correctly.
You should upgrade or use an alternative browser.
You should upgrade or use an alternative browser.
Going Mobile Project
- Thread starter bachelorb
- Start date
famous beagle
Well-known member
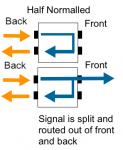
....For the record. The diagram I posted is for HALF NORMALLED. I.E. The top jack is always hot but plugging into the lower input breaks the thru' signal allowing an external input signal.
Dave.
Well ... it doesn't "break" the thru signal. It splits the signal. Is that what you meant?
Well ... it doesn't "break" the thru signal. It splits the signal. Is that what you meant?
Err? Plugging into the bottom jack breaks the 'thru' signal from the top jack. Pretty sure I have that right?
As I said, the contacts are shown external to the jacks for clarity when they are of course part of the jack body.
I actually MADE a jack field. Bought a shedload of jacks and an ally plate and drilled ALL the fekkin' holes! Do not do this. You will end up in the funny farm.
Dave.
famous beagle
Well-known member
Err? Plugging into the bottom jack breaks the 'thru' signal from the top jack. Pretty sure I have that right?
As I said, the contacts are shown external to the jacks for clarity when they are of course part of the jack body.
I actually MADE a jack field. Bought a shedload of jacks and an ally plate and drilled ALL the fekkin' holes! Do not do this. You will end up in the funny farm.
Dave.
This is the way I've always understood half normal to work. Is this not what you mean?
Edit: Oh crap ... you said plugging into the bottom jack. My mistake! Sorry about that.
")
Attachments
This is the way I've always understood half normal to work. Is this not what you mean?
Edit: Oh crap ... you said plugging into the bottom jack. My mistake! Sorry about that.
No worries.
Dave.
bachelorb
Cowboy Chord Virtuoso
Edit: I just re-read this and realized it could have come off a little as "you did this wrong!" I didn't mean to sound like that. It will certainly work the way you have it. It's just that you will have to use patch cables every time. That's not a big deal, of course.
And if you set up patch cables from your effects send to your Nanoverb in and then from your Nanoverb out to your effect return---and then just leave them there---you're essentially accomplishing the same thing, albeit with a bit more clutter.
ahhhhhh...... I got it!!! I thought I understood this, but I guess I didn't entirely......now I do!! ....now the challenge is to remember it
Thanks,
Brad
bachelorb
Cowboy Chord Virtuoso
I guess its about time to end this thread. When I started this, I owned a Portastudio and just wanted to learn more......and learn more I did!! From Busses, Aux-outs, effects, and inserts, to Compressors and reverbs and patchbays. This thread (....and a couple of others), has given me a basic understanding of all this.
I wanted to give a heartfelt thanks to all of you who spent your time here and helped. I appreciated all the advice and ribbing over the past year..... You guys are the best!!!
Brad
I wanted to give a heartfelt thanks to all of you who spent your time here and helped. I appreciated all the advice and ribbing over the past year..... You guys are the best!!!
Brad
bachelorb
Cowboy Chord Virtuoso
Dusting off this old thread because Going mobile might actually be a "thing" again. It was a lot more of a thing before this virus thing hit, but still....
Since I first started this, things have evolved a bit. I'd like to keep my phono jack patchbay. I still have my Tascam M-08 and M-106 I can use for my mixers. My Tascam 234 Syncaset is going to be replaced by a Tascam 134 Syncaset that adds 1-7/8 ips along with the 3-3/4 ips. I also have a small 1u power conditioner/supply.
I think I would like to add a small rack mount power amp to drive monitors and possibly an XLR patchbay.... which brings me to my first question.
I was wondering if there was such a thing as a phantom power XLR patchbay? My M-106 has no phantom power and I love my condensor mic for my guitar. I used to use an M-Audio audio buddy with the 106, which is fine, but if I could have something rack mounted, it would sure be easier.
If we don't take off again, I think this could really fit in well with my current setup with the Tascam 312B. Right now, I still have to get around the back of it to hook up my condensor mic.
How do y'all do it???
sweetbeats
Reel deep thoughts...
So let me see if I understand...you want to have a rack panel with forward facing XLR jacks that have a separate phantom power supply powering them?
If you only have the one mic needing phantom power, if it was me I’d be getting a 1U panel punched for standard D-type panel-mount connectors like this Redco 1U Punched XLR Rack Panels with Label Strip | Redco Audio, and then buy whatever combination of D-type connectors I need/want (i.e. female or male XLR, or female TS/TRS, or combo jacks, and then soldering up multicore to the back of those jacks and plugs to the other end of that to plug up to my mixer’s jack panel. And then I’d just be using an inline phantom power supply to power the one condenser mic. I have one made by Stewart Audio and also an old Rolls one...so it’s not a whole preamp, just a phantom supply. If I had a whole mess of condenser mics to power on a mixer with no phantom power, they DO make multi-channel phantom power supplies, so there’s that option, but they do, of course, get more expensive as the channel count goes up. I suppose if you wanted to get adventurous you could wire one jack on the panel as a phantom power input and then wire up a phantom rail across the mic jacks on the panel...use the single channel phantom supply as the supply for your rail...replicate the rail from the M-300B or something...it’s not complex, but you would need some small value capacitors and of course some hookup wire. I did this with my Tascam MX-80 rack-mount 8-channel mic preamp. It has the rail components built-in, but no onboard phantom power supply...from the factory the MX-80 came with a bizarre 2-pin XLR jack that is completely unobtanium, so I replaced the 2-pin jack with a standard 3-pin, and then just plugged the output of my Stewart Audio single channel phantom supply to the phantom input in the back of the MX-80. You could recreate the passive guts of the MX-80 on a rack-mount jack panel. Outside of that I don’t know of an XLR patch panel that has built-in phantom power. So, again, for me, if the goal was to remote the mixer jack panel to the front face of the rack, and I was also wanting to phantom power one mic, I’d make up my own jack panel with integral snake to the mixer jack panel and just get a simple external phantom supply to power the one mic inline.
Now here’s another question: how are you going to deal with the unbalanced mic inputs on the M-106? Are you going to just plug in those high impedance TS to low impedance XLR transformer adapters?
[EDIT]
I re-read my post...all relevant information I think, but you know, Brad, I also think the way most guys would do this (assuming you just have/use the one condenser) is to forget the jack panel, and for the input/output jacks on the mixer, just wire up a short custom snake and have a fan that comes out the back of the rack...no different than having a snake with a fan on one end for the mixer jack panel and a stage box at the other, only for your purposes you’d have a fan at both ends, and then, again, just use a cheap single channel inline phantom supply for the one condenser mic.
Wow you are quick Beats!
Like you I came up with this 1U 19 inch Rack Mount 16 Way XLR punched panel | Network-cabs
I think the need is really for an XLR 'breakout' strip? 'Patch' implies some sort of routing system.
If there is a desire to turn phantom power off to selected XLRs this can be done with 47uF 63V capacitors, mini DPDT toggle switches and some 'tie down' resistors. You can even have LED indication of spook juice. If you buy a lucky bag of LEDs and go through them with a PP3 and a 22k resistor you will find a few that give plenty of light for a drain of under 0.5mA.
I did something similar for an A&H zed10 to bring XLRs to the front of the table it was on with a Teac OR 4 track.
Can rough up a schematic if required.
Dave.
bachelorb
Cowboy Chord Virtuoso
Wow you are quick Beats!
Like you I came up with this 1U 19 inch Rack Mount 16 Way XLR punched panel | Network-cabs
I think the need is really for an XLR 'breakout' strip? 'Patch' implies some sort of routing system.
If there is a desire to turn phantom power off to selected XLRs this can be done with 47uF 63V capacitors, mini DPDT toggle switches and some 'tie down' resistors. You can even have LED indication of spook juice. If you buy a lucky bag of LEDs and go through them with a PP3 and a 22k resistor you will find a few that give plenty of light for a drain of under 0.5mA.
I did something similar for an A&H zed10 to bring XLRs to the front of the table it was on with a Teac OR 4 track.
Can rough up a schematic if required.
Dave.
Thanks Dave... Maybe... I'm still thinking this through....
From what you and SB are telling me, it may be less complicated to just stick with my Audio Buddy Preamp. I could always mount it in a 1U rack drawer.....
I re-read my post...all relevant information I think, but you know, Brad, I also think the way most guys would do this (assuming you just have/use the one condenser) is to forget the jack panel, and for the input/output jacks on the mixer, just wire up a short custom snake and have a fan that comes out the back of the rack...no different than having a snake with a fan on one end for the mixer jack panel and a stage box at the other, only for your purposes you’d have a fan at both ends, and then, again, just use a cheap single channel inline phantom supply for the one condenser mic.
The weirdest things stay with me SB.... You once told me when I wanted to use my phantom powered mic for something (I can't for the life of me remember what), that I would be running the signal through the amplifier, then suppressing it again and I should keep the chain to a minimum. This was one of my reasons for taking the audio buddy out of the loop. that and being able to hard mount something to the rack.
Would it be alright in your opinion to use the audio buddy in the recording chain :condensor-> Audio buddy-> High impedance input ????
sweetbeats
Reel deep thoughts...
IIRC my point about the Audio Buddy output was that it is at line level. So if you have a line level input on the mixer, you want to use that, rather than sending the signal through unnecessary amplification circuitry. So it would be mic —> Audio Buddy mic in —> Audio Buddy line out —> M-106 LINE IN.
That’s still a clean signal path.
That’s still a clean signal path.
bachelorb
Cowboy Chord Virtuoso
IIRC my point about the Audio Buddy output was that it is at line level. So if you have a line level input on the mixer, you want to use that, rather than sending the signal through unnecessary amplification circuitry. So it would be mic —> Audio Buddy mic in —> Audio Buddy line out —> M-106 LINE IN.
That’s still a clean signal path.
Got it.... Thanks. I just remember keep the signal from going through as much stuff as possible.... You've probably told me 100 things more important, but thats the only thing that stuck....

Interesting day today.... I'm kind of using my sister-in-law's birthday song as a test bed for a bunch of different configurations... First the bad news....
On my main setup, (Tascam 312/Tascam 234), I ran the tape and was having a huge problem with the signal dropping out when I played it back. I cleaned the head with alcohol and the q-tip was greyish black. Rerecorded the tape (thank goodness it was a digital drums I was transferring and had a dropout later. Cleaned the head again, and it was grayish black again. I'm wondering if the wheel rubber is starting to go and dirtying the tape.
Moved my recording set up over to the "Going Mobile" project (Tascam M-08/Tascam 134) the recording worked well, but I could never get it to fade all the way out at the end of the song.
Changed up the "Going Mobile" to the M-106 mixer, and everything worked like it should. Four tracked all the songs on the 134 and playback was great!!!
Pretty fired up about the 134... kind of bummed about the 234, but.... the the price we pay I guess for fiddlin with old crap
....beats... I'm going back to look at that 106 video about those program groups. My wife and I are going to be sharing a track singing, and I want to make sure we can both monitor in the headphones.... I think I'm done for today though.....
" I'm wondering if the wheel rubber is starting to go and dirtying the tape." That would put the muck on the back of the tape not the oxide layer and a pinch roller that bad would surely be sticky and tangle tapes?
If BTW you DO clean the rubber roller do not use ISPROPA (if you can get it now!) as that will attack the rubber. Use de-ionized water and elbow grease. Maybe start with ONE drop of Fairy liquid per 200ml water but others might have different ideas about that?
Dave.
If BTW you DO clean the rubber roller do not use ISPROPA (if you can get it now!) as that will attack the rubber. Use de-ionized water and elbow grease. Maybe start with ONE drop of Fairy liquid per 200ml water but others might have different ideas about that?
Dave.
bachelorb
Cowboy Chord Virtuoso
" I'm wondering if the wheel rubber is starting to go and dirtying the tape." That would put the muck on the back of the tape not the oxide layer and a pinch roller that bad would surely be sticky and tangle tapes?
Dave.
I just can't figure it out. I'm about to take the tape deck out and see whats happening better. It happens on multiple channels, and at random places and it goes and comes.
Here's a youtube video of the drum track I was having problems with. The drum track was recorded directly off garageband from my iPad. You can hear how bad the fluctuations are throughout, but especially at around 50 seconds.
sweetbeats
Reel deep thoughts...
" I'm wondering if the wheel rubber is starting to go and dirtying the tape." That would put the muck on the back of the tape not the oxide layer and a pinch roller that bad would surely be sticky and tangle tapes?
If BTW you DO clean the rubber roller do not use ISPROPA (if you can get it now!) as that will attack the rubber. Use de-ionized water and elbow grease. Maybe start with ONE drop of Fairy liquid per 200ml water but others might have different ideas about that?
Dave.
Dave, the 234 is a Philips compact cassette based machine and therefore the pinch roller contacts the oxide surface of the tape, and the capstan contacts the backing of the tape.
[MENTION=180572]bachelorb[/MENTION] So, Brad, the same cassette doesn’t leave any grayish-black deposits on the head in the 134, but does in the 234?, it doesn’t really make sense, the idea of the pinch roller since it is downstream from the heads, but if it was me I’d shove my finger into the cassette bay of the 234 and feel the pinch roller...if it is at all tacky, outside of the grippy feel the rubber roller should have, that’s a problem regardless of whether or not that’s the cause of the deposits on the head. If you wipe down other surfaces in the cassette bay are there grayish-black deposits there? Is the tape stock in the cassette grayish-black or is it brown? Are there deposits on the erase head as well as the r/p head? Any buildup on the guides?
It’s a bummer you are having this trouble with the 234, and I do likes me a 234, but you and I are both messing with 134 machines right now and out of the rack-mount Tascam multitrack decks I’ve torn into (234, 238, 134) the 134 is my favorite to work on...nicely laid out and put together, I like the feature set, and mine is running really well after a new capstan belt and gear C repair. I can understand your excitement. I only wish the 134 had onboard dbx or the option to use external noise reduction. I’m not a fan of the Dolby noise reduction for multitrack cassette...I know there are arguments on both sides of the fence, I’m just partial to the sound of the dbx on the 4-track cassette format...probably because I’m so used to it.
Anyway...blahblahblah...
Last edited:
bachelorb
Cowboy Chord Virtuoso
You are right about the pinch roller downstream..... I'm going to do some more troubleshooting right after lawn mowing here today. My wife went out in the back yard this morning and couldn't find her way back to the house, so I guess it's almost time for it......
Yes to the layout on the 134!!! I am hoping you are right about the roller, because taking out the mechanical tape transport is a pain on the 234!!! I started to play with the Dolbys yesterday, but not enough yet..... In fact, I recorded without any noise reduction because I never had to worry about that on the 234 since the dbx was always on.
I think the 134 is simpler to use, but I haven't really played with that a lot yet either....... but I'm about to.........
Right after I try to mitigate these weeds.... (....watching waaayyyyy to much Dr. Fauci lately........ )
It’s a bummer you are having this trouble with the 234, and I do likes me a 234, but you and I are both messing with 134 machines right now and out of the rack-mount Tascam multitrack decks I’ve torn into (234, 238, 134) the 134 is my favorite to work on...nicely laid out and put together, I like the feature set, and mine is running really well after a new capstan belt and gear C repair. I can understand your excitement. I only wish the 134 had onboard dbx or the option to use external noise reduction. I’m not a fan of the Dolby noise reduction for multitrack cassette...I know there are arguments on both sides of the fence, I’m just partial to the sound of the dbx on the 4-track cassette format...probably because I’m so used to it.
Anyway...blahblahblah...
Yes to the layout on the 134!!! I am hoping you are right about the roller, because taking out the mechanical tape transport is a pain on the 234!!! I started to play with the Dolbys yesterday, but not enough yet..... In fact, I recorded without any noise reduction because I never had to worry about that on the 234 since the dbx was always on.
I think the 134 is simpler to use, but I haven't really played with that a lot yet either....... but I'm about to.........
Right after I try to mitigate these weeds.... (....watching waaayyyyy to much Dr. Fauci lately........
)"Dave, the 234 is a Philips compact cassette based machine and therefore the pinch roller contacts the oxide surface of the tape, and the capstan contacts the backing of the tape."
Ooops! Apologies SB, I had my Teac A3440 in my head. Thinking about it, not ideal driving the oxide side but then the wee beasties did start out as a dictaphone!
Dave.
Ooops! Apologies SB, I had my Teac A3440 in my head. Thinking about it, not ideal driving the oxide side but then the wee beasties did start out as a dictaphone!
Dave.
sweetbeats
Reel deep thoughts...
"Dave, the 234 is a Philips compact cassette based machine and therefore the pinch roller contacts the oxide surface of the tape, and the capstan contacts the backing of the tape."
Ooops! Apologies SB, I had my Teac A3440 in my head. Thinking about it, not ideal driving the oxide side but then the wee beasties did start out as a dictaphone!
Dave.
Well actually, since the pinch roller is a passive idler, it is actually better to have the pinch roller contact to the oxide side of the tape. The pinch roller does not drive the tape, it merely, under pressure, conforms or wraps the tape around a small portion of the circumference of the capstan shaft to increase the frictional coefficient between the capstan shaft and the tape, so the shaft can drive the tape. So the Philips compact cassette format transport is correct as far as the tape drive itself and the consideration of more gentle tape handling.
TalismanRich
Well-known member
Two things that are unusual to me with the dropouts.
1. Most times when I hear dropouts they are momentary, like a second or so and usually on one channel. The fact that the volume drop lasts several seconds and occurs on both channels makes me wonder if the tape is somehow skewing off track and then recovering some time later. I couldn't really tell if the highs dropped off a lot, they seemed to, but it might be an illusion because of the volume drop.
2. Is it possible that the head on the 234 is somehow been pitted on the surface? If it is significantly rougher than normal that could cause it to scrape oxide off the tape. It may need to be polished. If you have a really good magnifier, perhaps you could look at the surface to see if it is as smooth and shiny as the 134. I used to work with chrome plated printing cylinders and have seen cases where the surface has pitting which looks like the chrome is almost frosted in worst cases. Since the only things upstream of the playback head is the erase head and tape guides, you might look at those surfaces also. It almost sounds like something is rough and "sanding down" the oxide layer.