Super quick uke build thread...

muttley600

Banned
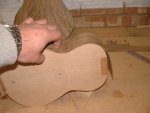
Some of you may recall me mentioning a build off I have with a few other luthier types every year before our Christmas get together.

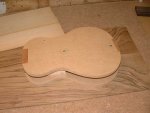
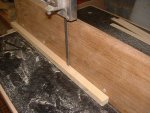
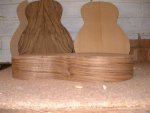
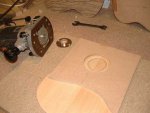
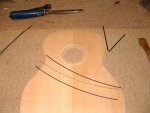
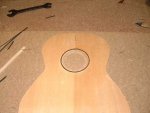
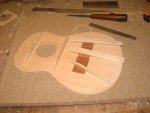
Last year was a cigar box build, the year before we did a £50 electric build. Well this year we have a scrap bin instrument build. The brief is that all the components must come from off cuts or salvage and the only thing that can be purchased or bought in are strings and tuners. Any instrument but no budget.

The catch every year is the build has to be done in 48 hours.:eek:

I finished mine last Friday at 11pm after getting the brief Wednesday at Midnight. Well for the first time I won.:D

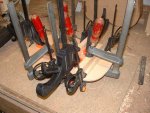
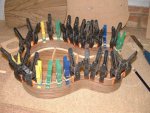
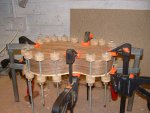
Pic attached and if anyone is interested in a build thread I'll stick some pics up because I have to do some for our newsletter.
 

Attachments

  • finisheduke2.jpg
    finisheduke2.jpg
    27.1 KB · Views: 103
  • finisheduke1.jpg
    finisheduke1.jpg
    23.4 KB · Views: 110
Looks like a little acoustic bass, those strings look HUGE! Made in 2 days out of garbage? Nice job man, lets hear how it sounds, got a clip?
 
Looks like a little acoustic bass, those strings look HUGE! Made in 2 days out of garbage? Nice job man, lets hear how it sounds, got a clip?

I'm going to have to learn to record stuff first.:o Seriously I still suck at stuff like that but I'll try and get a clip up if none of you guys are going to be super critical. I'm a delicate flower.;)

My playing is only marginally better than my recording skills as well.

The strings look bigger than they are. The string length is 16 1/2" so iT's a concert uke and the whole thing is only about 30" long. Not sure it was built on the fly from what I know will work and what I had to hand.
 
Beautiful. Congrats on the win. Do you usually have a piece of spruce that big in the garbage?? Can you send your trash my way?? :D
 
Wow, awesome stuff. Very impressed with the 3 ply binding work for such a small time period!! You must have a fairly well stocked scrapheap. Looks really neat.

How did you get the neck done in time?! Inlays and all (okay dots but sheesh)! It looks like it's even had a few coats of lacquer!

If I were you, I'd keep this under wraps lest customers see how fast your turnaround really could be!
 
Cheers guys but it's a very straight forward no frills build nothing special just functional.

@ Chili, The spruce is Carpathian and from stock I ripped into sets some time ago. This was the end stock or cleaning cut. It was only 2mm thick unfinished so a little too thin for regular work. It also had a few resin pockets. Ideal for a small build like this as it only nad to clear 4" wide (8" bookmatched).

@ My scrap bin is has all sorts in it. I fill up a few bins and some local wood turners and marquetry guys come round and take most of it. Some fairly decent pieces occasionally end up in there but I just don't have the space to keep everything. I've learned to be ruthless.

I'll chuck up some build pics later today to show how simple the build is and you'll bet an idea of how simple it really is.
 
OK, here's a few progress pics. Keep in mind this is a speed build challenge and you will see some things that are not the way I would advise doing them on a proper build. The idea here is to get things done quickly and some wiggle room is allowed.;)

First thing I need is a mold to build on. There are two ways to build on a mold, inside and outside. I'm one of the few guys I know of that prefer to build with an inside mold. Habit really and because I come from a violin/lute background years ago. This took about half an hour to put together.

The back and ribs are taken from a cleaning cut off a lump of European Walnut that I'm using for a bass build. Off the saw it measured about 2.5mm thick so if I can clean it up to around 2mm for the back and 1.5mm for the ribs I'm good to go. Took another hour to thickness them as I did it by hand with a block plane instead of setting up the thickness sander.
 

Attachments

  • mold.jpg
    mold.jpg
    27.1 KB · Views: 79
  • Backribsthicknessed.jpg
    Backribsthicknessed.jpg
    18.4 KB · Views: 78
Next task is to join the back and bend the ribs. The pics should be self explanatory. I sooth the join with a shooting board as a thickness planer would rip the hell out of 2mm thick curly walnut. Took no time at all by hand.
 

Attachments

  • backshooting.jpg
    backshooting.jpg
    33.7 KB · Views: 79
  • back-jointed.jpg
    back-jointed.jpg
    25.4 KB · Views: 78
Next I start bending the ribs to get them on the mold.
 

Attachments

  • ribfirstbend.jpg
    ribfirstbend.jpg
    21.3 KB · Views: 64
  • ribsbending.jpg
    ribsbending.jpg
    27.2 KB · Views: 64
They can then be glued to the top and bottom blocks.

You might see other bits of the build lying around. Thats because it was all done in a rush and things happened when they happened.
 

Attachments

  • ribsbent.jpg
    ribsbent.jpg
    26.1 KB · Views: 64
  • ribsonmold.jpg
    ribsonmold.jpg
    30 KB · Views: 64
A shot of the back being rough cut on the bandsaw. Did some spruce linings too.
 

Attachments

  • backoutline.jpg
    backoutline.jpg
    44 KB · Views: 64
  • riplinnings.jpg
    riplinnings.jpg
    53.1 KB · Views: 64
The back needs bracing and the linings are finished to around 2mm, bent to shape and glued in.
 

Attachments

  • linnings.jpg
    linnings.jpg
    45.7 KB · Views: 64
  • backbraces1.jpg
    backbraces1.jpg
    40.6 KB · Views: 64
After a bit of cleaning up I rough cut by eye for around a 3mm - 4mm curve on the back and blue that sucker on. You can make out the curve to the back in the second pic.
 

Attachments

  • backon.jpg
    backon.jpg
    46.1 KB · Views: 64
  • backgluedup.jpg
    backgluedup.jpg
    25.4 KB · Views: 64
The top has been coming along as well but now I need to think about bracing and sound hole. It needs to be light and quick.

The sound hole is cut with a router and various "top hat" bushes to give me the cuts I want. After that a few bits of scrap ebony and boxwood veneer finish it off.
 

Attachments

  • soundholecutting.jpg
    soundholecutting.jpg
    34.4 KB · Views: 65
  • soundholepurlfing1.jpg
    soundholepurlfing1.jpg
    35 KB · Views: 65
Once the soundhole is cut I can turn to the bracing. Nothing fancy just a design I thing will work.
 

Attachments

  • soundholepurlfing.jpg
    soundholepurlfing.jpg
    32.4 KB · Views: 65
  • topbracesmarkingup.jpg
    topbracesmarkingup.jpg
    38.3 KB · Views: 64
All set so I need to get some clamps on there and glue them up fast. I'd normally set up a go bar deck and lay these out properly but no time. Clamps, clamps and more clamps.;)
 

Attachments

  • topbraces.jpg
    topbraces.jpg
    46.6 KB · Views: 63
  • topbracingsoundhole.jpg
    topbracingsoundhole.jpg
    52.4 KB · Views: 63
More Linings on the ribs and I can finally close the box.
 

Attachments

  • morelinnings.jpg
    morelinnings.jpg
    54.8 KB · Views: 63
  • topclosingbox.jpg
    topclosingbox.jpg
    40.9 KB · Views: 63
Simple and quick being the aim here I'm going for a simple boxwood and ebony binding front and back. That way it requires just one depth of cut on the router and can be glued up in one go with care and much cursing. I have to admitt I got wifey to help brushing glue and passing tape for this as I only have two hands.:o

First the ebony is thicknessed and scraped to required size and then bent to shape. Ditto the boxwood. After that it's just a matter of gluing it up.
 

Attachments

  • bindingsfrough.jpg
    bindingsfrough.jpg
    43.9 KB · Views: 63
  • bindingsfinal.jpg
    bindingsfinal.jpg
    39.2 KB · Views: 63
Back
Top