Muttley's Custom LP Guitar Build

Carving a top really isn't hard and I can walk you through it. With your setup and patience you do it easy. Go for it, it'#s the next logical step and in my humble opinio0n what separates the hobby builders from craftsman..
Cool, I'm definitely working in that direction. Now that I can re-saw, and book match tops I'm planning to do something carved this winter. All help is welcome.
 
Just spent an hour cutting the binding channel. Binding an archtop requires an bit more care as you cant just run a router round it as the top surface is arched. The binding jig has a curved base on the router and keeps the router level in all directions while;e it runs round the body using the very edge of the top as a point of contact.


View attachment 83967


View attachment 83968


View attachment 83969
I see what you did here. Now I suppose I have to build one of these jigs?
 
Just a question: how many hours would you say you have in this build so far? I know that setting up for the cuts takes much longer than actually performing the cuts.
 
IMpressive stuff as usual. I'm still stripping the finish off a guitar I started on in 1996. I reckon 2 decades is ok for a DIY by me.
On a very commercial/serious note that you may not care to respond to: IF you were to put this instrument, (when finished), on the market what would be the asking price?
I ask because it looks like it'll be wonderful, given your previously demonstrated expertise it'll sound great, (because you won't finish until it does), and I wonder what reasonable price a luthier would place on such a piece.
 
Man that guitar is really looking good. You do very nice work. Congrats

What are the things about a traditional Gibson les Paul that you don't care for?

I'm kind of wondering if it's the same things I would change.
 
I see what you did here. Now I suppose I have to build one of these jigs?

I'll post up some details. It's not hard to build and this one is based on one I saw on mimf years ago. All you need is some one inch ply, two pair of very sturdy drawer runners, and some ball bearings.

When I get a bit of time over the holiday I'll take some close up and breakdown pics. It's a very handy jig and cuts binding channels in a snap.
 
Just a question: how many hours would you say you have in this build so far? I know that setting up for the cuts takes much longer than actually performing the cuts.

There's about 20 hours in it so far and I'm about half way through. I have been building guitars for a long time so I can pretty much get a standard build done in a week. This one has not had any jig building involved as I had them from previous builds. Building and setting jigs can double the time and cost especially if it's a non standard shape.

Cost is a hard one as you always have to factor in the timber choice and hardware. The timber on this one is top shelf so would be about £200 add the consumables of about £50 and factor in parts of about £150 for machine heads, switches, pots and the finishing etc., you'd be at about £450.

I often build two or three at time and sell them for about a grand.. The cost of bespoke stuff I do goes a lot higher than that. An archtop with average fittings and little inlay which is my bread and butter work would be double even triple that depending on amount of detail... There is no fixed price though, it's that how long is a piece of string thing.....
 
Another question: What's gonna be different about this hand made LP compared to a regular real LP?

Man that guitar is really looking good. You do very nice work. Congrats

What are the things about a traditional Gibson les Paul that you don't care for?

I'm kind of wondering if it's the same things I would change.

Thats a good question and the best thing about building is you can get exactly what you want rather than off the shelf.

I played a Les Paul std.. for quite a while in the 70's and the things I didn't like were, fat frets, fret nibs, 44mm nut width, stop tail piece, humbuckers..(although there is nothing wrong with them). I don't like the soft mahogany they use these days and I like a rosewood fingerboard. I don't mind a heavy guitar and the chambred stuff doesn't suit me as it tends to empty out the punch that les pauls have IMHO. I don't like the thick toffee apple polyester finish they have started using either.

This one will have 2mm standard frets with a standard fret over binding. A 14 inch radius rather than the usual 12 inch. It will also have a trapeze tail piece.

I will wind and build my own p90's for it based on the recent exchanges I've had with JCH. They will have forbon bobbins unlike most gibsons now which have switched to cheaper stuff. I have a real thing about p90's at present and was going to mod a guitar I built years ago to get a p90 in the stable but changed my mind and set about building this. My next build for myself will be an ES150 style with a p90... Not sure when I'll have the time for that as I already have a dozen to build before that...
 
A bespoke guitar would be a really nice thing to have but with my ear & playing it'd end up all wrong.
You do lovely work and the headstock is very cool.
 
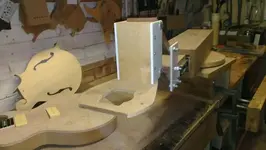
@ JCH.. A few pics of the binding jig.. This one I built quite a few years back based on a design by Don Williams.

The jig has two beams made from 1" ply that run inside each other fixed with a heavy duty draw runner. The ones I use are sold for filing cabinets and designed to carry quite a load. You'll need sturdy hinges as the thing has to run effortlessly and without any wobble. They also need to extend almost fully to give you the reach you need.

The jig assembled..

IMAG0233.jpg

The jig extended...

IMAG0238.jpg

The beams are fixed to a solid base that has a turntable on it to allow the beam arm to swing side to side. The net result is that the jig will now move all directions on the x axis simultaneously and freely. In,out and side to side.

The turntable needs to be solid also and I tried a few and ended up breaking down a lazy susan to extract the bearings and made my own plates. Much more solid.

Hopefully these pics are self explanatory. The plates are made from mdf with a routed channel in them to take the bearings.

IMAG0241.jpg

IMAG0242.jpg

IMAG0243.jpg

Finally the up/ down motion is accomplished with a simple trapezoid arrangement on the head. The router is fixed to the plate and can now ride up and down without tilting.. The bolts are just snug fit so it holds together but allows the thing to move with little effort.

IMAG0235.jpg

IMAG0236.jpg

Last but not least the router base needs a dome shaped base so it can ride along the edge of the instrument without snagging on the arch of the top. A simple dome shaped top hat attachment does this..

Seen from below..

IMAG0246.jpg


You'll find many examples of this jig on line if you search around. Made this one in about half a day and it has been used dozens of times and has never failed on me.
 
That binding jig is cool...especially if you're doing a lot of builds. I was thinking about binding a Tele body but I'm afraid of screwing up the rout
 
It's even more amazing that you build your own jigs to build your own guitars. All that's left is to cut down your own trees and cast your own metal parts. Maybe slaughter your own horses and process them to make your own glue? :D.
 
It's even more amazing that you build your own jigs to build your own guitars. All that's left is to cut down your own trees and cast your own metal parts. Maybe slaughter your own horses and process them to make your own glue? :D.

Trees I have lumbered. I'd love to0 have the ability to cast metal parts. I do make a lot of metal tools and do a lot of hardening. As to horses......

Seriously though one day I want to build a guitar with an absolute minimum of bought in labour or processing. Frets and strings would be only parts I can see that would be a problem. I've pretty much got a handle on everything else.
 
That binding jig is cool...especially if you're doing a lot of builds. I was thinking about binding a Tele body but I'm afraid of screwing up the rout

A tele body is one of the easiest to do as it's flat and you can use a standard router base. I know what you mean about screwing up thing. Even now I have a moment of apprehension before making any critical cut. The old adage measure twice cut once still applies only with a router I'd say measure twice cut twice. In other words spent a good deal of time setting up and testing the cut on scrap. Get an old tele body and try it on that. Another thing I'd do is make up a bigger base plate for the router as it helps avoid tipping and gives it a more stable feel. If you are used to routing it isn't that hard a job.
 
Back
Top